
Content
- page: Download and install Debian 11 (Bullseye)
- page: Make basic settings after installation
The 1. page content
- Introductory
- Get Debian 11 (Bullseye) and build a bootable device
- Installation
- Navigation
Introductory
In this description, we install one Debian 11 (Bullseye) a minimal server consisting of the base system of Debian 11 and the installation and configuration of some basic programs. This installation will be the basis for later Debian 11s LAMP- and tutorials on perfect servers. On this page, download the Debian 11 (Bullseye) installation package and follow the steps in the installation program.
- Ubuntu 20.04 LTS (Focal Fossa) Minimal Server Installation (2020/09/23) - [ Installation guide | download virtual machine ]
- Installing the Debian 10 (Buster) Minimal Server (November 2019, 11) - [ Installation guide | download virtual machine ]
- Installing Ubuntu 18.04 LTS (Bionic Beaver) Minimal Server (2019/07/02) - [ Installation guide | download virtual machine ]
- Installing the Debian 9 (Stretch) Minimal Server (2018-12-21) - [ Installation guide | download virtual machine ]
- Installing Debian 8 (Jessie) Minimal Server (April 2018, 04) - [ Installation guide | download virtual machine ]
Get Debian 11 (Bullseye) and build a bootable device
Debian 11 (Bullseye) was released on August 2021, 14 and has an end-of-life date has not yet been officially released. As soon as it is published, I will make up for it here. So if you want to build a live server, this is a good choice because Debian 11 is still at the beginning of its cycle.
Creating a bootable device
Once you have downloaded the ISO file, make it a bootable flash drive. There are several ways to do this: Learn how to make bootable flash drives here.
Because Debian server installations do not include a desktop environment, their hardware requirements are extremely low. Therefore, it is also popular with owners of older hardware, so don't forget the type of system on your motherboard:
- if our motherboard was made before 2010, in this case only BIOShas, which is MBR supports partitioning scheme
- if our motherboard was made between 2010 and 2020, in this case UEFIworks with, which is GPT supports partitioning scheme. These motherboards still have the CSMThanks to, they also support the BIOS and MBR pairs, so you can install on both motherboards made during this period.
- if your motherboard was built after 2020, in this case it only contains UEFI so it only supports the GPT partitioning scheme.
So write the installation kit to your flash drive as described above. If the middle option applies to us - where both systems are supported - then choose UEFI because it has a number of hardware advantages over the old BIOS.
In this description, I have one VirtualBox on a virtual machine I will install Debian 11 (Bullseye) in UEFI mode.
Installation
Startup main menu
After booting the computer / virtual machine with the installer, the installer boot menu will appear:

Here are pretty much the usual options, let's run them through quickly:
- Graphical installation: This is the default installation method with a graphical interface. This will install Debian 11 as well.
- install: And this is the text mode installer.
- Advanced options ...: Here are 6 more options available, such as advanced installation, recovery mode, and automated installation. You can start all this in both graphical interface and text mode.
- Accessible dark contrast installer menu ...: This is a visually impaired installation mode where dark and contrasting colors appear, helping the visually impaired.
- Install with speech syntheses: Speech synthesizer installation. It’s a text-mode installer where a speech synthesizer reads out the text that appears - also for the visually impaired.
Select the default graphics installer and start the installation.
Language and locale settings
First comes the language selection:

Let's set our language. It then says that the translation in the selected language is incomplete and that you still want to continue installing in the selected language:
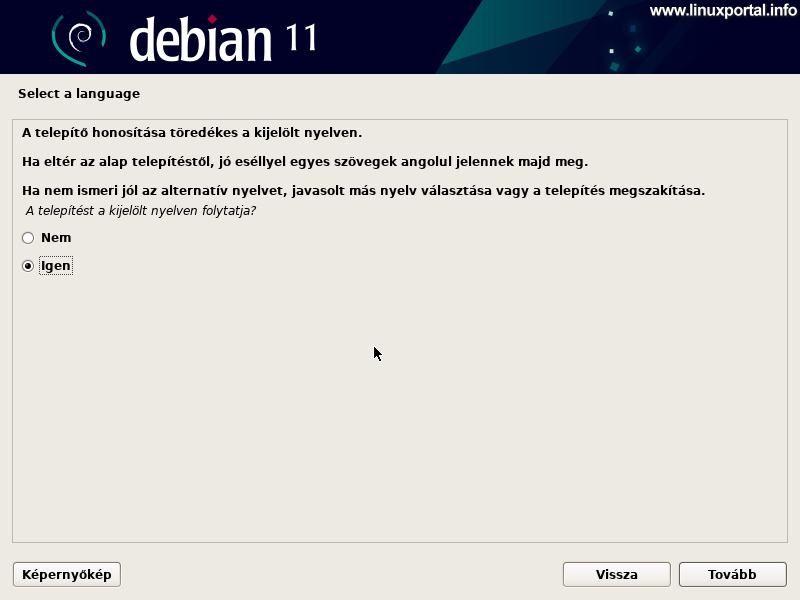
Select yes here and move on.

Then select the country.

Installing additional components
After the language settings, some components will be installed. We don't have to do anything here, just wait for the progress bars to go through:

Set up a network
The system automatically sets up the network:

First, try to configure the IPv6 address, if available in our online service (most newer networks already provide IPv6 addresses).
Sets the DHCPif they are distributed in this way IP addresses in our network:

Then we need to enter the name of the machine:

Enter your hostname here, which will be the (without switches) hosname will be the same as the command output. I'll enter "debian11" here.
Then comes the domain name, which is the part after the host name that completely identifies the machine:

Here is the usual linuxportal.vm I enter a name, continuing the virtual server serial naming logic that has already begun.
A hostname and the -f command will return the two names together, i.e. the full name of the machine (FQDN), which in this example is debian11.linuxportal.vm. So with this logic, we give these two names so that the network dependent parts will work properly in the future.
For a live server, the server is the main one domain name that is, what will be the name of the primary web page or other web service.
Users and passwords
This is where user access comes from. First we need to enter the root password:

Please enter a valid password. Here, too, I use the linuxportal_root password for these servers.
The installer then creates the first plain user, who must now enter his full name:

and your username:

This user will also need to enter their password:

I will publish this password on the download page for this server.
Partitioning disks
There are several ways to partition your system. For live use or a physical machine, consider the type and amount of physical hard drives available and partition them accordingly (eg, using SSDs, RAID, or logical (LVM) volumes, etc.).
For previous minimum server installations, I installed it with a simple, automatic solution - where everything is on one partition - so we already know this, so for the sake of variety, we will now create a custom partitioning scheme in this example to create a web server deployment. So here they are placed on separate partitions / Home, /Castle, a / Tmp directory structures as well as swaps. The installer also includes such a built-in partitioning scheme, but this automatic solution does not divide the available disk space between the created partitions in the right proportion for us. For example, it gives quite a bit of space / var structure in which the websites will need to fit and create too large a partition / Home which is not so much used for web servers. So this scheme focuses more on home desktop uses, so we’re setting them up now now.
Of course, nothing is set in stone here, but for the sake of example, we will create an optimal division that will be suitable for running a web server. Furthermore, we need to consider our own hardware resources, where there may be hard drives of different sizes. Here we are going to work with a 40 GB storage, we will be splitting this properly.
If you are familiar with the partitioning process, you can of course proceed with your own custom method, or if the Debian 10 automated solution (all on one partition) linked above is right for you, you can follow that example. Here, for the sake of variety, I'm just making a different partitioning than usual.
Manual partitioning
As a first step, the installer offers several partitioning methods:

Here, select Hand option and move on.
Then we get some options again:

Here, in the upper part, it also offers partitioning assisted by the installer, but as I mentioned above, this automatic division will not be good for web server design, so select the unit you want to partition from the list of hard drives that appears in the middle. In the present example, it is only a 42GB one VirtualBox hard drive is available, so I'll choose that here and move on.
Then comes a confirmation window:

Here you will be asked if you want to create the partition table on the selected hard disk. Choose yes here.
Nothing is changed here on the hard drive, only at the end when we write the changes. So everything can still be undone here.
Creating partitions
In the next window, in the upper part, the installer again offers the partitioning solution helped by some additional installers, but these are not used here either, but under the hard disk displayed in the middle part. FREE PLACE select the line to start creating your partitions manually:

So here we now select our free space to create our first partition. Let's move on.
Create an EFI partition
There are several options here as well:

If we chose the middle option here, the system would create the automatic division mentioned above, so we don't choose this, but the first one, Create a new partition select an option.
First we will need an EFI partition from which the EFI / UEFI system will boot:

Let's say this 512 MB size, that's what the EFI partition needs, and then move on.

Then configure it to put this partition at the beginning of the empty space and then on.

Set the Usage section here EFI system partitionand then set the start flag and click Partition setup complete option and then on.
This will take you back to the previous partition table page:

So we already have our EFI partition up here and the remaining free space. Now the next partition can come. Click Next to place the selection at the bottom.
Create a root file system partition
The next will be the root (/) file system partition. After clicking on the free space, the options reappear:

Select Create New Partition now. Then you also need to set the size:

So based on the above reflection, if you are installing a web server, the size of the root partition may be smaller, but if you want the machine to be used for normal desktop use - with a graphical desktop environment - it must be larger. Since we are now installing a web server, here I am setting up 15GB, taking into account the meager 40GB hard drive capacity. If you have a larger storage device, the size of the root file system partition can be more than, say, 20-25 GB. Since there will be no graphical desktop environment installed and many additions added, this partition will not be used as much.
Once you have set the right size for us, move on.

Set the location of the partition here as well, then move on.

Here are more things to configure than for the EFI partition:
- Use: Ext4 logging file system
- Attachment point: /
- Coupling options: defaults
- Label: you can enter this or leave it blank, I set the name "system".
- Reserved blocks: 5%
- Typical usage: usual
- Starting flag: ki
If set, select Partition setup is complete option and then Next or enter.
This will take you back to the partition table page:

We already have two partitions here. With the selection in the lower free space, click Next to create the next partition.
Create a swap partition
The next will be the swap partition. After clicking on the free space, the options reappear:

Create a new partition and then continue. Then you also need to set the size:

And let's set this to the beginning of the free space as well:

Then come the partition settings:

- Name: We can leave this blank
- Use: exchange place
- Starting flag: ki
Then select Partition Configuration Done.
This will take you back to the partition table page:

We have three partitions ready here. With the selection in the lower free space, click Next to create the next partition.
Create a home file structure partition
Here I will no longer go through all the windows, but create and configure the / home directory structure partition by analogy to the above.
To summarize, this partition stores the / home directory structure, which requires more space than a desktop or office desktop with little or no graphical user interface. So since we’re doing a basic installation for a web server right now, I’m setting up 2GB here, that’s enough to fit in my 40GB frame. Of course, if we have more storage space, we can raise this as well. I will only create this here for demonstration purposes.
So the partition creation parameters are:
- Size: 2GB (with me, but can be more than that)
- Location: Start
And your settings:
- Name: we can give it a name if we want
- Use: Ext4 logging file system
- Attachment point: / Home
- Coupling options: defaults
- Label: we can give it a label if we want
- Reserved blocks: 5%
- Typical usage: usual
- Starting flag: ki
Once saved, the partition table now looks like this:

The next partition may come ...
Create a Tmp file structure partition
The next partition will be the partition of the / tmp file structure. Here again I only write the parameters, let's create and set them based on them:
Creation parameters:
- Size: 1 GB here with me now. For the most part, that’s pretty much used to be.
- Location: Start
And your settings:
- Name: we can give it a name if we want
- Use: Ext4 logging file system
- Attachment point: / Tmp
- Coupling options: defaults
- Label: we can give it a label if we want
- Reserved blocks: 5%
- Typical usage: usual
- Starting flag: ki
Once saved, the partition table now looks like this:

The next and last partition can come ...
Create a var file structure partition
The last partition will be the partition of the / var file structure. I intentionally left this partition to the end, because if you use it as a web server, you will need the storage space here, where the web pages will also be located in the / var / www / * in directories. So I set the size of this partition to the size of the remaining space, so that it fills the remaining space.
Creation parameters:
- Size: 16.4 GB here with me now. Here we set it according to our possibilities and needs. If I had now created the virtual machine with a larger virtual hard drive, it could have been a higher value here as well, but in the beginning I set 40GB, which will be enough for the tutorials on this page.
- Location: Start
And your settings:
- Name: we can give it a name if we want
- Use: Ext4 logging file system
- Attachment point: / var
- Coupling options: defaults
- Label: we can give it a label if we want
- Reserved blocks: 5%
- Typical usage: usual
- Starting flag: ki
Once saved, the partition table now looks like this:

Close partitioning and save changes
Once we have created all the partitions we need, now is the time to back it up. So far, nothing has changed on the hard drive, but the next save here will write the physical changes to the disk. So anything up to this point can be undone or modified.

So, once you've made sure everything is set up as planned, select "Finish Partitioning and Save Changes" and click Next.
It still lists the changes here and asks for a confirmation.

Select yes here and then continue.
Later, we can still resize the partitions at any time if it turns out later that we made the wrong decision. A perfect example for this purpose is the GParted Live use of the system.
Installing a base system
The system will then proceed with the installation, this time copying the files to the physical hard disks ...

We have nothing to do here, we just wait until the progress bar reaches.
Configuring the package manager
The installer asks if you want to scan other CDs / DVDs for the package manager:

We use this option if, due to the offline installation, we have written out the complete installation set of several DVDs that we could use here now. However, if you are working with a small netinst installation kit, select the no option.
Then select the appropriate Debian mirror:

Mirrors are used to access all the contents of Linux distributions in a decentralized manner, so that the entire world is not burdened by a central server. Hungarian Debian mirrors are generally stable, so you can choose.
Furthermore, it is not final because it is APT we will even expand our repositories to include add-ons for later server installations that are not included in the basic repositories.
In the following window you can choose from the mirrors available in the configured country:
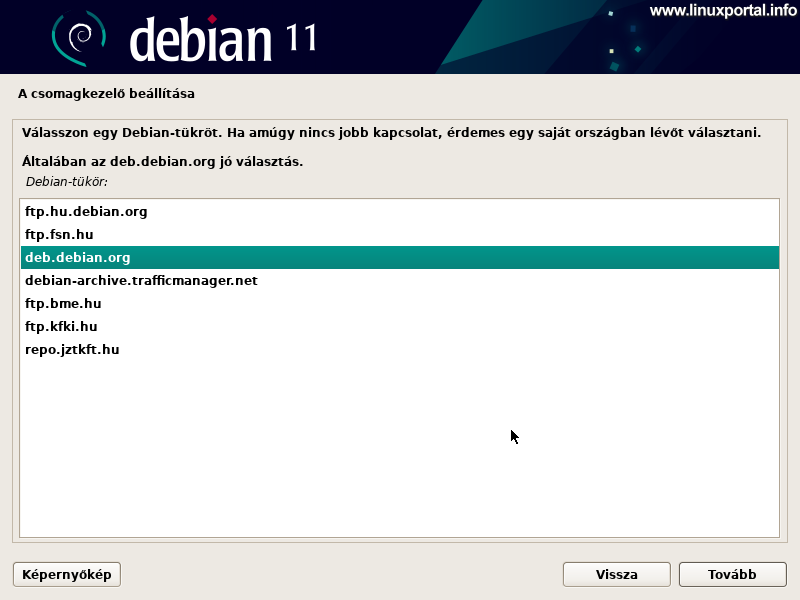
You can choose any one here, but it is advisable to choose deb.debian.org, which, as part of a global CDN network, provides a Debian mirror for home requests in Hungary. Particularly useful, for example, is installing a desktop Debian on a laptop that you travel around the world. So wherever you are, this mirror will always download updates from the nearest Debian mirror server. More about Debian mirrors read here.
In the following window you can configure your proxy settings:

If you do not use a proxy or do not know what it is, leave it blank.
The installer then configures the APT package manager:

and installs additional software:

Configure Popularity-contest
The installer will ask you if you would like to participate in anonymous statistics into which the package information is used:

Here we choose at our discretion.
Software choice
Here's where you decide which software and services you want to install on your system by default:

We will not install a graphical interface here, and we will install the web server parts ourselves later. So we leave only the two lower ones checked.
The installer then loads the packages of the selected components ...

Installing the GRUB Boot Loader
Then install the GRUB-five...

Previous Debian minimal server installations were still in BIOS mode, so you were asked here where to install the boot loader, as the MBR partitioning scheme worked differently than the GPT partitioning scheme used by UEFI. So here you are not asking, but will automatically install the GRUB boot loader on the 512MB EFI partition created for this purpose.
Finish installation
Finally still working a little,

And when done, it will ask us to remove the installation media and restart the machine.

We have installed the base system, but there are still some basic and comfort settings that we will need during future server installations. With these we continue the next page.
- What's new and changes in the Debian 11 (Bullseye) operating system
- Make bootable flash drives with Rufus 3.3
- Make bootable flash drives with Rufus 4.3
- How to configure VirtualBox for basic systems
- Debian 11 (Bullseye) LAMP server v1.0 installation
- Perfect server: Debian 11 (Bullseye) v1.0
- How to build and arming our ISPConfig3 server and how to secure our control panel, main services and websites with Let's Encrypt SSL
- Ubuntu 20.04 LTS (Focal Fossa) minimal server installation
- Install Debian 10 (Buster) Minimum Server
- Install a minimum server for Ubuntu 18.04 LTS (Bionic Beaver)
- Install Debian 9 (Stretch) Minimum Server
- Install Debian 8 (Jessie) Minimum Server
- Debian 11 (Bullseye) Official Download Site (debian.org)
- wiki.debian.org/DebianBullseye
- wiki.debian.org/DebianReleases
Navigation
- To post registration and login required
- 1022 views