
Content
Introductory
Our favorite virtualization software, the VirtualBox has undergone many developments in the past period. The new (6) main version was released on December 2018, 18, which included many innovations and has been continuously developed ever since. At the time of writing, we are on version 6.0.14, which was released on October 2019, 15. Detailed version history can be found here.
We have previously installed the VirtualBox 5.2 version for Debian 9 (stretch) host operating system, and now we're going to take the current 6.0.14 version Debian 10 (Buster) host system. In this example, I am trying out the latest VirtualBox in a Debian 10 + LXQT environment recently installed on my old laptop. However, this description applies to Debian 9 (Stretch) host systems as the installation process is almost exactly the same.
A newer version of VirtualBox has been released since this description was written. Here's how to install it:
Install VirtualBox 6.1.x on Debian 10 (Buster) host operating system
Preparations
Package repository and update packages
Before performing any major installation work, it is a good idea to upgrade to package store our database and packages so you can work with the latest software on the go. To do this, issue the following commands as root:
apt-get update
apt-get upgrade
Add a VirtualBox repository
As soon as a You can also see it in the Debian package database, the official Debian 10 (Buster) repository does not include VirtualBox packages by default. Although VirtualBox 5.2 is still available in the backports repository of the Previous Debian distribution, version 6 is no longer available. Therefore, we also need to add VirtualBox’s own luggage to our repositories to get the latest version. To do this, open a as root / Etc / apt / sources.list file:
nano /etc/apt/sources.listAnd add the VirtualBox repository:
# VirtualBox repó
deb http://download.virtualbox.org/virtualbox/debian buster contrib
(If you are writing this description on Debian 9 (Stretch), we use "stretch" instead of "buster" in this line.)
Save and then add the repository keys to your package manager keystore (remaining root):
wget -q https://www.virtualbox.org/download/oracle_vbox_2016.asc -O- | apt-key add -
wget -q https://www.virtualbox.org/download/oracle_vbox.asc -O- | apt-key add -
Next, update our repository database:
apt-get updateThen if we search for virtualbox packages the apt-cache with the command
apt-cache search virtualboxthe 5.2 and 6.0 branches are now available, as well as the virtualbox-guest-additions-iso image package included:
virtualbox-guest-additions-iso - guest additions iso image for VirtualBox
virtualbox-5.2 - Oracle VM VirtualBox
virtualbox-6.0 - Oracle VM VirtualBox
I mention the 5.2 branch because it no longer exists in the 6.0 version support for 32-bit host systems, so anyone who wants to install VirtualBox on an 32 bit host system will still have the 5.2 version running until July 2020.
A virtualbox-guest-additions, or guest integration services and we will discuss its role in another description.
Installation
Install the 6.0 version:
apt-get install virtualbox-6.0The installer starts, selects the necessary dependencies to install, and then writes (for me) that you will need 251 MB disk space:
Csomaglisták olvasása... Kész
Függőségi fa építése
Állapotinformációk olvasása... Kész
A következő további csomagok lesznek telepítve:
  libcurl4 libgirara-gtk3-3 libpoppler-glib8 libsdl-ttf2.0-0 zathura zathura-pdf-poppler
Javasolt csomagok:
  zathura-ps zathura-djvu zathura-cb
Ajánlott csomagok:
  linux-image
Az alábbi ÚJ csomagok lesznek telepítve:
  libcurl4 libgirara-gtk3-3 libpoppler-glib8 libsdl-ttf2.0-0 virtualbox-6.0 zathura
  zathura-pdf-poppler
0 frissített, 7 újonnan telepített, 0 eltávolítandó és 0 nem frissített.
Letöltendő adatmennyiség: 110 MB.
A művelet után 251 MB lemezterület kerül felhasználásra.
Folytatni akarja? [I/n]
Of course, this may vary depending on your environment, what additional package dependencies you are installing, but we can expect something like this. Select Yes here and the installation will continue.
Installing kernel modules
Virtualbox can use kernel modules to take a deeper look at the hardware needed for virtualization.
First, install the dkms package, which allows externally installed kernel modules to be upgraded without having to rebuild the entire kernel. Also, it is very easy to rebuild modules when the kernel is updated.
apt-get install dkmsVirtualBox kernel packages include a control interface for different hardware:
- vboxdrvA: It provides support for basic hardware such as processor and physical hardware
- vboxnetflt and vboxnetadp: These provide extended network support in addition to the basic NAT network module.
Otherwise, the virtual machine will not be able to take full advantage of the hardware and may stop working with the following error:
Kernel driver not installed (rc=-1908)
Based on the above, let's first install the header packages exactly matching our kernel version:
apt-get --reinstall install linux-headers-$(uname -r)(At the end of the command uname -r replaces our corresponding kernel version)
The output of this is for me:
Csomaglisták olvasása... Kész
Függőségi fa építése
Állapotinformációk olvasása... Kész
0 frissített, 0 újonnan telepített, 1 újratelepítendő, 0 eltávolítandó és 66 nem frissített.
Letöltendő adatmennyiség: 0 B/797 kB.
A művelet után 0 B lemezterület kerül felhasználásra.
(Adatbázis olvasása ... 299736 files and directories currently installed.)
Preparing to unpack .../linux-headers-4.19.0-6-amd64_4.19.67-2+deb10u1_amd64.deb ...
Unpacking linux-headers-4.19.0-6-amd64 (4.19.67-2+deb10u1) over (4.19.67-2+deb10u1) ...
Beállítás: linux-headers-4.19.0-6-amd64 (4.19.67-2+deb10u1) ...
This adds the necessary header packages to build the VirtualBox kernel modules.
We can then start the packet build:
rcvboxdrv setupvboxdrv.sh: Stopping VirtualBox services. vboxdrv.sh: Starting VirtualBox services. vboxdrv.sh: Building VirtualBox kernel modules.
Here you install the kernel modules used by the system. Once it has run, use the following command to list what modules you have installed for VirtualBox:
find /lib/modules/$(uname -r) -type f -name '*.ko' | grep vboxFor me, these were created:

A modprobe command to verify that the modules are working properly:
modprobe vboxdrv
modprobe vboxnetflt
modprobe vboxnetadp
I will only go into this now because I have the rcvboxdrv setup command did not build the above mentioned kernel module starting with 3 vbox. However, the VirtualBox kernel modules shown in the image have been created to run this command again.
By this time, our "VirtualBox" is already "basic":

Installing an Extension Pack
In order for VirtualBox to take full advantage of the host computer hardware, we need to install the Extension Pack. The current latest VirtualBox expansion pack provides the following extra hardware support in addition to the default program:
- USB 2.0 and 3.0 support (EHCI)
- VirtualBox RDP support (remote desktop connection to the virtual machine)
- disk Encryption
- NVMe and PXE boot with Intel chipsets
- Webcam management
It is strongly recommended to install this on every host for normal usability. On Windows systems this can be done by running a simple installer program, but on Linux you need to get a little bit cryptic. Let's see how this happens.
First of all, it is important that the version of the expansion pack exactly matches the version of VirtualBox itself. Therefore, after the regular system upgrade, we will definitely get the latest version. The version number of the latest upgrade pack that fits for this is stored by the manufacturer in the following file:
http://download.virtualbox.org/virtualbox/LATEST.TXT
Additional commands will require this version number, so read into a variable:
friss=$(wget -qO - http://download.virtualbox.org/virtualbox/LATEST.TXT)Then download the upgrade package:
cd /tmp
wget "http://download.virtualbox.org/virtualbox/${friss}/Oracle_VM_VirtualBox_Extension_Pack-${friss}.vbox-extpack"
and install (as root):
VBoxManage extpack install --replace Oracle_VM_VirtualBox_Extension_Pack-${friss}.vbox-extpackThis will print the license text that we need to accept:

Once accepted, the installer will run, informing you of the success. You are now ready to install the upgrade package.
Expansion Pack Check
You can check the success of installing the VirtualBox Extension Pack in the following ways:
The command line:
VBoxManage list extpacksExtension Packs: 1 Pack no. 0: Oracle VM VirtualBox Extension Pack Version: 6.0.14 Revision: 133895 Edition: Description: USB 2.0 and USB 3.0 Host Controller, Host Webcam, VirtualBox RDP, PXE ROM, Disk Encryption, NVMe. VRDE Module: VBoxVRDP Usable: true Why unusable:
Here you can see how the expansion package works according to the information.
From the interface:
Launch VirtualBox and then click on Beállítások button. Then the settings panel will appear. Click here on the left below extensions Next:
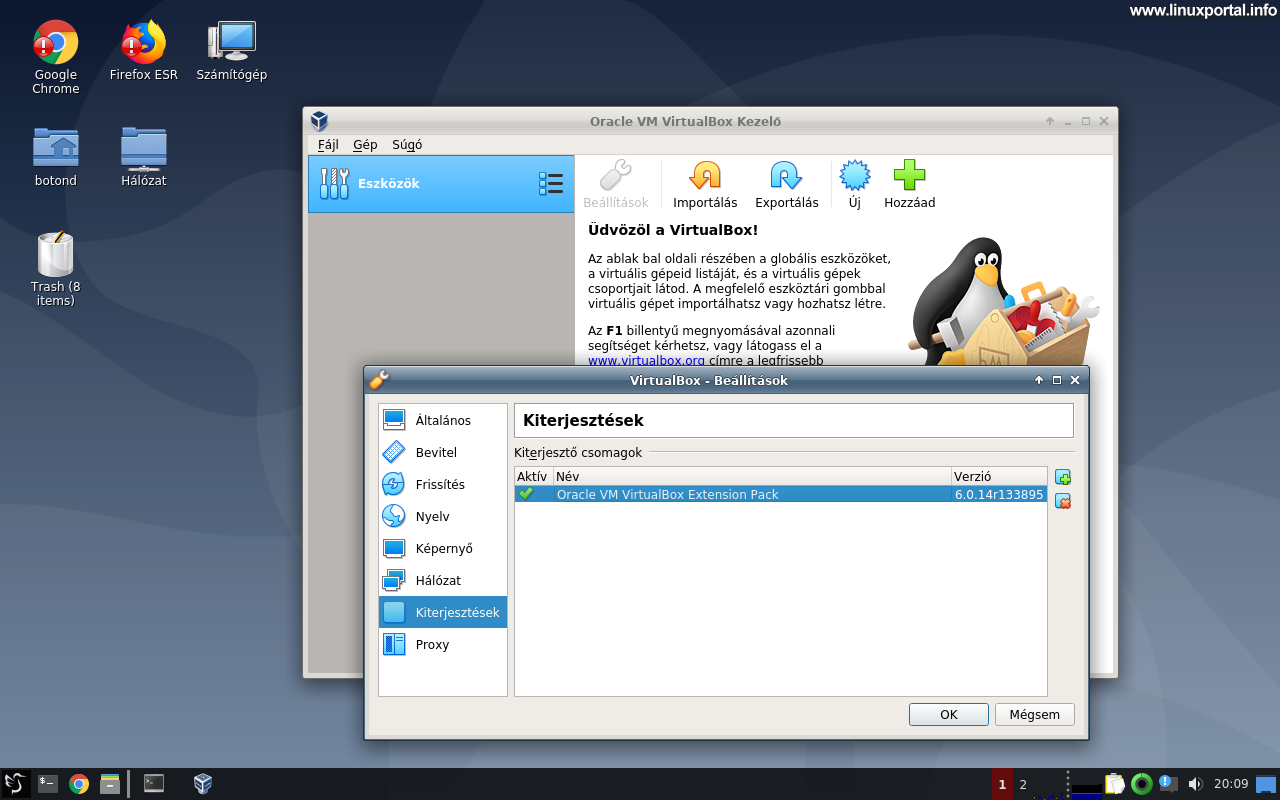
Here you can also install the downloaded upgrade packages - above VBoxManage extpack install instead of command.
Update VirtualBox from 5.2
I have done the parts of the description so far on my laptop, where a recent installation of Debian 10 (Buster) was available, which was necessary to be able to install VirtualBox 6.0 from scratch. And my everyday desktop computer has a Debian 9 (Stretch) system, which I've been using VirtualBox 5.2 for a long time, including to build virtual machines uploaded here. So now I'm upgrading VirtualBox to the new version on this machine so I can work on it anymore.
Since its time the earlier According to the VirtualBox 5.2 installation process I've installed the old version on my machine, so the VirtualBox repository, kernel modules and the earlier expansion pack are already available on this system. If you are in a similar situation, you just need to run the installation of the new version package:
apt-get install virtualbox-6.0The output of this is:
Csomaglisták olvasása... Kész
Függőségi fa építése
Állapotinformációk olvasása... Kész
Ajánlott csomagok:
  linux-image
Az alábbi csomagok el lesznek TÁVOLÍTVA:
  virtualbox-5.2
Az alábbi ÚJ csomagok lesznek telepítve:
  virtualbox-6.0
0 frissített, 1 újonnan telepített, 1 eltávolítandó és 94 nem frissített.
Letöltendő adatmennyiség: 102 MB.
A művelet után 67,1 MB lemezterület kerül felhasználásra.
Folytatni akarja? [I/n] i
Letöltés:1 http://download.virtualbox.org/virtualbox/debian stretch/contrib amd64 virtualbox-6.0 amd64 6.0.14-133895~Debian~stretch [102 MB]
Letöltve 102 MB 11mp alatt (8.990 kB/s)
Csomagok előkonfigurálása ...
(Adatbázis olvasása ... 198039 files and directories currently installed.)
Removing virtualbox-5.2 (5.2.34-133893~Debian~stretch) ...
Selecting previously unselected package virtualbox-6.0.
(Adatbázis olvasása ... 197231 files and directories currently installed.)
Preparing to unpack .../virtualbox-6.0_6.0.14-133895~Debian~stretch_amd64.deb ...
Unpacking virtualbox-6.0 (6.0.14-133895~Debian~stretch) ...
Processing triggers for mime-support (3.60) ...
Processing triggers for desktop-file-utils (0.23-1) ...
Processing triggers for systemd (232-25+deb9u12) ...
Processing triggers for shared-mime-info (1.8-1+deb9u1) ...
Beállítás: virtualbox-6.0 (6.0.14-133895~Debian~stretch) ...
addgroup: A csoport (vboxusers) már létező rendszercsoport. Kilépek...
Created symlink /etc/systemd/system/multi-user.target.wants/vboxdrv.service → /lib/systemd/system/vboxdrv.service.
Created symlink /etc/systemd/system/multi-user.target.wants/vboxballoonctrl-service.service → /lib/systemd/system/vboxballoonctrl-service.service.
Created symlink /etc/systemd/system/multi-user.target.wants/vboxautostart-service.service → /lib/systemd/system/vboxautostart-service.service.
Created symlink /etc/systemd/system/multi-user.target.wants/vboxweb-service.service → /lib/systemd/system/vboxweb-service.service.
Processing triggers for hicolor-icon-theme (0.15-1) ...
So the point here is that the installer will remove the previous 5.2 VirtualBox system and replace it with a new one. No need to be scared, all virtual machines, groups, settings, etc. will remain. Additionally, when you start VirtualBox, a notification window pops up telling you that there is a newer expansion pack for your current (6.0) VirtualBox and whether to download it. And from now on, the answer is obvious, VirtualBox will update it and delete the downloaded package file.
I did this update earlier today and unfortunately forgot to take pictures of these windows when I pressed them down. So now I can't serve them, but the next VirtualBox update will have to be done again with the next version, I'll replace it.
Resolving 3D acceleration problem
If you start a guest machine in the upgraded VirtualBox that has 3D acceleration enabled, it will immediately prompt you when you start the machine, warning you that the VBoxVGA graphics controller is out of date and will be removed in the future (6.1). support:

And the suggested solutions are:
- Switch to VBoxSVGA (or VMSVGA) graphics controller and upgrade guest integration services, or
- Turn off 3D support.
Of course, we choose the first of these, shut down the guest host accordingly, then enter its settings and select the Display settings there:
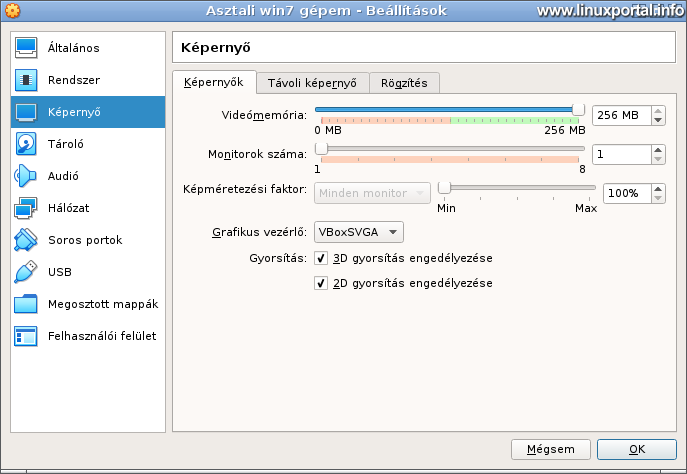
Here we switch the graphics controller to VBoxSVGA. The next step is to upgrade guest integration services. This will prevent this error from happening again.
Installing Guest Additions on a Windows guest machine
While the Extension Pack extends the hardware support of the VirtualBox installed on the host machine, the Guest Additions service extends the hardware management software of the guest host. Whether it's Windows, Linux, or any guest system, you should install the Guest Additions package on each one, which is responsible for catching your keyboard and mouse, for more convenient use of the guest system, and provides additional hardware device managers to make the most of your hardware.
Previously We have installed guest integration services on Debian 9 (Stretch) guest system, and we'll do it for Debian 10, but this will be a separate topic, but now we'll install the Guest Additions package on a Windows 7 guest system, which fits in this description as it consists of just a few steps. So for anyone using a Windows guest, you might want to do these few clicks.
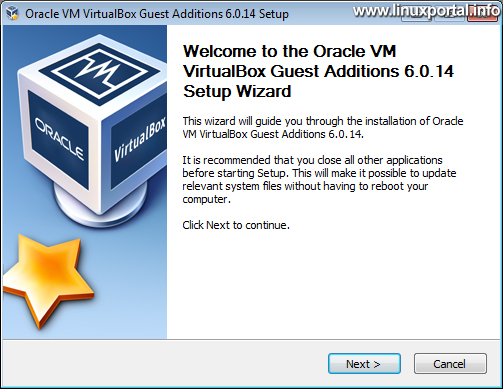
First, switch the guest system to window mode and select the menu bar at the top of the window. Tools main menu and click on the bottom Installation of integration services option. What happens then is to insert the ISO integration file into the virtual machine's DVD drive, which is then accessible from the machine.
Let's launch this DVD:
The first wizard window will appear after a standard permission prompt:
Proceed to the following window to select the installation location:

Next, you need to select the components you want to install:
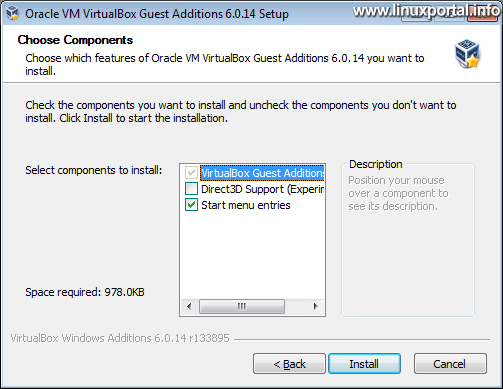
I did not set up Direct3D support here because I only use office applications on this guest machine. But experimenters might try to super-play with toys.
After the Install button, the installation process will go through:

Then, once installed, one of the most common questions in Windows is whether you want to restart your computer now. I'm already used to this after using linux ...: D

Of course, let's restart it because Windows wouldn't exist without it ...
Now that you are done, the machine will restart with the fresh Guest Additions after rebooting.
Conclusion
So this would be a complete installation of a VirtualBox 6.0, with all its add-ons ready for deployment. In my own experience, I can say that a Windows guest machine running a new version that has been in use since today's update is noticeably better. It also goes a little faster, and a couple of previous minor graphics bugs are gone. What I still noticed is that Debian 9 is on a host machine Samba shares also as if handled faster by the guest machine. Sure, a day is still a short time to give it a full try, but so suddenly I can say these since today’s use. So if there are still people who use version 5.2 - as I did this morning - I would definitely recommend upgrading to VirtualBox.
- Install VirtualBox 6.1.x on Debian 10 (Buster) host operating system
- Install VirtualBox 5.2 on Debian 9 (stretch) host operating system
- How to configure VirtualBox for basic systems
- How to configure VirtualBox for graphical desktop operating systems
- How to install Guest Additions on Debian running VirtualBox
- How to install Guest additions on Debian 11 (Bullseye) running in VirtualBox
- How to shrink image files of our VirtualBox virtual machines on Linux and Windows systems
- Encyclopedia - VirtualBox
- VirtualBox.org
- virtualbox.org - manual
- To post registration and login required
- 489 views