
Content
- page: Download and install Debian 11 (Bullseye)
- page: Make basic settings after installation
2. page content
Continuation
Az on the first page we have installed the Debian 11 (Bullseye) operating system without a graphical desktop environment, and on this page we will set up the basic things that will be needed for future server installations.
Boot System
The standard GRUB menu appears when you start:

Here, launch your newly installed system at Debian GNU / Linux option.
After the startup, the login section comes in, so let's log in as root here, because we need to do the following:

Remote access for more convenient use
Using the console is quite inconvenient, among other things, we cannot enter data directly from another computer and it is not as comfortable to use as a terminal. so if VirtualBox We installed the Debian 11 (Bullseye) base system on our computer, even on a physical computer, a more convenient solution is to log in from another computer SSH using our usual terminal program. To do this, of course, there must be a few conditions: the newly installed computer is available on your own network or from another machine, for example, we have our machines behind a router, and we also know the machine IP addresses. We assume that our newly installed Debian 11 system is available on the network, so we only need to find out its IP address. To do this, issue the following command on the console:
ip aThe command lists the network devices and their various data:

Here, the part starting with enp is the point from which the IP address of the machine in this example is 192.168.1.5. Of course, it’s different everywhere, so everyone should look for their own IP address.
We then open our usual terminal application on the other machine and log in with the plain user we created during the installation via the IP address. So with my own example:
ssh linuxportal@192.168.1.5Root login is disabled by default, so we can log in with our regular user.
Before the first login, it prints the usual question, the point of which is that you don't know this machine yet, so we'll continue the connection. Enter "yes" here, then ask us for the user's password:
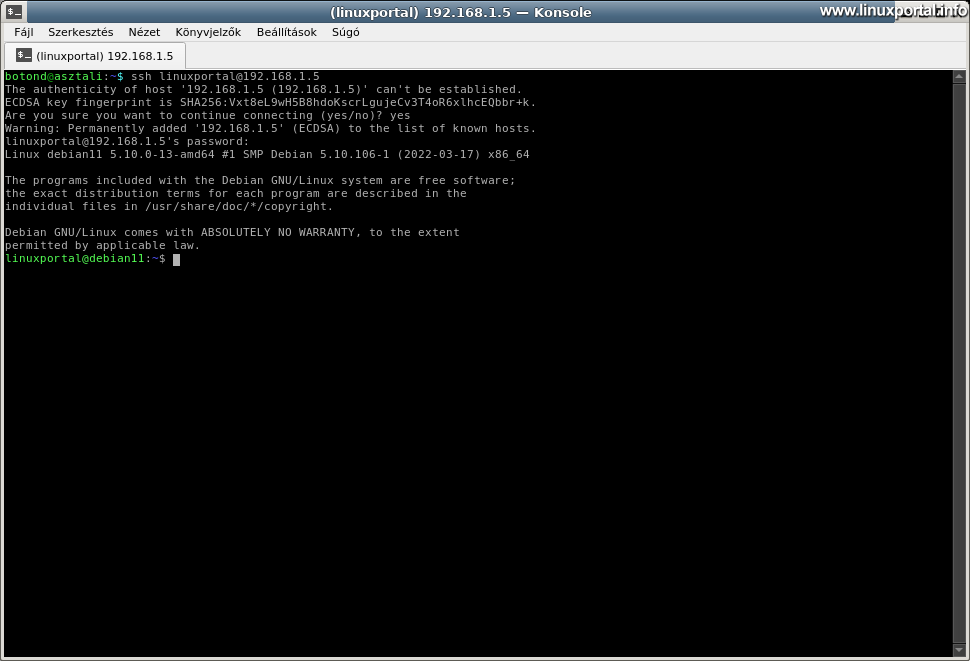
You can also confirm that the network is working and that the SSH server is working.
Then log in as root to make the necessary settings and installations. To do this, issue the following su command:
su -The "-" option causes the su command to start a login shell:

Now that we are rooted, the settings can come.
Make basic settings
In this chapter, we will make the basic settings that are absolutely necessary for the smooth operation of the server later. So let's stay inside root-Kent. The first step is to set the fixed IP address.
Set a fixed IP address
So first we set a fixed IP address for the machine so that it will always have the same address whenever we start the machine. This is essential for later server operation, and access is more convenient if you do not have to query the machine's IP address every time.
As you may have observed during the installation, the installer defaults DHCP has set up the system for address allocation, which is normal for desktop use, but now we need to switch it to a fixed address so that different services on the server are always available at the same address.
To do this, we edit the / etc / network / interfaces file:
nano /etc/network/interfacesThis basically contains something like this (our network interface name may be different):
# This file describes the network interfaces available on your system
# and how to activate them. For more information, see interfaces(5).

source /etc/network/interfaces.d/*

# The loopback network interface
auto lo
iface lo inet loopback

# The primary network interface
allow-hotplug enp0s3
iface enp0s3 inet dhcp
Let's change this to look like this:
# This file describes the network interfaces available on your system
# and how to activate them. For more information, see interfaces(5).

source /etc/network/interfaces.d/*

# The loopback network interface
auto lo
iface lo inet loopback

# The primary network interface
#allow-hotplug enp0s3
#iface enp0s3 inet dhcp
auto enp0s3
iface enp0s3 inet static
	address 192.168.1.140
	netmask 255.255.255.0
	network 192.168.1.0
	broadcast 192.168.1.255
	gateway 192.168.1.1
By the way, the parts highlighted in red should be commented out, and the part highlighted in green should be inserted. Also, the bold IP address will be our static IP address, so set this accordingly. If you are using a live server, enter the IP address you received from your hosting or network provider, and in your home network, select an appropriate address from your own domain. In this case, ensure in the router (with the bind address function) that only this machine can obtain this IP address so that no collision can occur. Also, if you are installing behind a router on your home network, set the gateway address to the router's access address, which is the above value in most cases, but some router types may have different addresses.
I have this Debian 11 (Bullseye) server series a 192.168.1.140 I will enter an IP address so that I will continue to use it on these machines so that it does not conflict with the addresses of servers installed with earlier versions of Debian.
Once everything is set up, save it.
Then edit the / Etc / hosts file:
nano /etc/hostsIts "factory" content is:
127.0.0.1       localhost
127.0.1.1       debian11.linuxportal.vm debian11

# The following lines are desirable for IPv6 capable hosts
::1     localhost ip6-localhost ip6-loopback
ff02::1 ip6-allnodes
ff02::2 ip6-allrouters
Then, in the second line, change the IP address (127.0.1.1) to our fixed IP address set above. Let's save it.
Then restart network management. Do this on the console if you have previously configured it over SSH, because it will drop connections due to the changed IP address:
systemctl restart networking.serviceYou can also check your new IP address on the console ip command:
ip a
We can then reconnect with our fixed IP address, which will no longer change.
Then, for both systems, the assignment must be set in the following format (shown through my own example):
192.168.1.140 debian11.linuxportal.vm
If you have also set the hosts file, remote access is more convenient:
ssh linuxportal@debian11
Check hostname
Check the hostname a hostname and the hostnamectl using commands:
hostname
hostname -f
hostnamectl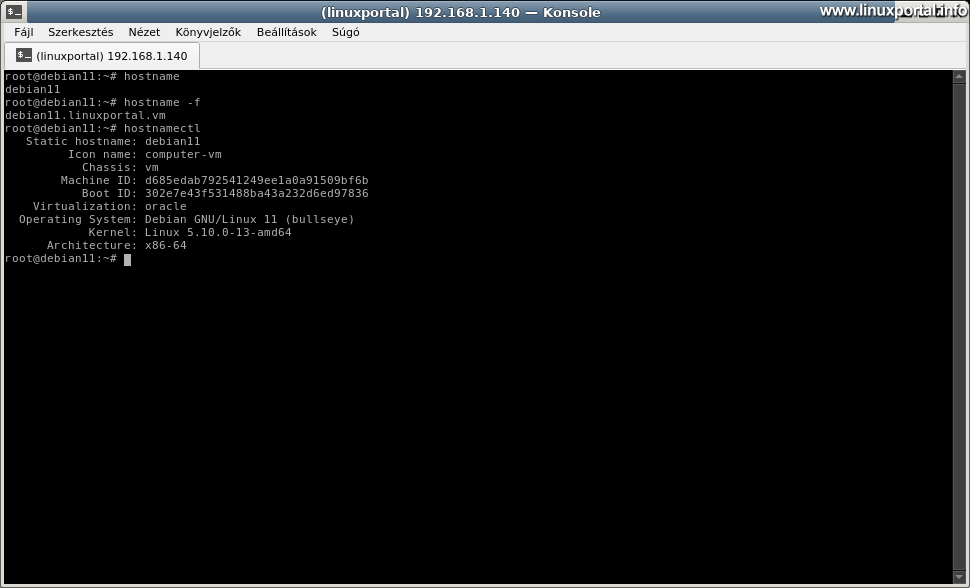
Normally, you can see the names you set during the installation. If something goes wrong, you can use the hostnamectl command to change the hostname:
hostnamectl set-hostname <új_hosztnevünk>Configure Nano (Optional)
A dwarf is an excellent command line editor, version 5.4 of which is already available in Debian 11 by default, with which we can efficiently edit our required configuration files, for example. We've already used the editor, but it's still worth setting up some options to make it even more useful.
This setting is optional, but if you use the nano editor often, you can make it more convenient to use it in the long run.
The nano configuration file is unique to each user's home directory .nanorc As. However, if you want to resolve the settings globally, it is better to place this file in a central location, and in the user libraries only one symbolic link to place. So you only need to change it in one place if needed. Accordingly, create a configuration file in the / etc directory:
nano /etc/.nanorcHere are some of these settings:
set tabsize 4
set mouse
set constantshow
Where settings mean:
- set tabsize 4: Tab size 4 characters. By default, the nano 8 character length is a tab.
- set mouse: Enables mouse operations. For example, positioning the cursor with the mouse, scrolling, etc.
- set constantshow: (in earlier nano versions set constknown as): Display row, column, character position information. This is also useful if, for example, the x in a given config file. a setting must be made in a row. This makes it easy to navigate to the right line.
In previous versions, even the smooth state had to be turned on for smooth scrolling, but in newer versions it already works by default. For more settings, visit nano side.
Save and link to the user's home directory:
ln -s /etc/.nanorc ~/.nanorcThis can then be done by any user.
After restarting nano, the new settings will take effect.
Set Sudo
During normal use, we use our regular user to perform normal activities, and from time to time we may need root privileges, but only for the duration of that command. Suitable for this is the sudo command. This is not installed on the system by default, so install it with the following command:
apt-get install sudoThe sudo command can only be used by users who are in either the group named sudo or / Etc / sudoers file, so there are two ways to add users to sudo users:
Add the user to a sudo group
A sudo by entering the group usermod command. RootAs, run the following command for the new user you want to add:
usermod -aG sudo <felhasználónév>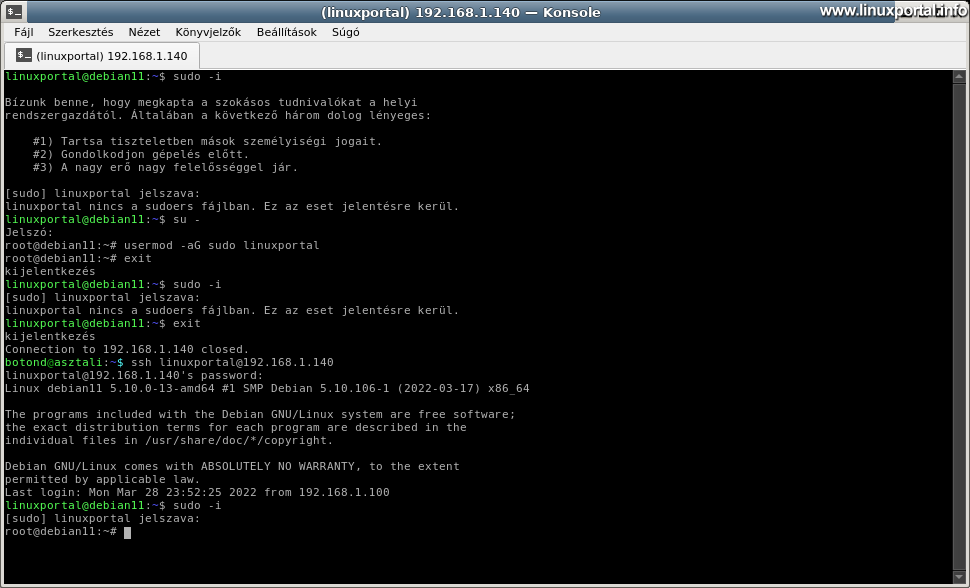
What you can see in the picture above:
- By default, the user cannot use the sudo command: "linuxportal is not in the sudoers file. This case will be reported."
- Then use the "su -" command to log in as root (using the root user).
- Add the linuxportal user to the sudo group using the "usermod -aG sudo linuxportal" command
- we exit the root shell
- Let's try using sudo with the plain user before it still doesn't work
- We also log out with the user and re-log in via SSH
- Sudo, a -i also starts the login shell as root.
So the point is that if you set up sudo for a user with this (add to group) method, the user will only be able to use it after re-logging in, not in their existing session.
Remove the user from the sudo group
If, for some reason, you want to remove the user from the sudo group later, do so below gpasswd command root-Kent:
gpasswd -d <felhasználónév> sudoHere, too, the user needs to log in and out again to update their status.
Add the user to a sudoers file
A / Etc / sudoers by direct input to a file. However, this file is not edited directly, but there is a separate command for this, the visudo, which is available after installing the above package. So if you want to add a plain user like this, run the command, which opens the / etc / sudoers temporary file for us with your default editor:
visudoThen insert the line of the desired user in this file according to the pattern highlighted in green:
#
# This file MUST be edited with the 'visudo' command as root.
#
# Please consider adding local content in /etc/sudoers.d/ instead of
# directly modifying this file.
#
# See the man page for details on how to write a sudoers file.
#
Defaults        env_reset
Defaults        mail_badpass
Defaults        secure_path="/usr/local/sbin:/usr/local/bin:/usr/sbin:/usr/bin:/sbin:/bin"

# Host alias specification

# User alias specification

# Cmnd alias specification

# User privilege specification
root    ALL=(ALL:ALL) ALL
felhasznalo    ALL=(ALL:ALL) ALL

# Allow members of group sudo to execute any command
%sudo   ALL=(ALL:ALL) ALL

# See sudoers(5) for more information on "#include" directives:

#includedir /etc/sudoers.d
The reversal of this, i.e. the removal of the user, does not need to be specified in detail, only the inserted line of the user needs to be removed and the sudoers file saved.
If you want to use the sudo command without a password, you can find out more here.
The first time you use sudo, the system will display the well-known "sudo warning" message, which contains point 3. The message is exactly as follows:
Bízunk benne, hogy megkapta a szokásos tudnivalókat a helyi
rendszergazdától. Általában a következő három dolog lényeges:

    #1) Tartsa tiszteletben mások személyiségi jogait.
    #2) Gondolkodjon gépelés előtt.
    #3) A nagy erő nagy felelősséggel jár.

[sudo] linuxportal jelszava:
This message only appears the first time you use it. If you want it to reappear the next time you use it, delete the file below root-Kent:
rm /var/lib/sudo/lectured/<felhasználónév>The message will reappear the next time the user uses sudo. And the file you just deleted will be re-created, so the warning message above won't appear again.
Expanding libraries and updating packages
In this step, we expand the APT repositories so that the packages that are the default are available for later server installations from trunks are not available. To do this, open the / Etc / apt / sources.list file to edit:
nano /etc/apt/sources.listThis basically looks like this for a recent Debian 11 (Bullseye) installation:
# deb cdrom:[Debian GNU/Linux 11.2.0 _Bullseye_ - Official amd64 NETINST 20211218-11:12]/ bullseye main

#deb cdrom:[Debian GNU/Linux 11.2.0 _Bullseye_ - Official amd64 NETINST 20211218-11:12]/ bullseye main

deb http://deb.debian.org/debian/ bullseye main
deb-src http://deb.debian.org/debian/ bullseye main

deb http://security.debian.org/debian-security bullseye-security main
deb-src http://security.debian.org/debian-security bullseye-security main

# bullseye-updates, to get updates before a point release is made;
# see https://www.debian.org/doc/manuals/debian-reference/ch02.en.html#_updates_and_backports
deb http://deb.debian.org/debian/ bullseye-updates main
deb-src http://deb.debian.org/debian/ bullseye-updates main

# This system was installed using small removable media
# (e.g. netinst, live or single CD). The matching "deb cdrom"
# entries were disabled at the end of the installation process.
# For information about how to configure apt package sources,
# see the sources.list(5) manual.
Let's expand this on contrib and the non-free allowing containers to look like this file:
# deb cdrom:[Debian GNU/Linux 11.2.0 _Bullseye_ - Official amd64 NETINST 20211218-11:12]/ bullseye main

#deb cdrom:[Debian GNU/Linux 11.2.0 _Bullseye_ - Official amd64 NETINST 20211218-11:12]/ bullseye main

deb http://deb.debian.org/debian/ bullseye main contrib non-free
deb-src http://deb.debian.org/debian/ bullseye main contrib non-free

deb http://security.debian.org/debian-security bullseye-security main contrib non-free
deb-src http://security.debian.org/debian-security bullseye-security main contrib non-free

# bullseye-updates, to get updates before a point release is made;
# see https://www.debian.org/doc/manuals/debian-reference/ch02.en.html#_updates_and_backports
deb http://deb.debian.org/debian/ bullseye-updates main contrib non-free
deb-src http://deb.debian.org/debian/ bullseye-updates main contrib non-free

# This system was installed using small removable media
# (e.g. netinst, live or single CD). The matching "deb cdrom"
# entries were disabled at the end of the installation process.
# For information about how to configure apt package sources,
# see the sources.list(5) manual.

Save and update the package database and packages:
apt-get update
apt-get upgrade
In a recent installation, only a few packages will be updated, but over time, as we build the server, there will be packages that can only be obtained from these extended component repositories.
Configuring Aliases and Colors (Optional)
This section is not a necessity, but you can make the command line more comfortable by setting it up. The earlier For instructions on installing Debian 10 (Buster) minimal server similarly, here you can set your own aliases and prompt colors in your own central file, which you can use with all users alike, so you only need to maintain your settings in one file. This is especially useful if you run multiple websites on the server and use SSH access for each. So here we create our own configuration file, which we then source into the .bashrc files of the users we want to configure.
To do this, create your own central configuration file:
nano /etc/.my_profileAnd let's put our own settings into this:
I put the comments in the file to make it easier to understand the meaning of the lines. The only difference here compared to Debian 10 is that I removed the boot part of the Bash command line add-on, because in Debian 11 this call is already included by default. /etc/profile.d/ in the directory bash_completion.sh file, so we don't have to deal with that here anymore.
apt-get install bash-completionIn the end, we check the root of the user in a branch and activate a prompt of a different color accordingly. This makes the script great for both root and plain users. This can come in handy when you often switch between plain and root users, so you are less likely to accidentally confuse their command lines.
Of course, we are free to format this file, we can spice it up according to our own needs and habits, here is just an example of setting up a few basic things.
Once you have entered all the settings you need, save it and then invite this file to the appropriate users .bashrc with the command placed at the end of your files:
nano ~/.bashrcThen let's include one of the versions:
. /etc/.my_profile
vagy
source /etc/.my_profile
Save, log out and log back in again, then your settings will take effect:

The image also shows how prompt and library colors and aliases work.
I have written before about using the color terminal in this description, so if you want to change the prompt colors, for example, see the linked content for more instructions.
Download
Conclusion
This would be a minimal Debian 11 (Bullseye) server installation, which will be an excellent basis for future server installations. We have set up a lot of things, so we can work comfortably on the server later.
What's next?
Minimal servers are great LAMP systems or even to build more complex servers. For the Debian 11 (Bullseye) series, I recommend the following tutorials to continue building the server:
- Debian 11 (Bullseye) LAMP server v1.0 installation
- Perfect server: Debian 11 (Bullseye) v1.0
- How to build and arming our ISPConfig3 server and how to secure our control panel, main services and websites with Let's Encrypt SSL
It is also worth looking around Servers category as well.
- What's new and changes in the Debian 11 (Bullseye) operating system
- Debian 11 (Bullseye) LAMP server v1.0 installation
- Perfect server: Debian 11 (Bullseye) v1.0
- How to build and arming our ISPConfig3 server and how to secure our control panel, main services and websites with Let's Encrypt SSL
- Ubuntu 20.04 LTS (Focal Fossa) minimal server installation
- Install Debian 10 (Buster) Minimum Server
- Install a minimum server for Ubuntu 18.04 LTS (Bionic Beaver)
- Install Debian 9 (Stretch) Minimum Server
- Install Debian 8 (Jessie) Minimum Server
Navigation
- To post registration and login required
- 652 views