
Content
Introductory
Virtualization allows us to install and run another operating system on our computer while our computer is running smoothly and the guest operating system is completely independent in a window. This saves you a lot of time and hardware by running two systems on the same machine.
Some of the tutorials posted on the site are free VirtualBox I create it using Linux running virtualization software, so in this article we will cover how to use it.
In this description I will introduce the virtual machine creation, setup, and launch. One Windows 7will create a new virtual machine on the host Debian Linux guest system. Of course, you can also run this tutorial on another host host to run VirtualBox.
I will not go into all the features of VirtualBox now, but will go through the settings that we will need to set up our machine in a targeted way.
For guest operating systems with a graphical desktop environment and therefore more hardware requirements You can read about VirtualBox settings here.
Get VirtualBox
https://www.virtualbox.org/wiki/Downloads
(5.2 version may be different at the time of writing, the latest version may differ)
I do not go into the details of installing the program here. Install VirtualBox as usual and start it.
Create a new virtual machine
To get started, click on the top toolbar on the VirtualBox main screen Uj icon or Machine menu Uj menu item.
Machine name and system
Specify the virtual machine name, (OS) type and version:

In this tutorial, I build a machine for Debian 8, but any major version can be specified. Here I provide the version only for the sake of differentiation so as not to confuse later if more versions are created.
Memory

I set up 4GB of RAM, that’s plenty enough for a minimal install, and whoever downloads the virtual machine from here can definitely set up that much memory on their own machine to work optimally.
Hard drive
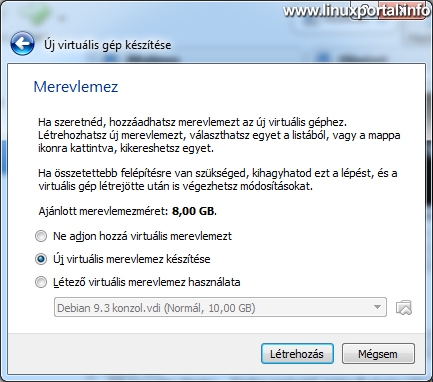
Create a new hard drive, but if, for example, the virtual machine was downloaded from here, select Use an existing virtual hard disk , and then browse to the downloaded hard disk image.
Hard disk type
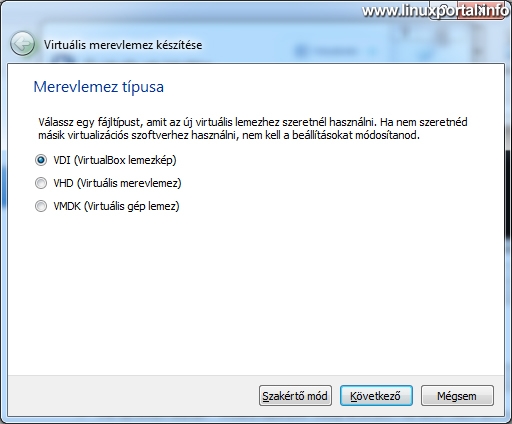
Select VirtualBox image option here. Also in tutorials I will upload virtual machines to the site in this form.
Physical hard disk storage
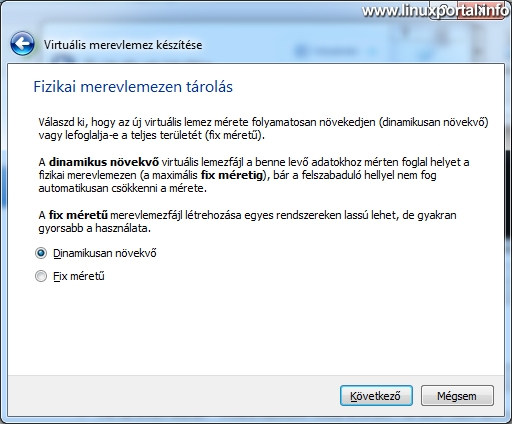
Here I am Dynamically growing I choose the option so that the newly installed virtual machines take up much less space than the partition we will be setting up for it.
File location and size
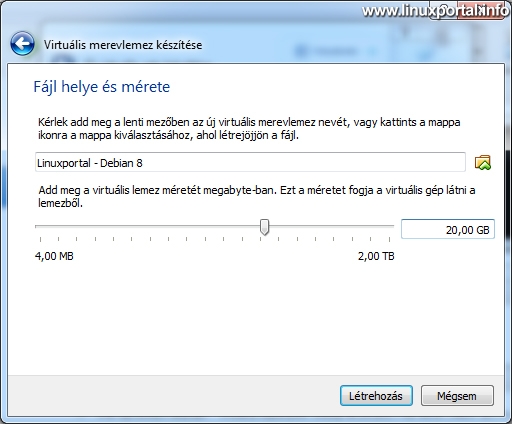
Here you can specify the physical storage location of your virtual machine and the size of the virtual drive.
Place:
If you do not change the location, you will store the virtual disk on your machine in the following directory:
C:\Users\<usernév>\VirtualBox VMs\Linuxportal - Debian 8
However, if you want to store the virtual disk in another directory, you can select the destination directory by browsing next to the name.
If you have an SSD drive that has some 10 GB of free space, you might want to do the following:
Create a fixed size 10-20 Gb disk and place it on the SSD drive. (We'll set this up later on when installing Linux as a system drive, swap partition, etc.) Then create a larger, dynamically growing disk that we put on our traditional drive. This disk will be used for example for web storage (/ var / www). This way we can achieve better performance with our virtual machine.
Size:
Since we have chosen the dynamically growing method above, any size up to 2 TB can be specified here, the physical file will start from 0 and will grow as needed during installation.
Overview
When all is done, your virtual disk will be created in the appropriate directory and the new virtual machine will also appear on the main screen of VirtualBox.
For me, the summary page for the newly created machine (click to enlarge) currently looks like this:

The size of the physical disk image you just created is 2.1 MB.
Set up a virtual machine
In this section we set up the rest of the virtual machine's parameters to get it ready to boot.
To stay on your new virtual machine, click on the VirtualBox toolbar configuration icon. This will bring up the virtual machine settings. There is quite a lot to set up here, so I'm going to go through the parts that need to be changed.
General
Advanced ear:
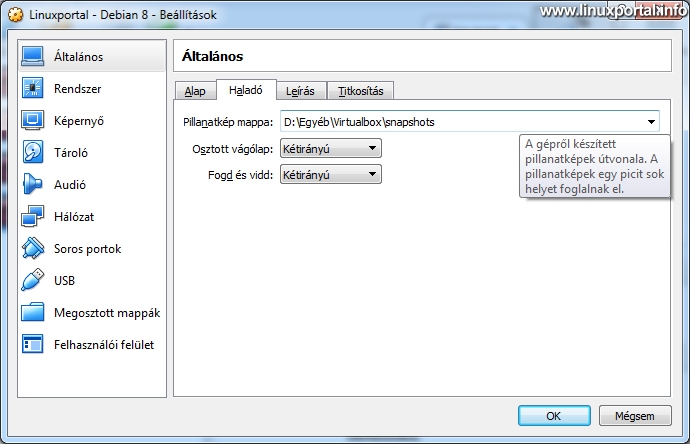
I'm moving the snapshot folder here to a more convenient location for me, because it may be necessary to take snapshots when creating tutorials (e.g., returning to a previous machine state). So if you want to take snapshots, you can set the output directory here.
Az Split Clipboardset to bidirectional, later it will be useful if you can bring selected texts between the host machine and the virtual machine, for example.
A Drag and drop and set it to bidirectional.
These settings are only for guest integration services will work properly with Guest Additions, but I'll write about that in another description.
System
Processor ear:

Set up as many processor cores as there are physical cores in your machine. HT cores do not perform as well during virtualization, so it is unnecessary to configure them as well. So for me, for example, I set 7 cores for the I3770-4 CPU.
Let's enable Enhanced capabilitiesand that.
Screen
screens ear:
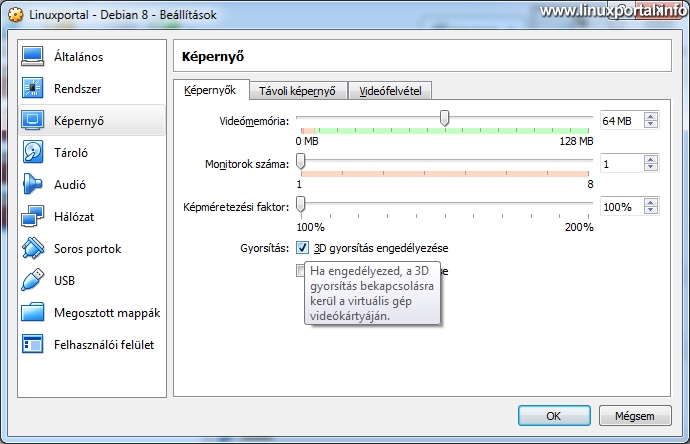
A video memory set it to at least 64 Mb. I have an Intel I7 integrated video core, so I can use more memory on another computer with a dedicated video card.
A 3D acceleration turn it on, it will be useful later.
holding
Use this panel to mount additional disks or optical drives to your virtual machine.
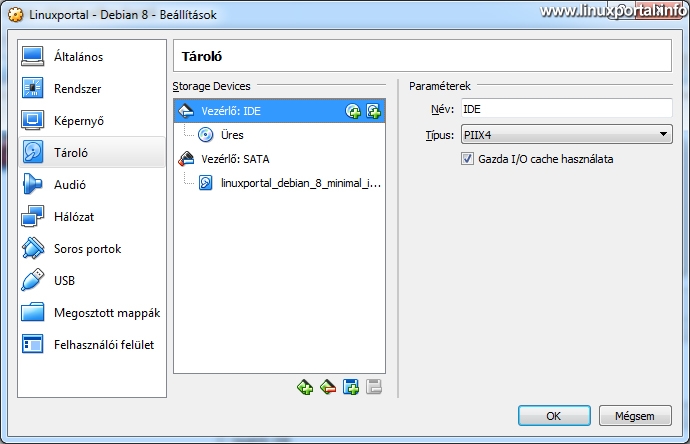
Clicking on the "Controller: HERE" line will display two icons at the end of the line, click on the first one: Adding an optical drive. A small window will pop up asking if you want to insert a virtual optical disc into the drive:
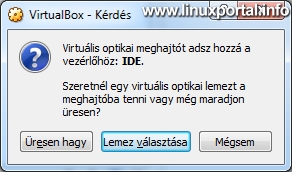
Click the Select Disc button here. Then browse to the appropriate installation image and download it.
Note here the order of the disks, if more than one optical disk drive is connected to make it IDE Primary Master. This way you will definitely start the system from here.
Network
Card 1 ear:

Set up when connecting Bridge disappear card, because if you have a computer behind the router, the router will see the virtual machine and give it an internal IP addresses on our LAN.
I'll make more descriptions that will build on that.
Open the advanced section, here you will need the MAC address.
It is advisable to configure your router with Address Reservation Or the IP & MAC Binding part of this MAC address and add an IP address. This way, your virtual machine will always have the same IP address when it is dynamically powered on (DHCP) address is being retrieved. Of course, it is worth setting up the same fixed IP address in the guest system as well.
This will be really important eg. when we set up a web server.
Router setup

I have a TP-Link - TL-WR1043ND type router (not a modern one, but it has been running flawlessly for over 10 years) so this is where I can show the setup.
Entering the admin interface of the router (at my place) a DHCP / Address Reservation menu, you need to create a new MAC-IP connection.
In this tutorial, I chose the IP address 192.168.1.120, so we'll use that IP address in Linux tutorials based on that later.
We are now ready, our virtual machine is ready to boot.
For the sake of simplicity, I haven't done disk management in this description, so this virtual machine will start with a single hard drive solution. Of course, new ones can be added to the configuration at any time later.
The topic of this description is only intended to cover so far, I will present the installation of the guest operating system in another article.
Related Content
- How to configure VirtualBox for graphical desktop operating systems
- Install VirtualBox 5.2 on Debian 9 (stretch) host operating system
- Installing VirtualBox 6.0.x on a Debian 10 (Buster) host operating system
- Install VirtualBox 6.1.x on Debian 10 (Buster) host operating system
- How to shrink image files of our VirtualBox virtual machines on Linux and Windows systems
- How to install Guest additions on Debian 11 (Bullseye) running in VirtualBox
- Encyclopedia - VirtualBox
- Install Debian 8 (Jessie) Minimum Server
- Install Debian 9 (Stretch) Minimum Server
- Install a minimum server for Ubuntu 18.04 LTS (Bionic Beaver)
- To post registration and login required
- 2822 views