
Content
Introductory
On December 2019, 10, Oracle released the VirtualBox newer version 6.1. It was mentioned earlier About installing VirtualBox 6.0 on Debian 10 host, in this description, you are upgrading or installing to version 6.1. This guide is similar to the previous one, but differs in a few points, so it’s definitely worth going through.
Update from version 6.0
The interesting thing is that since this is a new "middle" version branch, it is included as a separate package in the VirtualBox repository, but because it is not a major version upgrade, the VirtualBox interface does not notify you that a new branch has been released. I also only noticed a few days ago in the trunk, when I wanted to install it on my new (Debian 10) system as well. So if you are already using version 6.0.x, you can easily upgrade.
So if it is apt-cache command to search for "virtualbox" in the packages, you can see that several branches are available in parallel, which are either updated or not:
sudo apt-cache search virtualboxOn Debian 9 (Stretch) the output is:

And on Debian 10 (Buster):

So it can be seen that - with a slight difference, but - on both Debian releases there are several packages available with different versions of VirtualBox. So now whether you use Debian 9 or 10, you can upgrade VirtualBox the same way:
sudo apt-get install virtualbox-6.1The installer will remove the earlier version (6.0), but you do not have to worry, all settings, virtual machines will remain.
Update Extension Pack
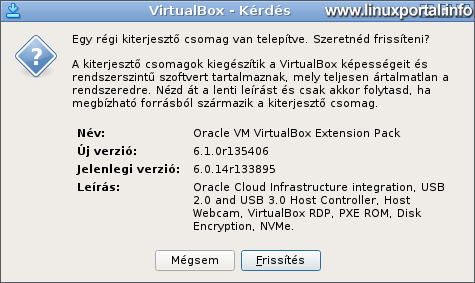
Once we have launched our new VirtualBox, log in to File menu and click here Check for updates option. You will then start searching for a newer expansion pack. Immediately it senses that we are not using the most recent one (just in my older Debian 9 installation):

Here, choose the download,

Let's confirm

Install ...
This is to let you know if an older version is available, or if we are upgrading. Update ...

Here we accept the terms ...
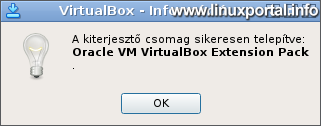
Notify me of update success, let's get it down ...

Here you can delete the old package that will no longer be used. This way, it does not take up space on our machine.
You are now ready to upgrade your Extension Pack for VirtualBox 6.1.
Update Guest Additions on a Windows guest machine
The Guest Additions package provides the guest system with various device drivers to achieve a higher degree of compatibility during virtualization. I just have a Windows 7 guest system that automatically notified me that there is a newer version of this package as well. So now we're going through this too. (Installing Guest Additions on Linux guest systems is discussed in another topic).
This installation is the same as in the previous version 6.0, but we'll take a look at a few steps here.
If the virtual machine is running, in window mode, click on the menu bar at the top of the window Tools menu Installation of integration services option. The virtual DVD drive will then launch a preset ISO image that will display the standard menu. Here's how to start the installation:

The next step is the installer welcome window,

let's move on here.
You will then be asked for the installation path, leave it by default, and then move on (I did not take a separate picture of it now).
In the following window, we need to select the components we want to install:
- VirtualBox Guest Additions (fixed)
- Direct3D support (Experimental)
- Start menu entries
Now there is no picture, but the same options as in the previous version.
In the window that follows, the installation is already done:

And finally he asks for a restart:

After restarting the guest machine, Windows will run with the latest drivers.
New installation of VirtualBox 6.1
I present this process based on the VirtualBox installed on Debian 10 (Buster) recently installed on my own machine.
If you are upgrading from a previous version but rather a recent install, first upgrade your packages.
Updating packages
Log in as root and run the usual upgrade commands:
apt-get update
apt-get upgrade
Add a VirtualBox repository
The official Debian 10 (Buster) repository does not include VirtalBox packages by default (see here), so we need to add VirtualBox’s own trunk to our repositories. To do this, open a as root / Etc / apt / sources.list file:
nano /etc/apt/sources.listAnd add the VirtualBox repository:
# VirtualBox repó
deb http://download.virtualbox.org/virtualbox/debian buster contrib
(If you are writing this description on Debian 9 (Stretch), we use "stretch" instead of "buster" in this line.)
Save and then add the repository keys to your package manager keystore (remaining root):
wget -q https://www.virtualbox.org/download/oracle_vbox_2016.asc -O- | apt-key add -
wget -q https://www.virtualbox.org/download/oracle_vbox.asc -O- | apt-key add -
Next, update our repository database:
apt-get updateWe can now search for virtual box packages:
apt-cache search virtualboxIn the output we get the result already shown at the beginning of the description.
Installing kernel modules
apt-get install dkmsThis is just my own theory, I'm not 100% sure why I didn't have to bother installing kernel packages later on with VirtualBox 6.1, but here are some tips:
- There was already the dkms package, which allowed the VirtualBox installer to include their own packages in the kernel during installation.
- Or, it may be that VirtualBox 6.1 resolves this issue in your installation system. Although I couldn't find any info on the version history page.
The first guess is that the preloaded dkms package solved this issue during the installation. Unfortunately I didn't watch the output line by line during the installation so I may have missed some useful info. :(
Install VirtualBox 6.1
Install Virtualbox itself:
apt-get install virtualbox-6.1Checking kernel modules
After installation, run the following commands to check the kernel modules:
find /lib/modules/$(uname -r) -type f -name '*.ko' | grep vbox
modprobe vboxdrv
modprobe vboxnetflt
modprobe vboxnetadp
For me, after a smooth installation, it gives this output:

Then start VirtualBox and create a virtual machine in it, and then start it. When the virtual machine starts up, the kernel modules have actually been added without our intervention.
Installing an Extension Pack
The Expansion Pack can be used to further enhance VirtualBox compatibility with the host system. This package provides the system with the following additional capabilities:
- USB 2.0 and 3.0 support (EHCI)
- VirtualBox RDP support (remote desktop connection to the virtual machine)
- disk Encryption
- NVMe and PXE boot with Intel chipsets
- Webcam management
From the command line, you can easily install the upgrade package.
First you need to know the latest version of VirtualBox. You can find it here:
http://download.virtualbox.org/virtualbox/LATEST.TXT
Clicking on the link will display only the version number. This can also be used in a command line installation, for example, saved to a variable:
friss=$(wget -qO - http://download.virtualbox.org/virtualbox/LATEST.TXT)You can then download the expansion pack, which will always be the latest:
cd /tmp
wget "http://download.virtualbox.org/virtualbox/${friss}/Oracle_VM_VirtualBox_Extension_Pack-${friss}.vbox-extpack"
Then install (as root):
VBoxManage extpack install --replace Oracle_VM_VirtualBox_Extension_Pack-${friss}.vbox-extpackThis will print the license text that we need to accept:

After accepting the terms, the installer runs. You are now ready to install the upgrade package.
Expansion Pack Check
The command line:
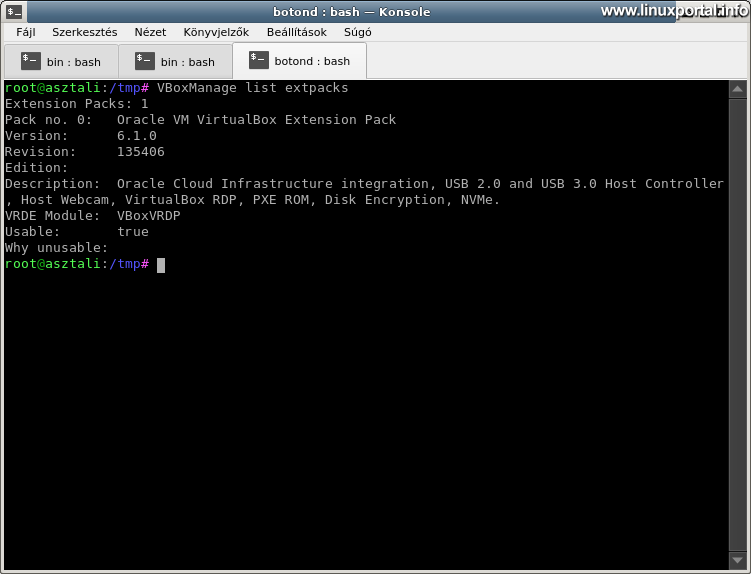
The following command can be used to check installed expansion packages:
VBoxManage list extpacksAnd the correct output is:
To control the interface:
Launch VirtualBox and then click on Beállítások button. Then the settings panel will appear. Click here on the left below extensions Next:

This would also install the upgrade package.
Conclusion
By upgrading or freshly installing VirtualBox 6.1, we can keep our favorite virtualization software up to date, which is also a free, very powerful tool for running various virtual machines. VirtualBox has undergone tremendous development in recent years (as well), making its popularity unbroken.
- Installing VirtualBox 6.0.x on a Debian 10 (Buster) host operating system
- How to configure VirtualBox for basic systems
- How to configure VirtualBox for graphical desktop operating systems
- How to install Guest Additions on Debian running VirtualBox
- How to install Guest additions on Debian 11 (Bullseye) running in VirtualBox
- How to shrink image files of our VirtualBox virtual machines on Linux and Windows systems
- Encyclopedia - VirtualBox
- VirtualBox.org
- To post registration and login required
- 265 views