
Content
Introductory
A recovery flash drive is a bootable device that can be used to rescue damaged filesystems or perform maintenance when the operating system is unable to boot due to a crash or even just a crash GRUBcan be restored if it does not work properly.
Restoring a system usually consists of several steps. First, the faulty machine is booted from the recovery USB device, then the root file system is mounted, then the maintenance operations are performed on it, and finally the machine can be rebooted from its own, repaired file system. In this description, we will make and test a recovery flash drive, which will not hurt if it is always lurking in our pockets in case there is any problem with our computer later.
Get GParted Live
GParted is an abbreviation for GNOME Partition Editor, the official partitioning application for the GNOME desktop environment, but can also be found in many other desktop environments. The GParted project also provides a Live system that includes a simplified Debian GNU / Linux operating system and the partitioning application itself. This allows you to boot your computer and then perform the necessary recovery or other partition / file system operations.
To purchase, visit GParted project download page, then download the ISO version of your architecture from here:
- i686: Recommended for upgrading older computers, the 32-bit version can handle up to 4 GB of memory and is used for 1-core processors.
- i686-PAE: Upgrade to previous version (Pphysical Adress Extension), it can already handle more than 4GB of memory as well as multiple processor cores
- amd64: For today's modern computers, this is recommended: 64-bit, you know what the previous one is, and it can boot UEFI-s motherboards as well.
So select the correct one for the computer you want to repair and download it. I'll continue with amd64, now it's the most common one.
Making a bootable flash drive
Take a flash drive and save all data on it before the operation. An old 1-2GB piece is plenty enough.
Bootable ISO dump
Bootable flash drives have been disregarded in the past, so you can choose one of the following methods according to your circumstances and mood:
- Make bootable flash drives with Rufus 3.3 (Windows)
- Creating a bootable flash drive on Debian
- Making a bootable flash drive with the balena Etcher 1.5 (Linux and Windows)
As you can see, there are plenty of options for writing ISO files.
GParted Live ISO file - similar to e.g. for other Debian or Ubuntu installation image files - an ISO hybrid file, which means that you don't need to do a special ceremony to make it a bootable USB device, just linux dd command using the file system to write to the USB device. Accordingly, this is now the most obvious method, so we are moving on.
Find a pen drive
There are several ways to find out the name of your flash drive device, for example Fdisk Or the lsblk commands:
sudo fdisk -lAs a result, you can easily find your flash drive among devices:
[...]

Disk /dev/sde: 7,5 GiB, 8011120640 bytes, 15646720 sectors
Disk model: DataTraveler 2.0
Units: sectors of 1 * 512 = 512 bytes
Sector size (logical/physical): 512 bytes / 512 bytes
I/O size (minimum/optimal): 512 bytes / 512 bytes
Disklabel type: dos
Disk identifier: 0x311b63d2

Eszköz     Indítható Start     Vége Szektorok  Size Id Típus
/dev/sde1             2048 15646719  15644672  7,5G  b W95 FAT32
In my example, this is an old 8 GB Kingston DataTraveller flash drive with a device name: SDE. It has a partition table and a FAT32 partition with the device name SDE1. In this example, this is mounted when inserting the flash drive.
So let's find our device accordingly.
You can also use lsblk to find the name of your USB device:
lsblkNAME MAJ:MIN RM SIZE RO TYPE MOUNTPOINT sda 8:0 0 894,3G 0 disk ├─sda1 8:1 0 512M 0 part /boot/efi ├─sda2 8:2 0 55,9G 0 part / ├─sda3 8:3 0 18,6G 0 part [SWAP] ├─sda4 8:4 0 80G 0 part ├─sda5 8:5 0 16M 0 part └─sda6 8:6 0 739,2G 0 part /mnt/drive-d sdb 8:16 0 111,8G 0 disk ├─sdb1 8:17 0 95,9G 0 part /mnt/debian9_root ├─sdb2 8:18 0 1K 0 part └─sdb5 8:21 0 15,9G 0 part sdc 8:32 0 931,5G 0 disk └─sdc2 8:34 0 931,5G 0 part /mnt/websites sdd 8:48 0 465,8G 0 disk └─sdd1 8:49 0 465,8G 0 part /mnt/hdd_500 sde 8:64 1 7,5G 0 disk └─sde1 8:65 1 7,5G 0 part /media/root/PENDRIVE_8G
Here, even on the name of the mount point, we can find the label on our flash drive if it has a tag and has been automatically mounted at insertion.
Then, if your flash drive or partition is mounted somewhere, you will need to unmount it first, otherwise you will not be able to burn your own filesystem from ISO and the operation will fail. To do this, run the following umount command on the flash drive or the partition on it (as mounted). me:
sudo umount /dev/sde1Then you can use the dd command to copy.
Copy ISO with dd command
Run the following command, of course with the name of each flash drive device and the version of GParted Live currently downloaded:
sudo dd if=gparted-live-1.0.0-5-amd64.iso of=/dev/sde bs=4M; syncA bs = 4M option to set the copy size to 512 MB instead of 4 bytes. This results in much faster copying. Also, the one after our dd command sync command ensures that writing is synchronized and not in the background. This way we can be sure that when we get the prompt again, the last block will be copied.
It ran for me in about half a minute and the output:
85+1 beolvasott rekord
85+1 kiírt rekord
359661568 bájt (360 MB, 343 MiB) másolva, 29,1149 s, 12,4 MB/s
Then if we run an lsblk command again:
lsblk
You can see that (in this example) a 8 MB partition is created on the 343 GB flash drive that contains GParted Live.
Now you have your bootable GParted Live flash drive ready.
You can also run an automatic mount as a validation check and check again with lsblk for a change to your flash drive:
sudo udisksctl mount -b /dev/sde1
lsblk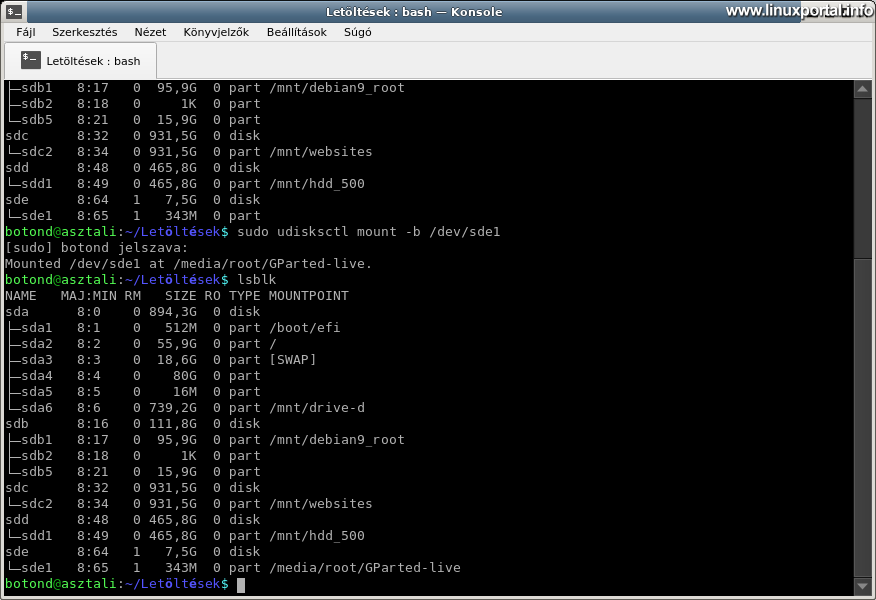
Here you can see that this 343 MB partition also got a "GParted-live" tag, so we can be sure that the operation was successful.
Using GParted Live
After creating the boot flash drive, you can also boot your computer from the USB key.
Boot System
The machine will also boot from the written flash drive, but here I have to use a virtual machine to take the screenshots, simply by attaching the downloaded ISO file to the machine's virtual disk drive, which will boot the system in the same way as a physical machine. with the boot USB key created above. So in the following, I will use this solution to demonstrate the basic operation and use of GParted Live.
After booting, the GParted Live boot menu will appear:

There are several options here, choose the first one.
Configuring the Keyboard
The following screen provides various options for setting up the keyboard layout:
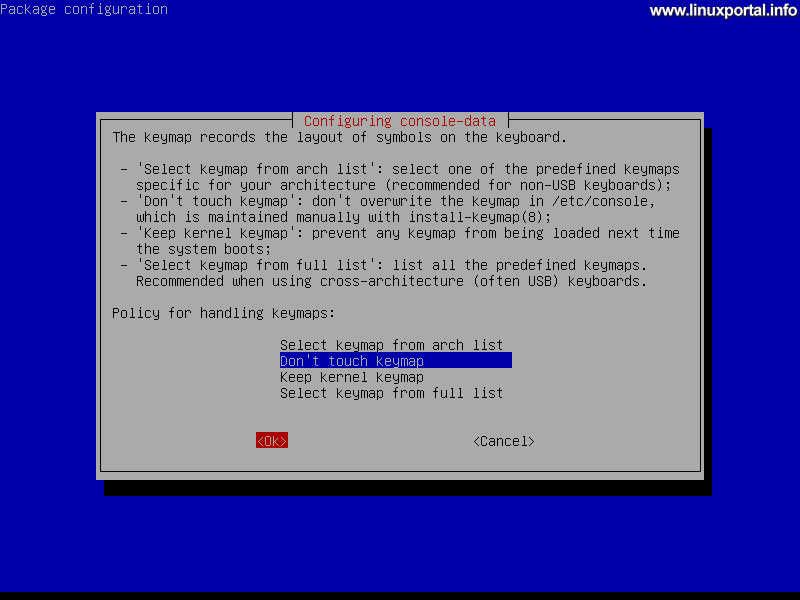
There are so many solutions here for keyboards, so this changes from time to time. At first I couldn't set it up properly, but after repeatedly restarting I get the right choice. Here we move on with the "Don't touch keymap" option.
Select language
The next step is to select the language you want to use from the list or leave it at the default (33) US English setting:
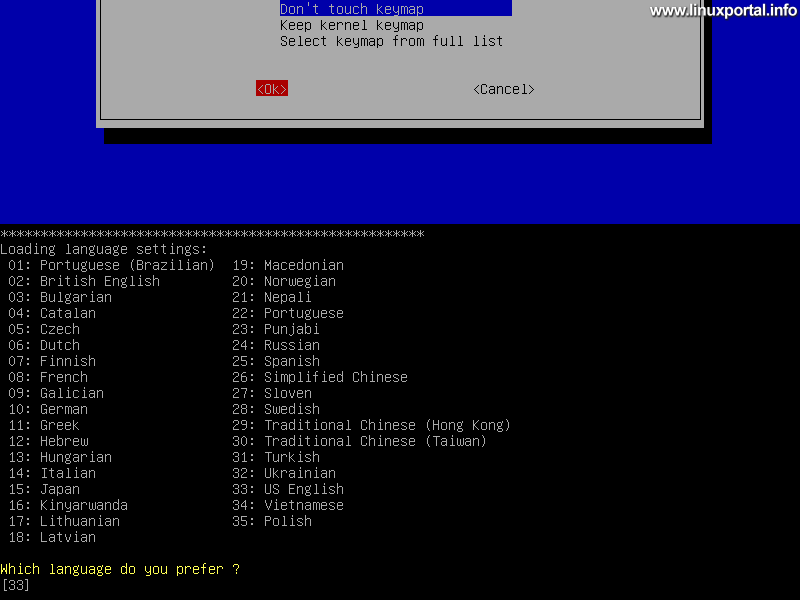
You can leave it here by default.
Select user interface
You can then choose whether to use the graphical interface or only console mode:

Opportunities:
- If you have no problems managing your video card under Linux systems by default, select the default option (0).
- If you want to manually configure the X server, select option 1.
- Alternatively, if you want to use the system in console mode, select option 2.
Here we choose depending on the task and the capabilities of the machine. Option 2 with console mode is recommended for video card issues. For example, at my old laptop I can use it just like that. This will prompt you to enter a root terminal which you can work with.
Now, however, the graphical interface works nicely on the virtual machine, so we move on, so now we choose the default option 0.
Graphic environment
After booting with the graphical environment comes a low-resolution desktop, some icons, and launches the GParted partition manager itself, which displays the disks and their partitions:
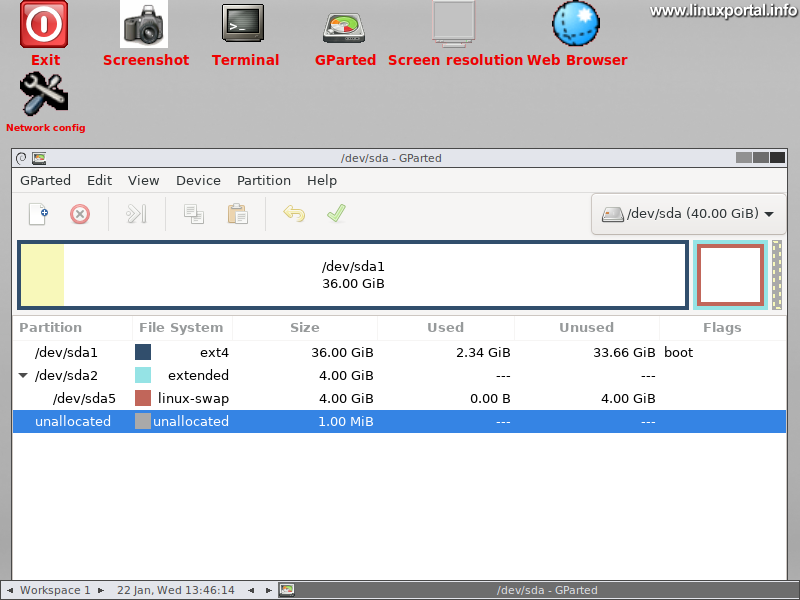
The GParted program is certainly familiar to many, so we will not discuss it here now, or we will find it in another description.
As you can see, the surface is very clean, but you will find the supplies you need for service.
Set resolution
In the first round, it is advisable to adjust the resolution upwards so that we have more space. To do this, double-click the icon labeled "Screen resolution":

This will bring up the resolution panel where you can choose the resolution that suits you.
Set up a network
The network is not configured by default. If you need a network, for example to install packages, click on the "Network config" icon:

And here, select the appropriate option for your network type. In most cases, we have a computer behind a router, for which DHCP is the right choice. You will then configure and start the network:

From now on we have internet, we can install packages, etc. Of course, to install the packages, we need to expand the package store source file, but this is not covered now.
Root terminal
Finally, the most important thing for servicing is the root terminal. Click the terminal icon. The terminal will then come in with a plain user. Here we run the appropriate sudo command:
sudo -iAnd we immediately get a root prompt. From here, you can locate the damaged file system, and then make the necessary repairs and maintenance.

Conclusion
Of course, this can be done by booting from the Live installation kit of any distribution (which has one), but they are over 2 GB in size, making it much more convenient to copy this 340 MB small system to a flash drive that also contains the necessary maintenance supplies ready to use .
The maintenance task itself is no longer part of this description, the only purpose is to look at how to quickly create a system recovery USB key when needed to start the system to recover it.
- GNOME Partition Editor - Download
- Make bootable flash drives with Rufus 3.3
- Make bootable flash drives with Rufus 4.3
- Print boot image using UNetbootin
- Print the boot image using the dd command
- Making a bootable flash drive with the balena Etcher 1.5
- How to reset our forgotten root password on our Linux system
- To post registration and login required
- 1947 views