2. page content
- page: TCP and UDP port scanning using the nmap command
- page: TCP and UDP port scanning using Netcat implementations
Content
Continuation
Az previous page we reviewed it Nmap command, on this page we learn about the basic use of the various implementations of Netcat commands.
The examples on this page of the description are also run from my desktop in the same way Debian 10 (Buster) Perfect Server 1.0 on the virtual machine's successor, that is On version 1.1 I perform.
Netcat implementations and commands
Netcat is a command-line utility that writes and reads data over network connections using the TCP or UDP protocol. It is one of the most effective tools in the system administrator's arsenal, which is why it is often referred to as the Swiss Army Knife of network tools. Netcat is cross-platform, so it is available on several operating systems such as Linux, macOS, Windows, and BSD. Netcat can be used to debug and monitor network connections, search for open ports, transfer data, etc.
ncat
Az ncat a network utility with functions that read and write data from the command line over networks. ncat is the "reincarnation" of the original Netcat program - its currently broken family - created by the NMAP project. It is designed to be a reliable back-end device that provides instant network connectivity to other applications and users. Ncat not only works with IPv4 and IPv6, but also provides the user with a virtually unlimited number of possible uses.
ncat provides most of the functions existing in the original implementations, as well as many new ones, but the support for port scanning has been removed from it (but regardless, it can also be used at the basic level for port scanning purposes).
Installing
The ncat command can be pre-installed on some systems, but usually we have to install it. Install it on Debian and Ubuntu systems ncat package:
sudo apt-get install ncatIf the package is installed - and it is the only or default Netcat version - then we can use it with the following commands:
- ncat: This is a dedicated command of the program. The ncat command always means the ncat program, regardless of the default setting, which is 10 in the Debian 7.70 (Buster) operating system on which the current description is based.
- no: "Common" command. This command always points to the default Netcat version symbolic link, so when using it, check the Netcat version number before using it in scripts, for example. If there is no other Netcat version on our computer, only ncat, or there are several versions, but this is the default setting, then this command points to the ncat command.
- netcat: This is also a commonly used command, the same applies here as in the case of "nc".
So the nc and netcat commands In this case "synonyms" of ncat. About this readlink and the which we can also check using commands:
readlink -f $(which nc)
readlink -f $(which netcat)
/usr/bin/ncat /usr/bin/ncat
nc -> /usr/bin/nc -> /etc/alternatives/nc -> /usr/bin/ncat
netcat -> /usr/bin/netcat -> /etc/alternatives/netcat -> /usr/bin/ncat
In the case of using ncat exclusively (only it is installed) or as default, all three commands can be used.
When preparing this description, I had all three Netcat implementations installed, so now ncat is set as default for preparing this chapter.
Setting the default Netcat version
If, like in my case, there are several versions installed on the computer, then the default Netcat version is that update-alternatives can be set with the command:
sudo update-alternatives --config ncAnd here we choose it ncat option.

Now come the port scanning tasks. In this section, we will review the ncat 10 version installed on the Debian 7.70 (Buster) system, and for the sake of simplicity, we will use the nc command version from here on.
TCP port scanning
The syntax of the nc command is:
nc [opciók] hoszt portSimilar to nmap, the ncat command handles TCP ports by default, so here we also examine them as a starting point. We can perform an individual TCP port scan with the following command:
nc -vz debian10.linuxportal.vm 21
In this example, the number 21 (FTP) port is examined. The meaning of the switches is as follows:
- -in: Verbose mode: Verbose mode. If this is not included, the program will not give any output. More on this below.
- -z: Zero-I/O mode. As a result of the switch, it only provides information about the status of the connection.
UDP port scanning
UDP ports can be queried with the -u switch:
nc -vzu debian10.linuxportal.vm 53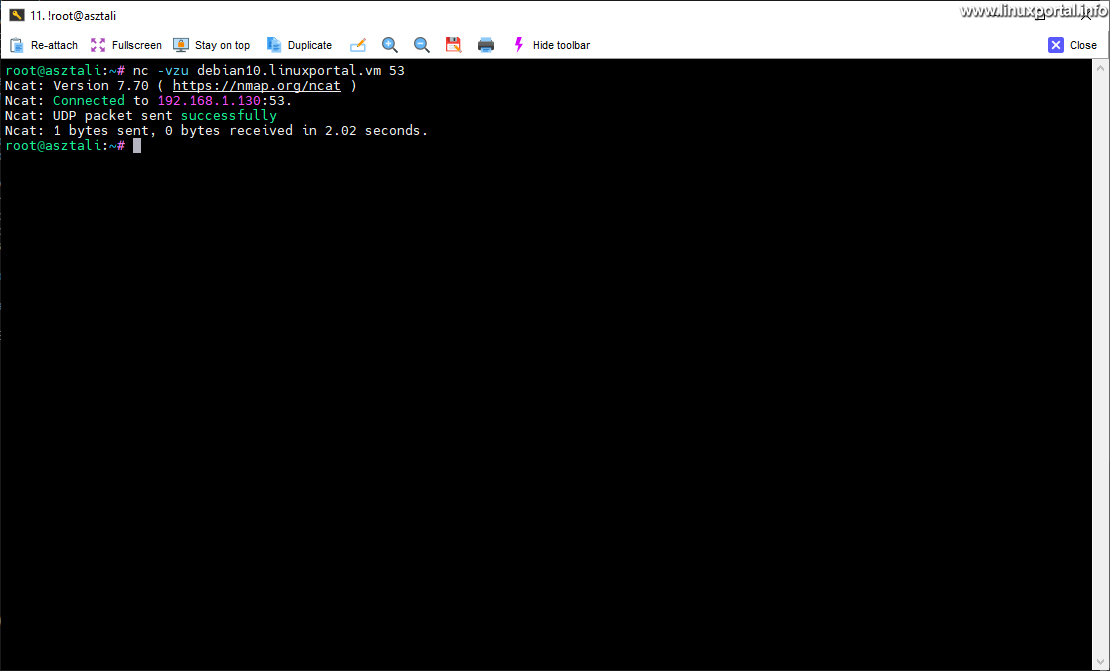
Query services
You can learn more about the services that monitor ports by removing the -z switch. In this case, the ncat program does not operate in zero I/O mode, but instead opens a communication channel in which we also receive the welcome text of the service. Examples of some known TCP ports and a closed port at the end:
nc -v debian10.linuxportal.vm 21
nc -v debian10.linuxportal.vm 25
nc -v debian10.linuxportal.vm 80
nc -v debian10.linuxportal.vm 110
nc -v debian10.linuxportal.vm 3306
nc -v debian10.linuxportal.vm 45 
Here we can see the responses from services monitoring behind known port numbers. Pure-FTPd on port 21 sends a nice little login message, while other services don't give any information about themselves. For example, port 80 (HTTP server). Finally, I also queried a TCP port that was certainly closed, so that a response from a closed port could also be seen.
Interestingly, port 3306 (MariaDB) gave the answer that this server (from which we started the ncat command) is not authorized for access. This is because when installing the LAMP server at the time it is we made the database secure, as part of which the remote connection to the database was also disabled. As a result, it does not even allow any remote connections.
No output mode
The ncat command can also be used without asking for output and in zero I/O mode. It will then not give any output and exit immediately. And about the status of the queried port, the $? we can find information from the exit code variable. This way, for example, we can use the program efficiently in automated scripts. Examples with previous ports:
nc -z debian10.linuxportal.vm 21
echo $?
nc -z debian10.linuxportal.vm 25
echo $?
nc -z debian10.linuxportal.vm 80
echo $?
nc -z debian10.linuxportal.vm 110
echo $?
nc -z debian10.linuxportal.vm 3306
echo $?
nc -z debian10.linuxportal.vm 45
echo $?
Here, the commands have no output, but we can only find out the status of the ports by querying the status variable. Where's the $? variable value is 0, the command did not give an error, i.e. the requested port is open. Where's the $? value is 1, the command exited with an error code, i.e. it did not find anything on the retrieved port, so it was closed.
With the help of this, we can, for example, query the ports in cycles of shell scripts, etc.
Scan multiple ports at once
As I mentioned in the introduction to ncat, the functions for checking multiple ports at the same time have been removed from the OpenBSD version on Debian distributions, so the query of port lists and port ranges can be done with different workarounds. In this section, we review these solutions.
Port range scan
The easiest way to do this is with ncat Bash we can query with cycles. Due to its more complex nature, it is advisable to put this in a few-line script, where it is more clear:
But if we want to run it in a row, we can also do this:
for i in {1..1000}; do nc -z debian10.linuxportal.vm $i; if [ $? -eq 0 ]; then echo "Nyitott port: " $i; fi doneThe output of the cycle is the following for me:

The operation of the script and the command is based on a simple, previously mentioned method without output: We run the nc/ncat command in a cycle -v without a switch, because of which the program does not output. Then we examine the exit code $? variable, and where we get a value of 0, we write that the port is open with the variable of the cycle.
If you scan UDP ports with this cycle, you have to slow down the cycle, because if you call the nc program frequently one after the other, it will detect an open port every x-th time. If we look at these ports separately afterwards, they naturally show a closed state. So if we "allow" the UDP scans too quickly one after the other, we get an inaccurate result. But if we put a 1-second sleep in the cycle, it gives an accurate result.
In the example below, I run a UDP port range scan. Since this is already a slower process, I now only run the cycle in the 1-100 range. Thus, the open UDP port 53 falls into this, and nothing else can be open. So the first command is with the plain UDP cycle, and the second with 1-second sleeps:
for i in {1..100}; do nc -zu debian10.linuxportal.vm $i; if [ $? -eq 0 ]; then echo "Nyitott port: " $i; fi done
for i in {1..100}; do nc -zu debian10.linuxportal.vm $i; if [ $? -eq 0 ]; then echo "Nyitott port: " $i; fi; sleep 1; done
Here you can see for the first command that it gave an unrealistic result. However, if we take a closer look, there is regularity in it, because every x-th port indicated that it was open. As I started to increase the value of sleep in the cycle (starting from 0.1), the erroneous results became rarer. Until finally, I got the exact result with the 1-second wait, where it gave the only really open UDP port 53. So, in the case of UDP ports, the ncat command must be run with a delay of 1 second, then it will give accurate results. Of course, in other circumstances (network, server speed, etc.) a different result may be possible.
In the loop, we can use it instead of the if-then structure grep command solution as well:
for i in {1..1000}; do nc -vz debian10.linuxportal.vm $i 2>&1 | grep "Connected"; done
What is happening here is that since ncat is a -v verbose mode writes to the error output (stderr), this must first be redirected to the standard output (stdout), and then we can filter for the appropriate keyword with the grep command. Just pay attention to the uppercase letter or use grep -i switch.
For UDP ports, the grep solution is:
for i in {1..100}; do nc -vzu debian10.linuxportal.vm $i 2>&1 | grep -C 1 "successfully"; sleep 1; doneHere, due to the slowness of the operation, we only scan in the port range 1-100 and search for the keyword "successfully", as well as the -C 1 option, we expand the number of lines written out by grep before and after the hits to 1-1, since in this output the port number is not on the same line as the searched keyword, so without this we would not see the lines containing the port numbers. And finally, don't forget the 1-second sleep.

Scan listed ports
If we need to scan specific ports, the most convenient solution is GNU Parallel command use. Install the parallel program first with the following command:
sudo apt-get install parallelThen we can use it.
And the nc/ncat command can be used as follows if we want to scan a port list. In the first example, we examine TCP ports, and in the second, UDP ports:
parallel nc -vz debian10.linuxportal.vm ::: 22 80 110 143 3306 8080
parallel nc -vzu debian10.linuxportal.vm ::: 20 53 200
As you can see, it is extremely easy to scan multiple ports using the parallel command.
The interesting thing about the second command is that the output was not formed according to the order of the specified enumeration. This is because the parallel command - as opposed to shell cycles - runs the commands in parallel, and since scanning the only open port out of the three UDP ports in the example took the longest time, its result arrived the latest.
nc.traditional (Netcat traditional)
nc.traditional (Netcat traditional) is a simple unix utility that reads and writes data over network connections using the TCP or UDP protocol. It is designed to be a reliable "backend" tool that can be used directly or easily controlled by other programs and scripts. At the same time, it is also a feature-rich network troubleshooting and discovery tool, as it can create almost any connection you might need and has many interesting built-in capabilities.
Installing
The traditional implementation of Netcat is usually installed by default on Debian server versions, but it must be installed on Debian desktop versions or, for example, Ubuntu systems. Therefore, if we use a system where it is not above by default, then install it netcat-traditional package:
sudo apt-get install netcat-traditionalOn Ubuntu systems, the netcat-traditional package is not available in the default package directory, but only in the universe package directory. The universe package can be set with the following command, if it has not been set yet:
sudo add-apt-repository universeThe netcat-traditional package can then be installed on Ubuntu systems as well.
If the package is installed - and this is the only or default Netcat version - then we can use it with the following commands:
- nc.traditional: This is a dedicated command of the program. The nc.traditional command always means the traditional implementation of Netcat, regardless of the default setting, which is 10-1.10 in the Debian 41 (Buster) operating system, which is the basis of the current description.
- no: "Common" command. This command always points to the default Netcat version symbolic link, so when using it, check the Netcat version number before using it in scripts, for example. If there is no other Netcat version on our computer, only nc.traditional, or there are several versions, but this is the default setting, then this command points to the nc.traditional command.
- netcat: This is also a commonly used command, the same applies here as in the case of "nc".
So the nc and netcat commands In this case "synonyms" for nc.traditional. About this readlink and the which we can also check using commands:
readlink -f $(which nc)
readlink -f $(which netcat)
/usr/bin/nc.traditional /usr/bin/nc.traditional
nc -> /usr/bin/nc -> /etc/alternatives/nc -> /usr/bin/nc.traditional
netcat -> /usr/bin/netcat -> /etc/alternatives/netcat -> /usr/bin/nc.traditional
In the case of using nc.traditional exclusively (only it is installed) or as default, all three commands can be used.
At the time of writing this description, I had all three Netcat implementations installed, so now nc.traditional is set as default for the preparation of this chapter.
Setting the default Netcat version
If, like in my case, several versions are installed on the computer, the default Netcat version can be set here as well with the update-alternatives command:
sudo update-alternatives --config ncAnd here we choose it nc.traditional option.

Now come the port scanning tasks. In this section, we will review the nc.traditional 10-1.10 version installed on the Debian 41 (Buster) system, and for the sake of simplicity, we will use the nc command version here as well.
TCP port scanning
The syntax of the nc command is:
nc [opciók] hoszt portSimilar to the previous commands, nc.traditional also handles TCP ports by default, so here we also examine them as a starting point. We can perform an individual TCP port scan with the following command:
nc -vz debian10.linuxportal.vm 21
nc -vz debian10.linuxportal.vm 22
nc -vz debian10.linuxportal.vm 80
nc -vz debian10.linuxportal.vm 110
nc -vz debian10.linuxportal.vm 57345
nc -vz debian10.linuxportal.vm 58100

The meaning of the switches is as follows:
- -in: Verbose mode. Verbose mode. As a result, the visible output lines appear. If used twice, it provides more detailed data.
- -z: Zero-I/O mode. Used for scanning. If not specified, it opens a persistent connection to the specified port and does not exit the program.
Here we can see examples of several things:
- Known open ports (e.g. 21, 80, 110)
- known closed ports (e.g. 22)
- unknown open ports (e.g. 57345)
- unknown closed ports (85100)
As we can see, nc.traditional also has its own database, which lists the names of the known services behind the known dust numbers. Of course, if we change the port number of one of our services, then Netcat is already in trouble, since it is not clear what service is behind the unknown but open port. For example, it used to be I changed the SSH server to port number 57345.
UDP port scanning
To scan UDP ports, we use a -u switch:
nc -vzu debian10.linuxportal.vm 53
nc -vzu debian10.linuxportal.vm 60
Here we can see an open and a closed port scan output. In this case, port 53 is a BIND DNS belongs to the server that was created earlier it was added during the installation of perfect server.
Detection of unknown services
Among the TCP ports, the SSH service was switched to another port that was not recognized by Netcat. Of course, only in this case do we know that the port number 57345 covers an SSH server, because it is our own setting, but if we want to find out a truly unknown service, we omit the -z switch. In this case - as I mentioned earlier - the Netcat program establishes a persistent connection with the port, where there is a chance that the "introductory text" of the service will be sent over the channel. Let's look at some examples:
nc -v debian10.linuxportal.vm 57345
nc -v debian10.linuxportal.vm 21
nc -v debian10.linuxportal.vm 80
nc -v debian10.linuxportal.vm 110
Here you can see how many different types of answers are received as many services. Of course, in each case, we have to disconnect with CTRL-C, because it disconnects itself only after X minutes of inactivity. So we can find out the bulk of the services if it is transferred to another port.
Interesting fact: sending data to a specific port
It does not belong closely to port scanning, but it is worth a few sentences as an interesting point:
By definition, no response was received from port 80 (HTTP), since we have to send a header there, as browsers do. Let's look at google.hu, for example. First we send a very simple HEAD and then a GET request:
printf 'HEAD / HTTP/1.1\r\nHost: google.hu\r\nAccept: \r\n\r\n' | nc -v google.hu 80
printf 'GET / HTTP/1.1\r\nHost: google.hu\r\nAccept: \r\n\r\n' | nc -v google.hu 80
And the output is:

With the first command, in the HEAD request, we receive the headers of the requested page, and in the second, GET request, the HTML content of the website is also received after the headers. Fortunately, we got a 301 redirect right away, so the source fit into one window. In this case, the browsers jump to the target address. In this case, we received a redirection to www, since only the domain name I entered it in the request without www. If we followed the redirection, the page would either come in or we would get another HTTP -> HTTPS also redirection. Of course, all this happens in the browser in seconds, which the users don't even have to be aware of.
Thus, with the help of shell scripts from the Netcat program, you can even build web robots, which, for example, "jump" on the links found on the pages and index the pages, or even collect email addresses from them to build email databases, etc. address lists are not legal). The rest is just a matter of well-composed regular expressions that process the received source codes. Of course, there are countless downloadable or even online programs for such purposes, I only wrote this as an interesting point to illustrate the versatility of the Netcat program.
Scan multiple ports at once
Unlike the ncat command, with the help of nc.traditional we have the possibility to scan several ports at the same time.
Port range scanning
In the first example, we look at the entire port range, i.e. the ports up to 1-65535, the running time of which is measured by team command:
time nc -vz debian10.linuxportal.vm 1-65535
The interesting thing about nc.traditional is that it scans ports in descending order. It took 13 seconds to scan the entire range. Here it also recognized the Munin node listening on port 4949, which it also did I installed it earlier on this server. Obviously this too based on a central database indicated.
In the case of UDP ports, the situation is exactly the same as in the case of the ncat program: if we do not use timing, it sees almost all UDP ports as open when we query them in a range. Let's see an example of this:
nc -vvzu debian10.linuxportal.vm 40-60Here, I've put in a double -v switch, so closed ports are also displayed in the output. We examine the range 40-60, similar to the previous ncat, so the truly open port 53 also falls into the range:
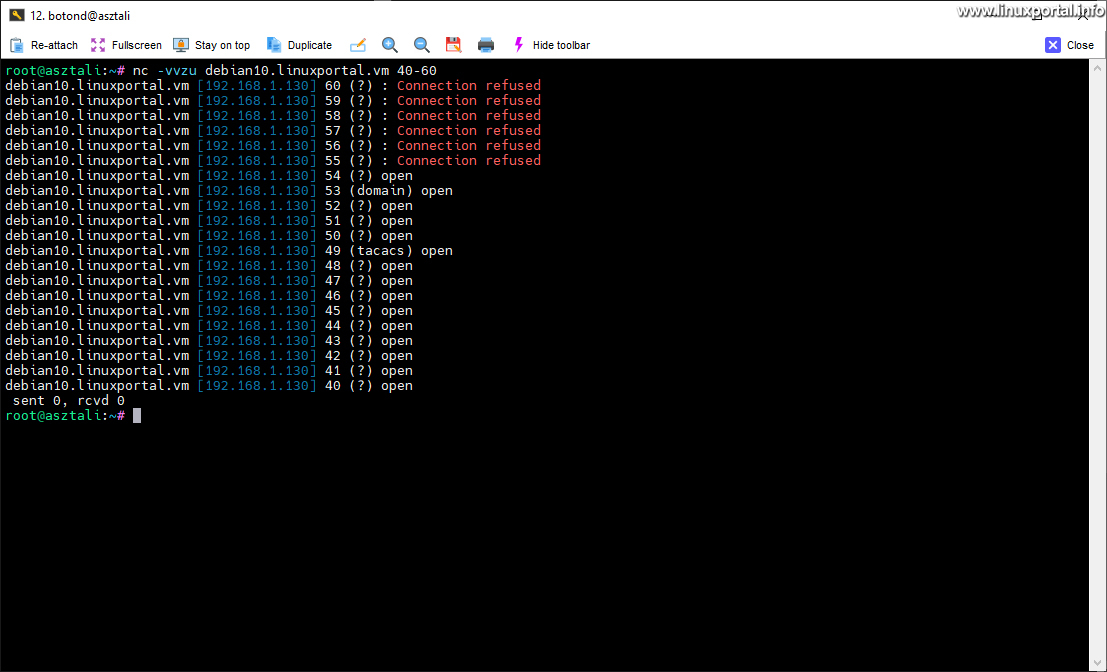
Here, too, we proceed in the same way as in the case of ncat: fast UDP port scanning without timing results in many open ports. Which, of course, does not correspond to reality. The only difference is that since the scanning is done here in the reverse order, starting from the higher ports, the first few ports were properly handled, and then the open ports came here as well.
For correct operation, use intervals of 1 second here as well. However, here we don't have to play magic in the cycles we created ourselves, but that's what the nc.traditional command is for -i parameter of which we can specify the elapsed time between the data sent to the ports on a second basis. Accordingly, our command is:
nc -vvzui 1 debian10.linuxportal.vm 40-60
This way we got a flawless result. Port 53 is the only UDP port open on this server. He also found a service called tacacs here, of course with the port closed, only based on the database a known service can be found here. And this we can see it here. This is a service called "Login Host Protocol (TACACS)".
nc.traditional also has a built-in timer, so we can scan UDP ports with it without any problems.
Scan listed ports
The list of ports can be entered using a list separated by spaces.
Example of TCP ports:
nc -vvz debian10.linuxportal.vm 21 22 25 53 80 110 143 8080 12000We can also use double when listing -v switch, so we can also see the responses of closed ports, but still not in a disturbing way, since there are few ports involved.

In the case of UDP ports, use a timer in this case as well, because in the case of about 5 ports queried quickly in succession, they already show open states. Here we query some ports, including the open port 53. I didn't use a 1-second timer for the first command, but I did for the second:
nc -vvzu debian10.linuxportal.vm 1 2 3 4 5 6 7 8 9 10 53 60 70 80 90 100 200 300 400
nc -vvzui 1 debian10.linuxportal.vm 1 2 3 4 5 6 7 8 9 10 53 60 70 80 90 100 200 300 400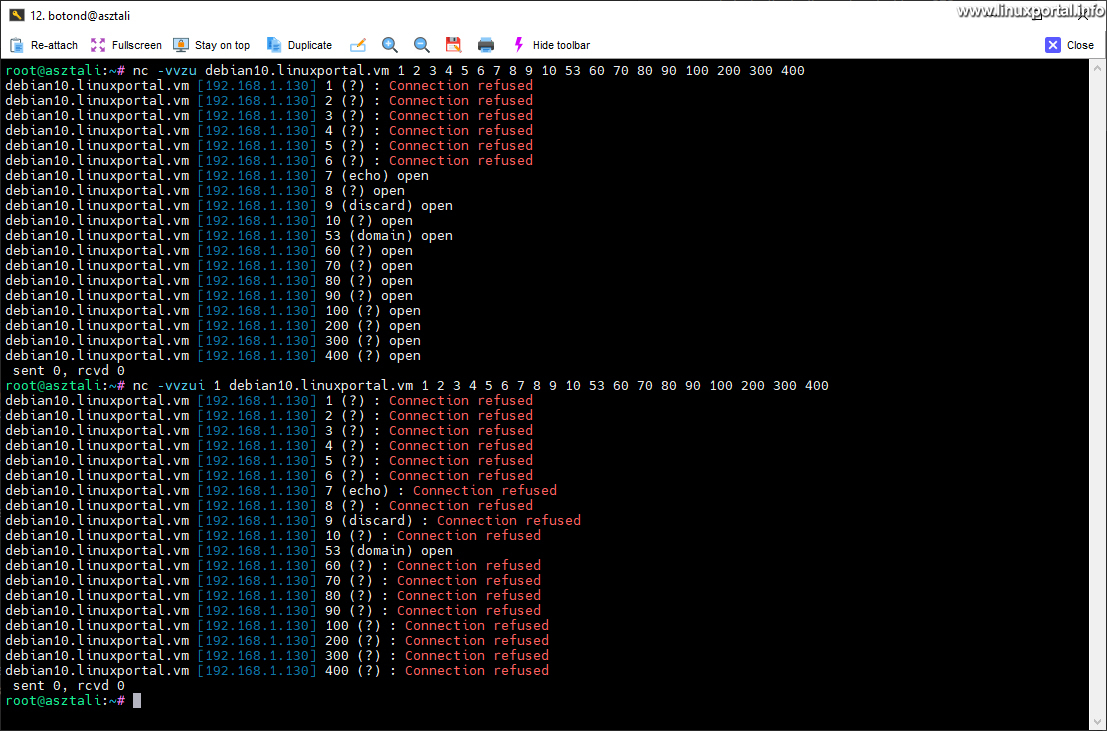
Here you can clearly see the result of the port scan without timing and with a 1-second timing on a screen. While in the first case it produced good results for the first few ports, after that it indicated all ports as open. The timing command, on the other hand, gave a suitable result: only the truly open port 53 was marked as open.
This list also contains the port numbers of some well-known services - which of course do not run on this server - which you can check on the link shown earlier if you are interested in these services.
So the lesson is to always use 1-second time intervals when querying UDP ports in a group, if you use the ncat or nc.traditional versions. If you work with your own cycles, you should place sleeps in them, or if you query several UDP ports at the same time with an nc command, you should specify the timing parameter for them. Of course, this is still a bit more "wooden" solution than the internal control system of nmap, but it is already a degree better than in the case of ncat, where we had to place timings in the cycle.
nc.openbsd (Netcat OpenBSD)
Az nc.openbsd (Netcat OpenBSD) utility can be used for almost anything, including things related to TCP, UDP, or UNIX-domain sockets. It can open TCP connections, send UDP packets, listen on any TCP and UDP ports, perform port scanning, and manage both IPv4 and IPv6 networks. Unlike telnet, nc scripts nicely and sends error messages correctly to stderr instead of stdout like telnet does.
Installing
The OpenBSD implementation of Netcat is usually pre-installed in the server and desktop versions of Ubuntu, to use it on Debian systems, install the netcat-openbsd package:
sudo apt-get install netcat-openbsdIf the package is installed - and this is the only or default Netcat version - then we can use it with the following commands:
- nc.openbsd: This is a dedicated command of the program. The nc.openbsd command always means the Netcat OpenBSD implementation, regardless of the default setting, which is 10 in the Debian 1.195.2 (Buster) operating system - on which the current description is based -.
- no: "Common" command. This command always points to the default Netcat version symbolic link, so when using it, check the Netcat version number before using it in scripts, for example. If there is no other Netcat version on our computer, only nc.openbsd, or there are several versions, but this is the default setting, then this command points to the nc.openbsd command.
- netcat: This is also a commonly used command, the same applies here as in the case of "nc".
So the nc and netcat commands In this case "synonyms" for nc.openbsd. About this readlink and the which we can also check using commands:
readlink -f $(which nc)
readlink -f $(which netcat)
/usr/bin/nc.openbsd /usr/bin/nc.openbsd
nc -> /usr/bin/nc -> /etc/alternatives/nc -> /usr/bin/nc.openbsd
netcat -> /usr/bin/netcat -> /etc/alternatives/netcat -> /usr/bin/nc.openbsd
In the case of using nc.openbsd exclusively (only it is installed) or as default, all three commands can be used.
When preparing this description, I had all three Netcat implementations installed, so now nc.openbsd is set as default for the preparation of this chapter.
Setting the default Netcat version
If, like in my case, several versions are installed on the computer, the default Netcat version can be set here as well with the update-alternatives command:
sudo update-alternatives --config ncAnd here we choose it nc.openbsd option.

Now come the port scanning tasks. In this section, we will review the nc.openbsd 10 version installed on the Debian 1.195.2 (Buster) system, and for the sake of simplicity, we will use the nc command version from now on.
TCP port scanning
The syntax of the nc command is:
nc [opciók] hoszt portSimilar to the previous commands, nc.openbsd also handles TCP ports by default, so here we also examine them as a starting point. We can perform an individual TCP port scan with the following command:
nc -vz debian10.linuxportal.vm 21
nc -vz debian10.linuxportal.vm 22
nc -vz debian10.linuxportal.vm 80
nc -vz debian10.linuxportal.vm 110
nc -vz debian10.linuxportal.vm 57345
nc -vz debian10.linuxportal.vm 58100
Here, the operation of the switches of the command and the obtained results are the same as in the case of nc.traditional, only the output looks a little different: we get the names of the services in square brackets, and in the case of open ports, instead of "open", "succeeded!" " we get subtitles.
Apart from these, there is no difference compared to nc.traditional, so we can continue.
UDP port scanning
Here too the -u switch to UDP mode:
nc -vzu debian10.linuxportal.vm 53
nc -vzu debian10.linuxportal.vm 60
There are several differences here compared to the nc.traditional version:
- In UDP mode, no output is given for closed ports, unlike the nc.traditional version, where it says "Connection refused". As we have seen, in the case of TCP ports, the output was given for closed ports, but not for UDP ports. This might be a bug in the program.
- The double -v switch does not work here, if we were to try to get the program to give more output, so the double verbose mode is not available here, nc.openbsd does not support it. This is also clear from the help.
So, when using nc.openbsd for closed UDP ports (and of course also for open ones), the $? we can know the result for sure from the variable.
Detection of unknown services
Here we also run the examples used for nc.traditional:
nc -v debian10.linuxportal.vm 57345
nc -v debian10.linuxportal.vm 21
nc -v debian10.linuxportal.vm 80
nc -v debian10.linuxportal.vm 110
There is no difference here compared to the nc.traditional version, only the square brackets, which I already mentioned.
Scan multiple ports at once
Let's review the scanning of multiple ports at the same time here.
Port range scanning
Here I also run the example used for nc.traditional to scan the TCP port range:
time nc -vz debian10.linuxportal.vm 1-65535
Here again there are differences compared to nc.traditional:
- Here we get the other extreme, as in the case of UDP ports: closed ports are also listed here. Unlike with nc.traditional, where it only displayed open ports.
- It scans the ports here in ascending order. Unlike nc.traditional where it scanned in descending mode.
This gives unmanageable output for such a large range, so we have to solve the filtering of the output ourselves:
time nc -vz debian10.linuxportal.vm 1-65535 2>&1 | grep -v "refused"
As I mentioned above in the ncat chapter, Netcat implementations are a -v outputs "requested" by a switch are sent to the standard error output (stderr) instead of the standard output (stdout). Therefore, we must first redirect the received output from the error output to the standard output with the "2>&1" part, and then we can filter it with the grep command. Here, I filtered for the keyword "refused" to filter out only errors of this type from the output (other types of errors may also occur, they remain in the output in this case as well).
We also run our previous example to scan the UDP port range:
nc -vvzu debian10.linuxportal.vm 40-60Since the double -v switch has no effect here, I run it with a single -v switch as well, so that there are no unnecessary switches in the command:
nc -vzu debian10.linuxportal.vm 40-60
There are also differences here:
- When scanning a port range in UDP mode, it does not give output for closed ports either. This is not disturbing, because we do not need to filter for anything here.
- In the case of batched UDP ports, automatic timing works with nc.openbsd, no separate a -i use a switch.
Scan listed ports
Let's run the previous example used for the nc.traditional command here as well:
nc -vz debian10.linuxportal.vm 21 22 25 53 80 110 143 8080 12000
There are only so many minor differences in results that the same result is smooth here -v option, because nc.openbsd is the smooth one -v switch also displays the closed TCP ports, while with the previous nc.traditional command -vv switch could be used to make it display closed TCP ports as well.
There is no other difference here, just the usual square brackets, etc.
For UDP ports, our previous example command:
nc -vzu debian10.linuxportal.vm 1 2 3 4 5 6 7 8 9 10 53 60 70 80 90 100 200 300 400Simple here too -v I use a switch...

Here, as we are used to now in the case of nc.openbsd, in the case of UDP ports, it does not give output from closed ports. In contrast to the nc.tradicional command, where the closed UDP ports were also listed.
There is no other difference here, you found the only open port, port 53 (domain).
That would be the overview of Netcat implementations. There are operational differences between the three versions, so when using it, we should consider which one is more optimal for us. For example, when it gives, when it does not give output, do we need to scan a range, etc.
Conclusion
We eliminated port scanning at a basic level with the nmap command and all three implementations of Netcat.
The Netcat program is an excellent network utility, but it has quite limited port scanning capabilities compared to nmap. For example, nmap supports simultaneous scanning of several targets, while in the case of Netcat this can only be solved by embedding scripts. Also, nmap contains many other extra functions, the use of which goes beyond this description.
Overall, nmap is the more professional solution in terms of port scanning capabilities, but we can also scan with implementations of the Netcat program at a basic level, which was, after all, the purpose of this description. In the case of Netcat, port scanning should be considered as an additional function, as in the case of the Swiss army knife, it is one tool among many. nmap, on the other hand, focuses purposefully on port scanning at a professional level.
Of course, there are many other programs for port scanning, however, the purpose of the description is to check the security of our own server, which we can do excellently with these tools as well.
- How can we check the used and free TCP/UDP ports of our Debian or Ubuntu Linux operating system?
- How can we change the default tcp port 22 of our SSH server on our Debian or Ubuntu Linux server for better security?
- Manual page - socket (2)
- Manual page - nc / ncat
- Manual page - nc.openbsd (Netcat OpenBSD)
- Manual page - nc.traditional (Netcat traditional)
- nmap.org
- nmap.org - Nmap Reference Guide (Manual) (Hungarian)
Navigation
- To post registration and login required
- 42 views