
The 1. page content
- page: TCP and UDP port scanning using the nmap command
- page: TCP and UDP port scanning using Netcat implementations
Content
Introductory
When checking ports from the outside, we perform a port scan on the computer to be checked to find out which ports are open, which services monitor these ports, etc. Port scanning is usually performed by system administrators to check the security of the server, but unfortunately, it is also often used by malicious attackers to map the weak points of the selected target computer.
In this description, we will see how we can check the security of our own computer or server against unauthorized intruders "from the outside".
Port scanning
During the port scan operation, the command is typically run from another computer by entering the IP address of the target computer to be scanned, but it can also be run locally; then when entering the goal a 127.0.0.1 IP addresses or the localhost we use hostname.
No matter how you use these commands, the working principle of port scanning is the same: it approaches the task from the outside through the network interface, so the options are more limited than looking into the processes running on the system or open files, a in the case of an internally initiated port check, etc. In such cases, the program performing the port scan operation sends data packets to the network ports of the computer or server specified as the target and, by analyzing the received responses - with the help of well-known patterns - tries to find out on which ports which service is running. Of course, this operation does not give 100% accurate results, as there may be services that try to "avoid being noticed" by curious people, and may even intentionally give misleading answers. But basically, well-known services listening on default ports can be detected with relatively high accuracy. Therefore, in order to increase the safety of the the default port numbers of various services are often changed to an unknown, unique port number, so that they cannot be found by port scanning, or at least make the search operation more difficult.
During the port scanning operation, we only receive information on whether a specific port is open and what service is waiting for connections - in contrast to port checks from the inside, when the active states of the ports (active data communication is taking place on them) can also be distinguished from their listen (monitoring) status, as well as how many threads/channels communication takes place on the active ports, i.e. how many clients are connected to them (e.g. Apache web server, FTP, SSH, etc.)
In the case of external port scanning, we only receive information about the listening ports. Following the operating principle of the commands, this is of course also true for localhost tests, so regardless of whether the command is run on the tested machine or from a remote machine: in both cases, communication takes place via the network interface.
Furthermore, it is also advisable to keep in mind that on the computer or server under investigation a firewall can also work, which, for example, allows connection to certain services, such as SSH or SMTP, etc., from only some IP addresses or domains using a whitelisting method. In this case, if the computer performing the scan is outside of this permitted range, it will not detect these ports or services during the scan.
Of course, we now start from the assumption that we want to check our own server, which does not have such a firewall setting, so we can scan its really open network ports.
Running the examples in this write-up from my desktop machine, the Debian 10 (Buster) Perfect Server 1.0 on the virtual machine's successor, that is On version 1.1 I'll do it because there are already enough services running on this server to demonstrate port scanning with them.
Port scan commands for checking ports from the outside
In another description already we touched on the commands for checking network ports from the outside, now let's see them in more detail, a little closer:
Nmap
Az Nmap command (Network Mapper) is a tool for efficient network discovery and security monitoring. It can also be run as a normal user, but many of its functions can only be used with root privileges, so the following parts here root execute with privileges.
To install it on Debian/Ubuntu systems, run the following command:
sudo apt-get install nmapTCP port scanning
Most of the more well-known services use the TCP protocol, the scanning of which - due to its operating principle - is much faster than that of UDP ports (more on that in another description), so we will first look at the scanning of TCP ports. The following simple nmap command can be used to discover the TCP ports of a remote computer or server:
nmap <hosztnév>By default, the command looks for TCP ports, but you can also give it the -sT with a switch. So the following command gives the same output:
nmap -sT <hosztnév>Let's see how it works! So on my virtual machine:
nmap debian10.linuxportal.vm
Starting Nmap 7.70 ( https://nmap.org ) at 2022-07-19 00:18 CEST
Nmap scan report for debian10.linuxportal.vm (192.168.1.130)
Host is up (0.00041s latency).
Not shown: 985 closed ports
PORT     STATE SERVICE
21/tcp   open  ftp
22/tcp   open  ssh
25/tcp   open  smtp
53/tcp   open  domain
80/tcp   open  http
110/tcp  open  pop3
143/tcp  open  imap
443/tcp  open  https
465/tcp  open  smtps
587/tcp  open  submission
993/tcp  open  imaps
995/tcp  open  pop3s
3306/tcp open  mysql
8080/tcp open  http-proxy
8081/tcp open  blackice-icecap
MAC Address: 08:00:27:4E:95:0C (Oracle VirtualBox virtual NIC)

Nmap done: 1 IP address (1 host up) scanned in 1.60 seconds
The command, as it says in its output, performed the operation in 1.6 seconds. At first you might think that it is very fast, since it checked thousands of ports in less than two seconds. In reality, however, it is not like that, but before we get into that, let's try it for example, we change the port number of our SSH server to another port number, and then run the command again. For the sake of the example, I will now change the port number to 57345 based on the linked description. Of course, we can set it to something else, but I'll stick to my own example. Running the previous command again, our output is:

As we can see here, our SSH port 22 has disappeared from the list of TCP ports. How come you couldn't find the SSH port on the forwarded number? The answer is simple: The nmap program is by default 1000 most popular port numbers and scans their corresponding service per protocol, which is why its default mode of operation is so fast. The list of better-known ports and services is compiled and maintained by the IANA (Internet Assigned Numbers Authority). The list available here. The nmap program is a he makes his own list based on this.
So if nmap does not scan all ports by default, how can we find out the status of ports and services with different port numbers than the default? We can find out about this in the sequel.
Scanning of specified ports and port range
The nmap command can be specified which ports and their range to scan during the operation. The parameter for this is a -p. The command syntax is a -p regarding the use of a switch:
nmap -p <portszám> <hoszt>
nmap -p <portszám>-<portszám> <hoszt>
nmap -p <portszám>,<portszám> <hoszt>
The first example looks at a specific port number, the second looks at a range from to, and the third looks at port numbers listed with commas. Let's see some examples of each!
Scan a specific port
nmap -p 22 debian10.linuxportal.vm
nmap -p 57345 debian10.linuxportal.vm
nmap -p 58000 debian10.linuxportal.vm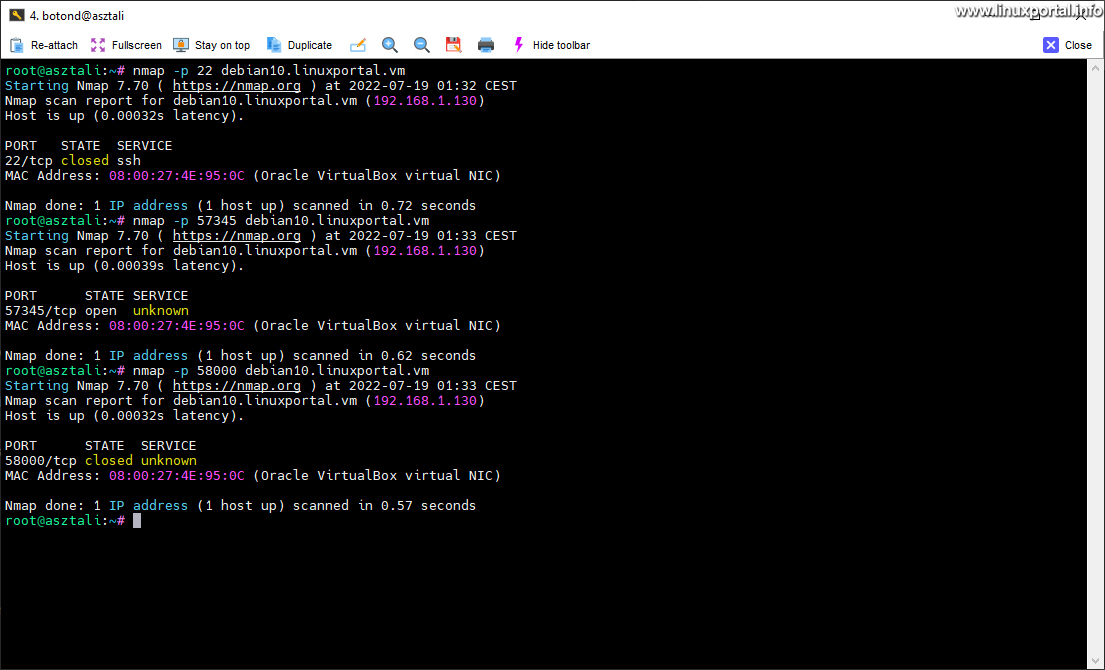
In the first command, I searched for the "missing" port 22. Here it stated that SSH service "would" be here, but the port is closed. So, since I searched for a known port, it listed the well-known service associated with it by default.
In the second example, I searched for my switched port, 57345, and it said that it was open, but there was an unknown service behind it.
- The attacker immediately drops the connection on the default port 22 if he tries there. That's why you resort to port scanning...
- By default, port scanning does not display the switched port, so it has to scan an extended range, which can take a very long time.
- If he finally finds an open port after a long search, since it is an unknown port number, he does not know what service is connected to it, i.e. it does not become clear to him that it is an SSH port. Therefore, it is necessary to ask separately what service is waiting on the found unknown port number. We'll take a look at that as well.
So it is worthwhile to change the port number of network services that are not reserved for the masses on the "consumer side", but for administrative purposes.
In the third example, I searched for an also unknown port number, behind which there is no service. It said that the port is closed and that there is no known service connected to it.
Returning to the second command, if we found an unknown but open port, then the -sV (small s and big V) switch can be used to query which service "lives" on it:
nmap -p 57345 debian10.linuxportal.vm
nmap -p 57345 -sV debian10.linuxportal.vm
Starting Nmap 7.70 ( https://nmap.org ) at 2022-07-19 01:58 CEST
Nmap scan report for debian10.linuxportal.vm (192.168.1.130)
Host is up (0.00035s latency).

PORT      STATE SERVICE VERSION
57345/tcp open  ssh     OpenSSH 7.9p1 Debian 10+deb10u2 (protocol 2.0)
MAC Address: 08:00:27:4E:95:0C (Oracle VirtualBox virtual NIC)
Service Info: OS: Linux; CPE: cpe:/o:linux:linux_kernel

Service detection performed. Please report any incorrect results at https://nmap.org/submit/ .
Nmap done: 1 IP address (1 host up) scanned in 0.89 seconds
First, I simply ran the port query, then with the -sV switch. The switch therefore detected the service on the port and its version, etc.
Port range scan
nmap -p 1-100 debian10.linuxportal.vm
nmap -p 57000-58000 debian10.linuxportal.vm
The first command queries the port numbers from 1 to 100, and in the second we examine a higher range, which also includes our custom SSH port. And their output is:

Of course, it is also possible to scan a port range -sV to detect the services with a switch, but this slows down the operation significantly:
nmap -p 57000-58000 -sV debian10.linuxportal.vm
Here, there is only 1 found (open) port in the retrieved range, but the operation still slowed down from 1.63 seconds to 1.90 seconds. This significantly slows down the speed when scanning a range of several thousand. Therefore, it is more appropriate to simply query the range in the first round, then query the found ports in a list, and then use the -sV switch.
Scan listed ports
nmap -p 22,443,57345,58000,62500 debian10.linuxportal.vm
nmap -p 22,443,57345,58000,62500 -sV debian10.linuxportal.vm
In the first command, we check 22, 443 (HTTPS), our configured SSH port and 2 other ports. In the second command, we scan the same ones, but a -sV switch, we also detect the services behind them. And their output is:

Starting Nmap 7.70 ( https://nmap.org ) at 2022-07-19 02:39 CEST
Nmap scan report for debian10.linuxportal.vm (192.168.1.130)
Host is up (0.00044s latency).

PORT      STATE  SERVICE
22/tcp    closed ssh
443/tcp   open   https
57345/tcp open   unknown
58000/tcp closed unknown
62500/tcp closed unknown
MAC Address: 08:00:27:4E:95:0C (Oracle VirtualBox virtual NIC)

Nmap done: 1 IP address (1 host up) scanned in 0.57 seconds

[...]

Starting Nmap 7.70 ( https://nmap.org ) at 2022-07-19 02:39 CEST
Nmap scan report for debian10.linuxportal.vm (192.168.1.130)
Host is up (0.00041s latency).

PORT      STATE  SERVICE  VERSION
22/tcp    closed ssh
443/tcp   open   ssl/http Apache httpd
57345/tcp open   ssh      OpenSSH 7.9p1 Debian 10+deb10u2 (protocol 2.0)
58000/tcp closed unknown
62500/tcp closed unknown
MAC Address: 08:00:27:4E:95:0C (Oracle VirtualBox virtual NIC)
Service Info: OS: Linux; CPE: cpe:/o:linux:linux_kernel

Service detection performed. Please report any incorrect results at https://nmap.org/submit/ .
Nmap done: 1 IP address (1 host up) scanned in 12.96 seconds
Not much new happened here, only the listing with commas is new.
UDP port scanning
UDP port scanning is performed by the -sU we can do it with a switch and that's it root can be run with authorization. So if you haven't logged in as root before, do it now or use the sudo command.
Staying with my own Debian 10 virtual machine example, scanning UDP ports is therefore:
nmap -sU debian10.linuxportal.vm
Starting Nmap 7.70 ( https://nmap.org ) at 2022-08-09 15:57 CEST
Nmap scan report for debian10.linuxportal.vm (192.168.1.130)
Host is up (0.00039s latency).
Not shown: 999 closed ports
PORT   STATE SERVICE
53/udp open  domain
MAC Address: 08:00:27:4E:95:0C (Oracle VirtualBox virtual NIC)

Nmap done: 1 IP address (1 host up) scanned in 1083.67 seconds
In the case of UDP ports, nmap also examined the 1000 most known ports, among which it found port 53 (domain), which is the DNS intended to provide service. In this case, the Bind9 DNS server takes care of this, which the I installed it on a perfect server before.
Running the example just now takes a lot of time, the reason for this and its remedy will be discussed later.
If we want to look at this port 53 separately and also want to request the recognition of the service behind it, then - similarly to the TCP ports already presented above - run the following commands to retrieve port 1-1:
nmap -sU debian10.linuxportal.vm -p 53
nmap -sUV debian10.linuxportal.vm -p 53
The first command only retrieves the data of the specified port 53 based on the database of known ports, and then with the second command - which only retrieves the -sV adds a switch to the previous one - but we ask that nmap itself tries to find out what service is actually running on this port. As you can see in the picture, the nmap command failed to identify the service based on the received response, so we got a digital fingerprint of the response in the output of the command, which we can send to the nmap developers so that they can expand their database.
What is noticeable even before the results are displayed is the speed of UDP operations. We can also see in the outputs that the very first scanning command did indeed run for 1083 seconds, which is no less than 18 minutes, and the commands that were run after that, to which we gave a port each, also ran much slower than the TCP requests. I mentioned earlier that UDP port scans are much slower than TCP ports, so before we get any further into UDP port scanning, we need to do something about increasing the running speed, i.e. reducing the scan time.
Reduction of scanning time
As we have seen above, the port scanning operation sometimes takes an awful lot of time. Such a situation mostly occurs when scanning UDP ports, but we can also experience a greater slowdown when scanning TCP ports, for example, if the scanning of a wider port range is combined with service detection. Fortunately, there are proven techniques for this as well, but remember that these solutions always come at the expense of something, which is usually related to the accuracy of the obtained result. So, when using the techniques presented here, always consider which is more important: time, or the accuracy of recognizing the port or service you are looking for. So let's see some solutions.
In the following series of examples, let's take the 40-80 UDP port range as a basis, since this also includes our one open UDP port, and it runs for such a long time that it doesn't take much time from us, but the speed increases can still be measured spectacularly with such times.
So the command is as follows:
nmap -sU debian10.linuxportal.vm -p 40-80
Starting Nmap 7.70 ( https://nmap.org ) at 2022-10-20 23:17 CEST
Nmap scan report for debian10.linuxportal.vm (192.168.1.130)
Host is up (0.00039s latency).
Not shown: 40 closed ports
PORT   STATE SERVICE
53/udp open  domain
MAC Address: 08:00:27:4E:95:0C (Oracle VirtualBox virtual NIC)

Nmap done: 1 IP address (1 host up) scanned in 37.40 seconds
So here we query the 40-80 UDP port range, which for me now ran in 37.40 seconds. Of course, you also found our open port 53 in the range.
If we make up for all this one more -vv switch, we get a much more detailed answer:
nmap -sU debian10.linuxportal.vm -p 40-80 -vvStarting Nmap 7.70 ( https://nmap.org ) at 2022-10-21 00:08 CEST
Initiating ARP Ping Scan at 00:08
Scanning debian10.linuxportal.vm (192.168.1.130) [1 port]
Completed ARP Ping Scan at 00:08, 0.22s elapsed (1 total hosts)
Initiating UDP Scan at 00:08
Scanning debian10.linuxportal.vm (192.168.1.130) [41 ports]
Discovered open port 53/udp on 192.168.1.130
Increasing send delay for 192.168.1.130 from 0 to 50 due to max_successful_tryno increase to 4
Increasing send delay for 192.168.1.130 from 50 to 100 due to max_successful_tryno increase to 5
Completed UDP Scan at 00:08, 15.55s elapsed (41 total ports)
Nmap scan report for debian10.linuxportal.vm (192.168.1.130)
Host is up, received arp-response (0.00035s latency).
Scanned at 2022-10-21 00:08:19 CEST for 16s
PORT STATE SERVICE REASON
40/udp open|filtered unknown no-response
41/udp closed graphics port-unreach ttl 64
42/udp closed nameserver port-unreach ttl 64
43/udp closed whois port-unreach ttl 64
44/udp open|filtered mpm-flags no-response
45/udp closed mpm port-unreach ttl 64
46/udp open|filtered mpm-snd no-response
47/udp open|filtered ni-ftp no-response
48/udp closed auditd port-unreach ttl 64
49/udp closed tacacs port-unreach ttl 64
50/udp closed re-mail-ck port-unreach ttl 64
51/udp open|filtered la-maint no-response
52/udp closed xns-time port-unreach ttl 64
53/udp open domain udp-response ttl 64
54/udp closed xns-ch port-unreach ttl 64
55/udp closed isi-gl port-unreach ttl 64
56/udp open|filtered xns-auth no-response
57/udp open|filtered priv-term no-response
58/udp open|filtered xns-mail no-response
59/udp closed priv-file port-unreach ttl 64
60/udp open|filtered unknown no-response
61/udp open|filtered ni-mail no-response
62/udp open|filtered acas no-response
63/udp closed via-ftp port-unreach ttl 64
64/udp open|filtered covia no-response
65/udp open|filtered tacacs-ds no-response
66/udp closed sqlnet port-unreach ttl 64
67/udp closed dhcps port-unreach ttl 64
68/udp open|filtered dhcpc no-response
69/udp open|filtered tftp no-response
70/udp closed gopher port-unreach ttl 64
71/udp closed netrjs-1 port-unreach ttl 64
72/udp closed netrjs-2 port-unreach ttl 64
73/udp closed netrjs-3 port-unreach ttl 64
74/udp open|filtered netrjs-4 no-response
75/udp closed priv-dial port-unreach ttl 64
76/udp closed deos port-unreach ttl 64
77/udp closed priv-rje port-unreach ttl 64
78/udp open|filtered vettcp no-response
79/udp open|filtered finger no-response
80/udp open|filtered http no-response
MAC Address: 08:00:27:4E:95:0C (Oracle VirtualBox virtual NIC)
Read data files from: /usr/bin/../share/nmap
Nmap done: 1 IP address (1 host up) scanned in 15.93 seconds
Raw packets sent: 222 (6.338KB) | Rcvd: 35 (2.428KB)
I've included all of this just for fun, but with this more detailed output, we get a lot of useful information about the nmap port scanning mechanism, which can serve as a good reference for setting the switches shown below. I highlighted the line of the only open port in green.
A detailed description of the states of the ports included in the outputs can be found here. The same in Hungarian read here.
So now - without claiming to be complete - let's see a couple of switches that can be used to shorten the query time, all at the expense of accuracy, of course.
Maximum number of trials (--max-retries switch)
If nmap doesn't get a response during the scan, it will send another attempt. This usually happens when ports are filtered with a firewall or the response is lost on the network, etc. nmap will automatically adjust this value according to the circumstances. For example, depending on network performance or responses received. If necessary, more attempts will give a more accurate result, but this is at the expense of performance. nmap normally repeats a test only once, but increases the number of times when necessary. The default maximum number of trials is 10, so if you do not change this value, you can repeat a trial the maximum number of times. If performance is the main consideration, this value can be set lower. So if, for example, the network performance is bad or nmap gets uncertain answers, it will try several times, so in these cases we can improve the performance.
Let's try setting a value of 5 and see the result of scanning our previous UDP port range:
nmap -sU debian10.linuxportal.vm -p 40-80 -vv --max-retries 5
Here we can see that we got the same result, but this time the port scan ran for around 13 seconds, which is almost 1/3 the running time.
We can also see a line like this in the output:
Warning: 192.168.1.130 giving up on port because retransmission cap hit (5).
This indicated that nmap had "given up" trying to scan a port in the range because it had reached the maximum number of attempts.
Of course, we could lower this limit, but at lower values we get a more imprecise output.
Limiting the delay time between trials (--scan-delay and --max-scan-delay switches)
With the help of switches, we can control how long nmap waits between sent tests. It is particularly useful for servers with controlled traffic, because for example there are destinations that only send one response per second to UDP scan attempts. All further sent trials are then lost. If we do not define these values, then - as can be clearly seen in the above outputs - nmap automatically adjusts them depending on the circumstances. This is indicated in the outputs by lines beginning with "Increasing send delay", where the set new delay time appears.
Setting these values too low will result in many lost trials, causing nmap to increase the number of trials. Therefore, it is necessary to set an optimal value and/or it is advisable to combine it with limiting the number of trials.
In this example, we will now try a fairly low value band (between 50 and 100 ms) and see what happens:
nmap -sU debian10.linuxportal.vm -p 40-80 -vv --scan-delay 50ms --max-scan-delay 100ms
Here we can see that compared to our original port scan, this also ran much faster, here the operation took 24.49 seconds compared to the original 36 seconds.
Using a timing template (-T switch)
The previously mentioned switches - and, of course, many other switches that we did not mention here - can all be used effectively, however, many users prefer to be able to access their settings with different templates, so that there is no need to fiddle with the optimal setting of the parameters, which is often it takes more time than the port scan operation itself. nmap is a -T switch offers 6 timing templates, each with a different setting profile. The 6 templates are as follows:
- Paranoid
- Sneaky
- polite
- Normal - this is also the default
- Aggressive
- Insane
-T3 specifying a parameter does not cause any changes. Aggressive mode speeds up the scan assuming you are using a fast and reliable network. Finally, crazy mode assumes you're using a particularly fast network and are willing to sacrifice some accuracy for speed. (source: nmap.org)It's worth experimenting with these, but keep in mind that the lower modes take much longer to scan ports. In the example below, we can see mode 4, i.e. aggressive mode, on our usual UDP port range:
nmap -sU debian10.linuxportal.vm -p 40-80 -vv -T 4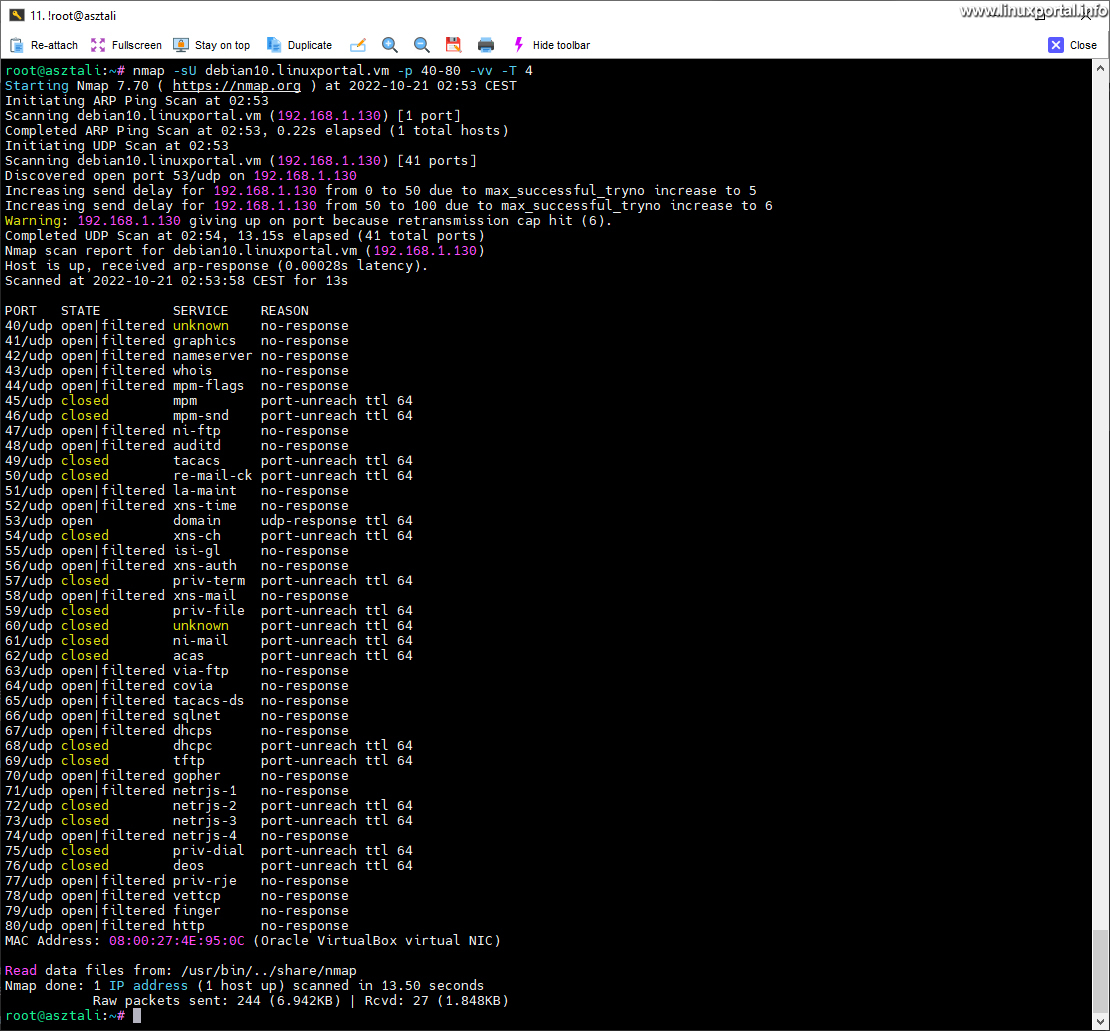
In the example, the port scan was completed in 14 seconds, which is also much faster than it was during our initial operation. Here, it is worth starting from the maximum value of 5, which already gave inaccurate results for me, and work your way down. For me, the lower values on this virtual server ran for a very long time, so I interrupted the operation. This setting of 5 gave the same speed and the same result on the same UDP port range.
If you are using a decent broadband or ethernet connection, it is recommended to use the -T4 parameter permanently. Some people like to use the -T5 parameter, but this can be too aggressive in many cases. Some people like to use the -T2 parameter because they think they are less likely to destroy the target, or because they think of themselves as generally polite people. However, they often don't realize how slow -Tpolite really is. This scan can be ten times longer than a default analysis. The default timing (-T3) rarely causes crashes or bandwidth issues, so it's best to use it for vatoss scans. To reduce these problems, it is much more suitable to leave the version detection than to adjust the timing parameters. (source: nmap.org)
Of course, apart from these switches, there are many others that deal with speed optimization, I have only presented a few of them here for the sake of illustration. You can read more about these switches here:
- nmap.org - Timing and performance (English version)
- nmap.org - Timing and performance (English version)
The description of the commands that can be used for port scanning is not over yet, a next page we continue with the description of Ncat (OpenBSD and Tradicional implementations),
- How can we check the used and free TCP/UDP ports of our Debian or Ubuntu Linux operating system?
- How can we change the default tcp port 22 of our SSH server on our Debian or Ubuntu Linux server for better security?
- Manual page - socket (2)
- Manual page - nmap
- nmap.org
- nmap.org - Nmap Reference Guide (Manual) (Hungarian)
Navigation
- To post registration and login required
- 419 views