
3. page content
- page: Installing the base system and ISPConfig and checking the installed services
- page: Create and set primary web account, email account, DNS zone, domain name redirection
- page: Checking web interfaces, requesting and installing PTR records and SSLs, troubleshooting
Content
Continuation
Az previous page we created the server's primary web account, email account and DNS zone, then we used one external name server service, we finally redirected the domain's name servers to our own server. On this page, we check the web services and other components running on the server, then we set up Let's Encrypt SSL-certificates for the control panel and the necessary services, as well as for the websites. Finally, we perform a few more fine-tuning tasks and eliminate any problems that may arise.
Restore hosts file
Once we have made sure that our domain name has really been updated everywhere on the nameservers IP addresses - which we can even check with our mobile phone with the help of various network applications from our own Wi-Fi and mobile Internet networks, to see if this is the case with us - then we can restore our hosts file. You can either delete the lines set at the beginning of the description, or temporarily comment them with # characters, and then save them.
Control of web interfaces
Initial potential DNS errors
If we removed the lines from the hosts file, temporary errors may occur at first:

It gives this error:
DNS_PROBE_FINISHED_NXDOMAIN
If this happens, you don't have to be scared, you just have to wait until the DNS cache of your computer is rebuilt with the latest data. We can speed this up by clearing the DNS cache. On Windows systems, for example, it is ipconfig / flushdns command should be issued several times, so Windows will take over the newer data sooner.
But by the time I wrote this, just enough time had passed that now, when I tried these interfaces again, they already work:
ISPConfig

Az ISPConfig ok
phpMyAdmin

A phpMyAdmin also works. Although it throws an error message:
A $cfg ['TempDir'] (/var/lib/phpmyadmin/tmp 1) nem elérhető. A phpMyAdmin nem képes a sablonok elrejtésére és lassú lesz.
This is of course not an error related to this, which is explained below rootissued as chown we can fix it with the command:
chown -R www-data:www-data /var/lib/phpmyadminThen update:

This is the one above chown command is now only a temporary "patching", because later ISPConfig will reset it again and this error message will appear again, so we will come back to this problem separately and fix it with a permanent solution.
Roundcube Webmail

Roundcube Webmail also works. Now, however, we have a working email address with which we can test the webmail program:

The particularly good news here is that several things passed the test at the same time based on the image:
- Webmail works
- Monit works, including its notification function
- Sending mail (SMTP) works on the server
- Mail reception also works on the server, i.e. Dovecot IMAP our server also thanks you, you feel good.
As you can see, this server has been working for me since Sunday (4 days ago), during which time Monit also had time to collect some data.
Monit
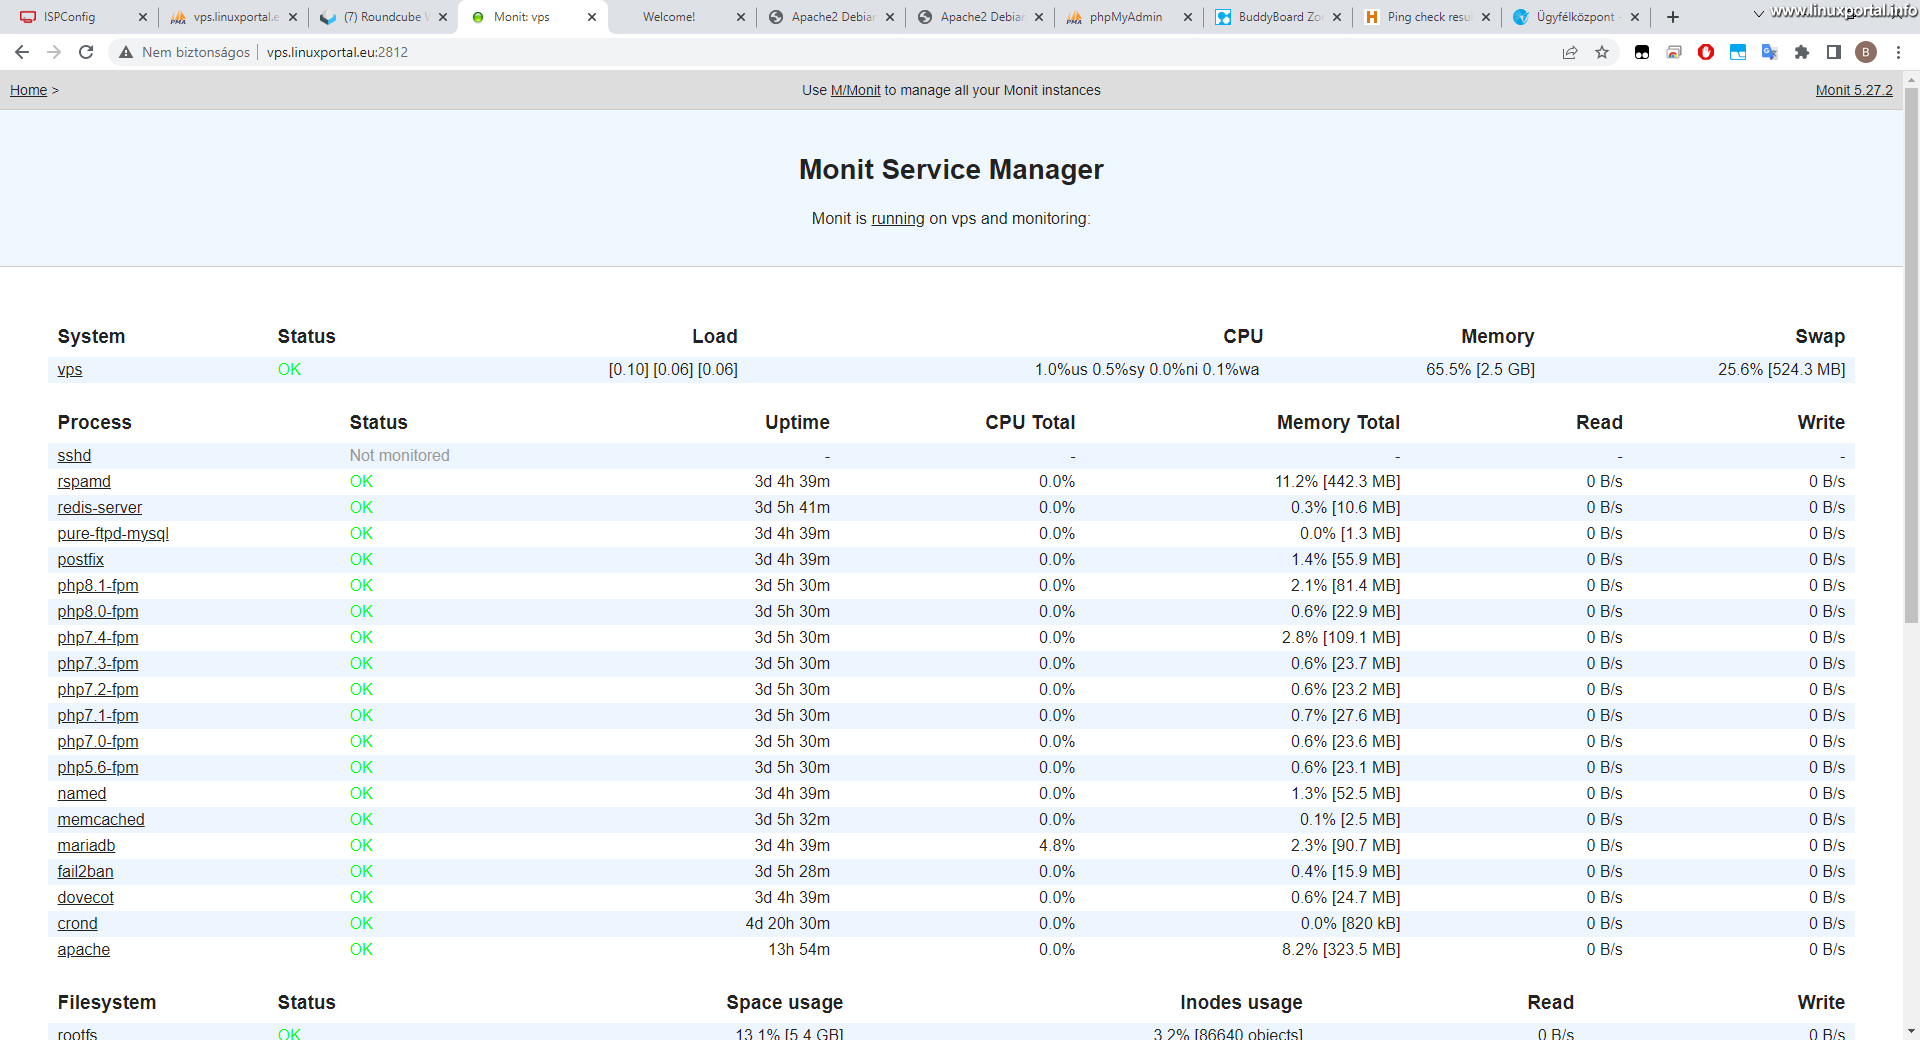
Monitor works too.
Website

And the "website" works too.
Set PTR record
If all name servers have already been updated, i.e. our server is also accessible from the outside world, and the services on it, then set the PTR record. This primarily serves to ensure that correspondence works smoothly and that letters sent from our server do not end up in spam folders.
To set this up, visit our service provider and ask them to set up our full hostname (FQDN) as a PTR record of our IP address. In this example, I have this a vps.linuxportal.eu. For this, we have previously set the necessary "A" record in the DNS section, so we have nothing else to do with it, just ask our service provider to set it up. There are hosting providers that provide a separate interface for this, so we can make this setting ourselves. If there is an error in this connection, or if we get stuck with setting it up, ask our service provider for advice.
Setting up SSL certificates
Secure with SSL certificates HTTPS protocol to access our websites and other web services. Free SSL certificates are available from Let's Encrypt CA (Certificate Authority) will be issued to us, and acme.sh will automatically retrieve and set it ACME will be done by the client.
We will now set up two certificates on our server, let's see their process!
Configure SSL for ISPConfig control panel and main services
First of all, we will protect our ISPConfig control panel with an SSL certificate, and we will chain this certificate to other services as well.
I already wrote a description about this before, which was specifically about this part:
However, the execution of this task no longer requires manual intervention, but the update script of ISPConfig will do it for us, so let's consider this previous description as a study of what the current update script does in the background.
Update ISPConfig Control Panel a --force switch
I also made tutorials on updating the ISPConfig control panel before, you can find them here:
So we discussed updating the panel earlier, now we will essentially do the same thing, only a --force using a switch.
So let's keep running rootas the following command:
ispconfig_update.sh --forceWhile running the script in another terminal window a tail I follow it with a command acme.sh his diary a /var/log/ispconfig/acme.log file so that I can see live what is happening in the background around the SSL request:
tail -f /var/log/ispconfig/acme.logThe benefit of this is that any error that occurs in connection with the issuance and configuration of the certificate, we receive information about it here firsthand. Also, in normal cases, we can find out about success here for the first time.
Then come the questions of the update script:
Select update method (stable,nightly,git-develop) [stable]:

Let's press here ENTERt.
I'll put the next couple of questions together, highlighting the things / actions to be completed in green at the end, so we don't make this part too long, and then I'll go into more detail about the more important SSL parts:
Shall the script create a ISPConfig backup in /var/backup/ now? (yes,no) [yes]: [ENTER]
Reconfigure Permissions in master database? (yes,no) [no]: [ENTER]
Reconfigure Services? (yes,no,selected) [yes]: [ENTER]
ISPConfig Port [8080]: Itt célszerű egyedi portszámot beállítani a nagyobb biztonság érdekében, de ebben a leírásban én most ezen hagyom, tehát [ENTER]
Create new ISPConfig SSL certificate (yes,no) [no]: yes [ENTER]

And here comes the point, so here ISPConfig will request a new SSL certificate, which it will do in the first round with Let's Encrypt, and if it fails there for some reason, it will generate a self-signed copy as a fallback. But now that we have everything set up so far, this should not be an obstacle now. So, enter "yes" here.

And the SSL request process has started. Here, of course, he "rolled" the diary a bit longer, here only the bottom is visible, but what it still shows is that he managed to issue the certificate to the vps.linuxportal.eu FQDN and copied the /usr/local/ispconfig/interface/ssl/ directory from which ISPConfig and several other services will use it.
In the meantime, viewing in a third window, he neatly put the files in their place and made a backup copy of the previous, self-signed certificate:

Of course, our control panel still works with the self-signed certificate in memory, it still needs an Apache restart for the new files to take effect. But we don't have to deal with this, the update script will do this at the end, so let's move on.
The following installation question will appear:
Symlink ISPConfig SSL certs to Postfix? (y,n) [y]: [ENTER]
Symlink ISPConfig SSL certs to Pure-FTPd? Creating dhparam file may take some time. (y,n) [y]: [ENTER]
Reconfigure Crontab? (yes,no) [yes]: [ENTER]
Here at the first one Postfixchain the SSL to and then to Pure-FTPd. Then the update is ready:

The list of issued SSL certificates can be queried with the acme.sh command:
acme.sh --list
So here you can see that there is already one vps.linuxportal.eu our certificate issued in the name But apart from that, there is still no www or plain domain name version without it. So now we can only access things with full hostname (FQDN) access via HTTPS connection.
Once we're done with that, we can also check our web stuff.
SSL certificate verification on web applications
Chrome stubbornly "remembers" the SSL status, so the red indicator remains for some time. And often even deleting the SSL cache or restarting the browser does not help. But once in a while he thinks and disappears. This might be a bug in Chrome. However, if we open the details of the certificate, it shows well, so the pages are already loaded with the new certificate, but the red mark remains.
To avoid this small and temporary beauty flaw, I now open these web interfaces from an incognito window, where everything starts with a completely clean slate. But, of course, you can also open it from another browser, only in Chrome you can see both the opened page and the certificate data.
ISPConfig

As you can see, the panel comes in nicely with the fresh and crisp SSL. The browser even stored the password for it (of course, it is a different matter that it deletes everything after closing the incognito window).
phpMyAdmin

Two more details are worth mentioning here:
The ISPConfig control panel can be accessed by default on port 8080, and the web applications - including phpMyAdmin - on port 8081, if we want to access them with the full host name (e.g. vps.linuxportal.eu:8081/phpmyadmin). It will also be available later from any website starting with www, if SSL is requested and configured for them as well. But there is currently no certificate for the www subdomain, that will be set up later. The use of port 8081 is ensured by the Apache apps configuration so that web applications can be accessed via HTTPS, regardless of the fact that, for example, no certificates have yet been issued for websites, as is the case now. But we will discuss this in more detail in another description.
The other small thing is the small phpMyAdmin error that has already been corrected above, which has now reappeared. We will fix this permanently in another description, as I mentioned above. As soon as this description is ready, I will link it here.
Postfix Webmail

This is also fine, it works fine on port 8081 with the new SSL. In the meantime, Monit sends notifications. As we can see, a Fail2Ban already collects IP addresses. We will even set this up in another description.
Monit

Monit's web interface is currently unavailable, throwing an error "ERR_SSL_PROTOCOL_ERROR". This is because fully qualified hostname (FQDN) access (vps.linuxportal.eu) SSL is already configured, so it would work with it by default, but Monit works on its own unique port 2812, where a simple HTTP connection is configured. Thus, these two protocol directives conflict. The setting of this can be seen at the end in the troubleshooting and fine-tuning section.
We hope that in time this SSL setting/re-chaining will also be included in the ISPConfig update script, and then it will be one less hassle.
Website
And finally comes our little green welcome panel called the website:

Of course, this still doesn't work either, since, as I mentioned above, SSL must be requested separately for the website, regardless of whether it is our primary website or our web hosting, this must be set separately for each website. This will continue with the next section.
Setting up SSL for the first web page
As I just mentioned, it doesn't matter which website it is, i.e. the first/primary one or the second one, the settings must be made the same for all of them, but since this is really our first website, that's why I gave this title to this section.
To set up SSL, go to their ISPConfig control panel as an admin, then go to sites to the main menu, the Websites sub-menu immediately appears with a list of websites:

Go to the website you want to set up, then check the SSL and Let's Encrypt checkboxes together:

Then save it and wait until the red circle from above disappears.
Also, set the rewrite to HTTPS function to load the page only with HTTPS. To do this, open the website settings again, then go to the redirection tab. A new option appears here that was not there before: "Rewrite HTTP to HTTPS". We mark this:

Then if we also look into the log of acme.sh:

and we also query the list of SSLs, we now have two certificates here:
- linuxportal.eu, www.linuxportal.eu, vps.linuxportal.eu
- vps.linuxportal.eu
The point here is that a vps.linuxportal.eu is included in both certificates. What we requested earlier authenticates the ISPConfig control panel on port 8080 (or what we set when installing the upgrade) and authenticates web applications on port 8081 (this is the local Apache configuration of the server, and the certificate does not include the ports , so this is not to be confused). And the certificate requested is for the website itself, so linuxportal.eu, www.linuxportal.eu and vps.linuxportal.eu.

And as we can see, the time of issue is also different from that of the first requested certificate. Of course, this is also clearly visible in the list retrieved in the terminal.
Thus, the SSL protection on the server is now complete.
Troubleshooting and fine-tuning
In this chapter, we will review some errors, their corrections, and fine-tuning settings, which I will prepare in separate tutorials, because they deserve a separate description due to their topic and this will not be made too long.
I will expand this section later, when I complete a new add-on.
Set default website
The server does not respond to some URL accesses as expected. So, for example, if you try to access the server with its IP address in the web browser, the expected content is not displayed, but, for example, the Apache2 Debian Default Page or, in the case of HTTPS, the website at the top of the name list. These URLs are as follows:
https://vps.linuxportal.eu/
http://178.238.208.205/
https://178.238.208.205/
Of course, substitute your own host name, domain name, and IP address here.
We solve this problem in the description below:
Monit setting and fine-tuning
The use of SSL still needs to be set up in the Monit service monitoring system, and we will also make some settings and fine-tuning in it.
We make these settings in the description below
Repair and optimization of phpMyAdmin error
phpMyadmin still contains a small error, which will be corrected in the soon-to-be-completed description.
Conclusion
So this would be a perfect Debian 11 (Bullseye) server installation from start to finish, all done on a production server. In this way, I hope I was able to provide useful and interesting information to all those who want to install a similar server for themselves.
- How to secure our ISPConfig3 control panel and key services with free Let's Encrypt SSL
- How to set the default website on our ISPConfig server so that the Apache2 Debian Default page is not loaded when accessing the server's IP address or full hostname
- Server monitoring with Monit on Debian and Ubuntu systems
- Encyclopedia - DNS (Domain Name System)
- Encyclopedia - ISPConfig
- Encyclopedia - Web Hosting Control Panel
- Encyclopedia - phpMyAdmin
- Encyclopedia - Roundcube
- Encyclopedia - PTR record
- Encyclopedia - SSL (Secure Sockets Layer)
- Manual page - acme.sh
Navigation
- To post registration and login required
- 71 views