Content
Introductory
One is great for running your own websites, web development, creating a test environment, or practicing LAMP server quick compilation. However, to host client websites, I would prefer a more serious server configuration, such as a perfect server configuration for Debian to 8 or the Debian to 9.
In this description, we will install a very simple LAMP server on a Debian 8 (Jessie) operating system, which will include the following components:
- Apache 2.4.10
- MySQL 5.5.62
- PHP 5.6.x
- phpMyAdmin 4.2.12
All of these components are installed from the official Debian repositories in the versions indicated above. This way, you can update packages later centrally APT package manager It helps.
I will label this Debian 8 (Jessie) LAMP installation with the 1.0 version as we will be adding many more plugins later to make it even more useful and efficient.
Debian 8 (Jessie) archived on March 2019, 20 nem LTS libraries so they no longer receive updates.
Therefore, it is highly recommended to install Debian 9 (Stretch) when building a new server! Instead, this description is for reference only.
A The Debian 9 (Stretch) version of the LAMP server installation description can be viewed here.
Of course, it can also be installed on a desktop computer with a graphical environment; the important thing is that the above components are now first installed on the machine for proper configuration and operation.
System Update
First, log in to the server as root, then update the Debian packages as usual. apt-get command:
apt-get update
apt-get upgrade
Installing MySQL
Install MySQL with the following command:
apt-get -y install mysql-server mysql-clientA dialog will appear during installation:

You will need to enter a root password and ask for confirmation.
Install Apache2
Install the Apache2 web server:
apt-get -y install apache2You can also test how it works by typing in a browser to access the server (at my 192.168.1.120 IP address):

The default webroot directory is a / Var / www / html. So by default this is one virtualhoszt is configured during installation, whose configuration file is located here: /etc/apache2/sites-enabled/000-default.conf.
The Apache2 configuration file is: /etc/apache2/apache2.conf.
Installing PHP 5.6
The official PHP version shipped with Debian 8 is 5.6. To install it as an Apache module, use the following command:
apt-get -y install php5 libapache2-mod-php5We will add many more things to this server later, including Installing and deploying PHP-FPM is.
Then restart Apache:
service apache2 restartThen we can check PHP:
php --versionPHP 5.6.39-0+deb8u1 (cli) (built: Dec 16 2018 21:56:53)
Copyright (c) 1997-2016 The PHP Group
Zend Engine v2.6.0, Copyright (c) 1998-2016 Zend Technologies
with Zend OPcache v7.0.6-dev, Copyright (c) 1999-2016, by Zend Technologies
Database support and installation of additional modules
In order to use PHP from the database, we need to add another package:
apt-get install php5-mysqlndAfter installation, phpinfo already shows MySQL support:
php --info | grep "MySQL"MySQL Support => enabled PDO Driver for MySQL => enabled
Then look at the list of available PHP modules in apt-cache command:
apt-cache search php5-Here is a long list of PHP plugins we need.
For general PHP usage, you should install this assembly:
apt-get -y install \
    php5-apcu \
    php5-imagick \
    php5-intl \
    php5-json \
    php5-memcache \
    php5-curl \
    php5-gd \
    php5-imap \
    php5-mcrypt \
    php5-pspell \
    php-pear \
    php5-xmlrpc
It includes everything important, but of course you can install any package you need.
Let's restart Apache again:
service apache2 restartPHP control
Go to the webroot directory and create a php file:
cd /var/www/html/
nano phpinfo.php
Add the following content and save it:
<?php
    phpinfo();
?>
Next, load the file from the web root into your browser:
http://192.168.1.120/phpinfo.php
Installing phpMyAdmin
Only the good old phpMyAdmin is installed, which has a convenient interface to efficiently work with databases. To install it, enter the following command:
apt-get -y install phpmyadminHere are some questions you might encounter during installation:
We need to select a web server to host the phpMyAdmin interface:

Here, of course, select apache2 and then OK.
The following panel asks if you want to automatically configure your own phpMyAdmin database for you:

Select Yes.
You will then be prompted for the root password (specified during MySQL installation):
Give it to him.
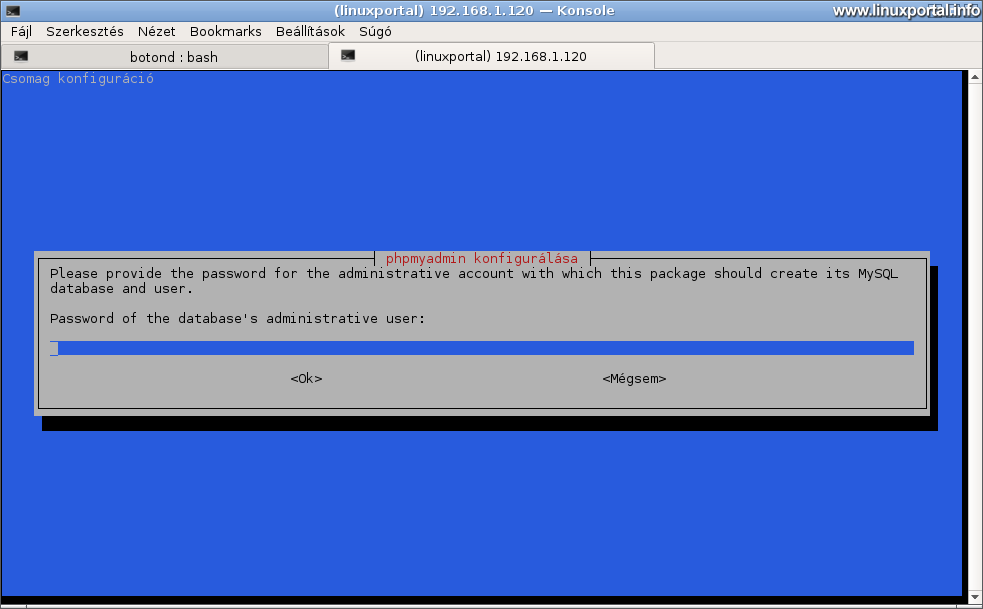
You will then be prompted for another password that the phpMyAdmin control user will work with:

With this user, phpMyAdmin performs background maintenance, structure synchronization, etc., so we won't have to deal with it. This way we can press an enter, it will generate its own password for you.
We are done with that.
Enter phpMyAdmin with your browser a http://<IP-cím>/phpmyadmin Loading Address:

Since we only have root, let's log in with:

And a flawless phpMyAdmin interface welcomes us waiting for us to start working on it.
Download virtual machine
Conclusion
So here is a completely basic LAMP web server that can now run any PHP and MySQL based website.
We will continue to work on it gradually to become a more useful and efficient server.
- Encyclopedia - LAMP Systems
- Installing Debian 9 (Stretch) LAMP Server v1.0
- Installing Debian 10 (Buster) LAMP Server v1.0
- Install v18.04 on the Ubuntu 1.0 LTS (Bionic Beaver) LAMP Server
- Install Ubuntu 20.04 LTS (Focal Fossa) LAMP Server v1.0
- Debian 11 (Bullseye) LAMP server v1.0 installation
- wiki.debian.org - LaMp
- howtoforge.com - Debian 8 Jessie LAMP server tutorial with Apache 2, PHP 5 and MariaDB (instead of MySQL)
- How to enable external access to user web directories in Apache2
- How to install PHP-FPM on a Debian 8 (Jessie) LAMP server
- Perfect server: Debian 8 (Jessie) V1.0
- Perfect server: Debian 9 (stretch) V1.0
- Perfect server: Debian 11 (Bullseye) v1.0
- Install a minimum server for Ubuntu 18.04 LTS (Bionic Beaver)
- To post registration and login required
- 233 views