Content
Introductory
A LAMP and other more complex servers phpMyAdmin, which allows us to conveniently manage our databases on a web interface. In the official repository of Debian 10 (Buster) before phpMyAdmin was not available web database management interface installation package. So when the Debian 10 LAMP server installation description I made it then had to be installed manually. Since then, however, Debian has made it available in the backports repository at phpMyAdmin package. In this description, in addition to the previous Debian 10 (Buster) LAMP server installation description, we will install our favorite web database manager from the backports repository, among other things, following the changes that have taken place in the meantime.
This guide covers two scenarios that are realistic and useful when installing / maintaining Debian 10 servers:
- Installing the latest phpMyAdmin from the Debian 10 (Buster) backports repository (installing a new server)
- Manually update manually installed phpMyAdmin with the latest version - Retaining databases and settings (maintenance of previously installed server)
Installing phpMyAdmin from the Debian 10 (Buster) Backports repository
If you are installing a new server and came from the Debian 10 (Buster) LAMP installation guide, you can also install phpMyAdmin from the backports repository so that your database manager will update automatically. If you do not want to use the backports container, continue installing the LAMP server at by manually installing phpMyAdmin.
Prerequisites
In the following, therefore, we assume that a MySQL / MariaDB, database server, Apache web server and PHP 7.3 is already installed on the machine, followed by phpMyAdmin, which we will now install from the Debian backports repository.
The Debian Backports repository
Before we decide for sure that this is the right installation method for us, let's say a few words about the Debian Backports repository.
In the Debian Backports repository, you can access packages that are newer than those in the stable release, or even not included in the stable release at all. Packages in the backports repository are not as extensively tested as those in the stable release of Debian, so they may be incompatible with other components of the system and may pose a security risk to the system as a whole. Therefore, use with caution is recommended!
More details can be found here at Debian Backports repositories and their use.
Backports storage setting
To set the repository as root, open for editing / Etc / apt / sources.list file:
nano /etc/apt/sources.listThen add the following line to the end:
deb http://deb.debian.org/debian buster-backports main
Update the package store database:
apt-get updateInstalling from the phpMyAdmin package
Install the phpMyAdmin package. As you can see, we get version 5.0.4, this is currently the latest version. Run the following command:
apt-get install phpmyadmin -t buster-backports
APT will then compile a list of standard dependencies and then list the required and recommended packages selected for installation. Proceed here with the answer "I".
Configure phpMyAdmin - Select a web server
When installing from a package, the system sets us up for the right things - as opposed to manual installation, where we had to set everything up. First, you ask what kind of web server we use:

Here you select your web server. In this case, this is "apache2", then move on.
Configuring phpMyAdmin - using dbconfig-common
Then, after a further installation, in the following dialog, you will be asked if you need your own database to run phpMyAdmin and whether you want to configure the phpMyAdmin automatically dbconfig-common via:

Choose yes here.
You will then be prompted for another password that the phpMyAdmin control user will work with:

With this user, phpMyAdmin does the background maintenance, structure synchronizations, etc., so we won't have to deal with it. So press an enter to do this to generate your own password.
The installation is now complete.
Allow root access
On first use, phpMyAdmin does not allow root access. If we try to log in, we get an error:

For security reasons, this is disabled, so if we want to be able to log in as root, we need to allow it. This can be done using a MySQL command.
When installing the Debian 10 LAMP server when installing MySQL / MariaDB we set the defaults file, you can run MySQL commands as root without entering the password, so in this case run the following command:
echo "UPDATE mysql.user SET plugin = 'mysql_native_password' WHERE user = 'root' AND plugin = 'unix_socket';FLUSH PRIVILEGES;" | mysql --defaults-file=/etc/mysql/debian.cnfIf you did not set the defaults file, run the same MySQL command by typing the password:
echo "UPDATE mysql.user SET plugin = 'mysql_native_password' WHERE user = 'root' AND plugin = 'unix_socket';FLUSH PRIVILEGES;" | mysql -u root -pHere we did the same thing as for the manual installation version also, just now on a command line.
Testing
Then repeat the login as root:


Here you can also see the different parameters of our server, as well as our version of phpMyAdmin (Version number: 5.0.4deb2 ~ bpo10 + 1), which also shows that it comes from the backports repository. So we no longer have to worry about updates either.
Manually update a manually installed instance of phpMyAdmin
If you have previously installed Debian 10 (Buster) on your server manually using the phpMyAdmin database management system, then we also have to solve it ourselves. So in this chapter we will perform this update operation so that our database manager can still be up to date.
Prerequisites
This upgrade guide is only compatible with the manually installed instances of phpMyAdmin mentioned here, so if you have previously installed the database manager according to another description, there may be other configuration needs for it to work properly!
Entering the current phpMyAdmin interface, we can check the version number:

This is even the older version 4.9.1 I put on the LAMP server and has been on it ever since. Also write that there is a newer version, z 5.0.4. So it's ripe for the upgrade.
Back up
First, back up your current copy of phpMyAdmin so that we can restore it if any problems occur. For this rootrun the following command as:
mv /usr/share/phpmyadmin/ /usr/share/phpmyadmin_bakAt the same time, we removed the original directory, where the files of the new instance will be placed.
Download and unpack
RootIf you remain as, re-create the directory and enter it:
mkdir /usr/share/phpmyadmin/
cd /usr/share/phpmyadmin/
A phpMyAdmin official download site scrolling down we find a section called "Latest Stable Version". Find the link "phpMyAdmin-latest-all-languages.tar.gz" here. This will allow us to download the latest stable version at all times. Copy the URL, then download it to the current directory and extract it:
wget https://www.phpmyadmin.net/downloads/phpMyAdmin-latest-all-languages.tar.gz
tar -xzf phpMyAdmin-latest-all-languages.tar.gz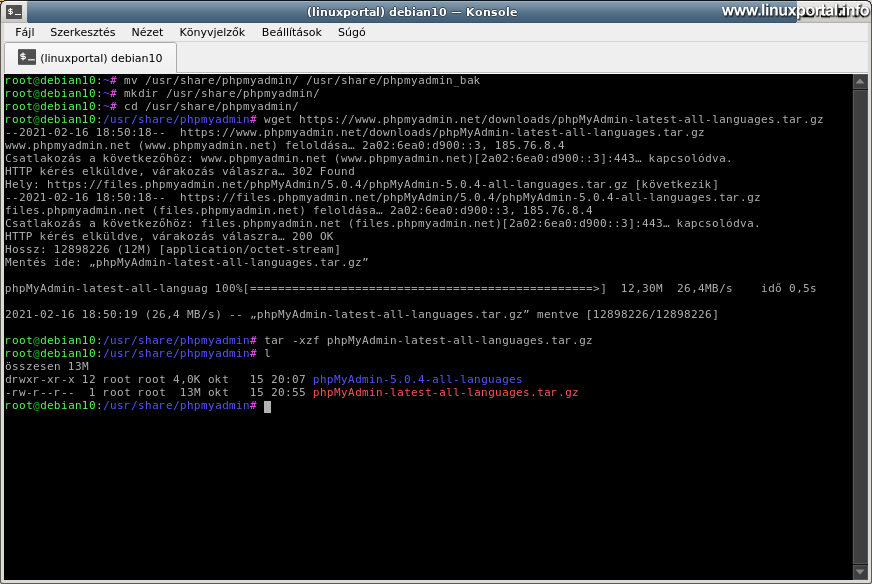
So for me at the time of writing, version 5.0.4 is the latest.
Move the files from the extracted subdirectory to their location:
mv phpMyAdmin-5.0.4-all-languages/* .When using the current directory (.), Make sure that you are in the correct directory before running the command.
Reset my settings
After downloading a brand new phpMyAdmin package, we now need to reset our own settings. These settings are the same as before During the installation of phpMyAdmin, we did it in the config.inc.php file, so we need to copy this back from the backup. THE / usr / share / phpmyadmin / while remaining in the directory, run the following command:
cp /usr/share/phpmyadmin_bak/config.inc.php .So our previously configured stuff will be restored in this fresh version as well.
After copying the config.inc.php file, it is a good idea to run through the new package /usr/share/phpmyadmin/config.sample.inc.php file, if it contains anything different from our file, we copy it into our own (apart from our own modifications, of course). There are currently no important differences between the old and the new file, but there may be changes in later versions that we also need to track in our own config.inc.php file.
Update database structure
Sometimes the structure of the phpMyAdmin database also changes from one version to another, so we also need to check this for each update to see if such a change has taken place. Go to the phpMyAdmin sql directory and look in it:
cd /usr/share/phpmyadmin/sql
ls -al

Here are some files, including the first one already run during the manual installation of phpMyAdmin create_tables.sql file, which created the basic database structure for us.
The point here is that if we find an SQL file here that ends up with a version number that falls between our previous and newly downloaded versions of phpMyAdmin, we need to run it. Because after a manual update, versions may be omitted, as they are now, so the SQL file may have been created to update an intermediate version. If you find more than one of these files, run them in order of version.
SQL files can be run in the same way as when creating tables when installing is.
In this case, this package does not currently contain an SQL file that we should run, so we have no further action to do here.
Check phpMyAdmin
When you're done, go to the interface as root:

In the lower right panel you can see the current latest (5.0.4) version number, and there are no errors at the bottom of the page either, so the update was successful without any errors.
Cleaning
If we looked around the interface in more detail and found everything to be fine, we can remove the unnecessary things:
rm -rf /usr/share/phpmyadmin_bak
Conclusion
So this would be in addition to the phpMyAdmin installation description for Debian 10 (Buster) servers, where you can install phpMyAdmin from the Debian 10 Backports repository, but if you have previously installed it manually, you will also learn how to upgrade to the latest version. This way, with Debian 10 installations, everyone can decide which method is best for them.
- To post registration and login required
- 152 views