
Content
- page: Overview of basic terms and preparation for Matomo hosting
- page: Download and install Matomo
- page: Placing tracking code on WordPress pages
- page: Placing tracking code on Drupal pages
- page: Placing and customizing tracking code on custom pages
- page: Make important settings after installation
- page: Installation of GeoIP 2 (PHP) based geolocation system
- page: Matomo migration of a complete system to PHP-FPM based server API operation
8. page content
- Continuation
- basic Requirements
- versions
- Advanced PHP-FPM Configuration
- Geolocation settings (optional)
- Testing Matomo
- Conclusion
- Navigation
Continuation
Az previous page we have launched the Matomo (Piwik) geolocation system, and on this last page, we’re moving storage to be faster, more efficient, and more secure PHP-FPM server API based operation.
When making the description, my primary consideration was to make this guide as widely available as possible, so I was in a lot of dilemmas at the beginning about how to build it. On the one hand, the goal was to make this installation work on every server I made - so PHP-FPM-free On LAMP servers on the other hand, I definitely wanted to include this part, because I think that using PHP-FPM is now basic, almost mandatory. I also thought of going through both lines in parallel (as an Apache module and with PHP-FPM at the same time), but then I discarded the idea because it would have been too complicated to describe the whole thing and there would have been a lot of room for error between the two versions. back during jumping. Therefore, I decided to put it on the last page of this description as an add-on, which only contains the modifications and additions based on the settings made so far. Even so, variations remained on this part (e.g. PHP versions, default, or custom PHP), but these will be discussed below ...
So this section is optional, but definitely recommended for those who are more nervous :) and want to get the most out of the performance and efficiency of their server and make their Matomo system run faster.
basic Requirements
The basic condition for migrating Matomo to PHP-FPM is that you have completed at least pages 1 and 2 of the description, and that one of the following is true:
- In the beginning, we chose one of the perfect servers to start with, which already includes PHP-FPM. In this case, we can jump on.
- If we started with a LAMP server we already have we have installed PHP-FPM similar to this description. In this case we can continue to jump.
- If you are starting with a LAMP server that does not already have PHP-FPM installed, then we will complete the following brief addition.
Quick installation of PHP-FPM
We do the following as root!
First, update the our luggage and our packages:
apt-get update
apt-get -y upgrade
Then install the required packages:
For PHP 5 (eg Debian 8):
apt-get -y install php5-fpmStart the service a systemctl command:
systemctl start php5-fpm.serviceFor PHP 7.x (eg Debian 9, Debian 10, Ubuntu 18.04):
Let's find it in our package for our own version of PHP 7.x is apt-cache command:
apt-cache search "php7" | grep "fpm"To do this, release the appropriate subversion of PHP 7, install it accordingly.
(Debian 9 a 7.0-lon, Debian 10 a 7.3's, For Ubuntu 18.04 a 7.2 PHP the basic)
So for me, 7.0:
apt-get -y install php7.0-fpmStart the service:
systemctl start php7.0-fpm.serviceApache configuration
If you are done with the above, turn it on Apache proxy_fcgi module:
a2enmod proxy_fcgiFinally, restart Apache:
systemctl restart apache2.serviceWith this you also have the basics of PHP-FPM, we can continue with the next section.
versions
I'm trying to make it workable for everyone, so here's one thing I mentioned at the beginning of the page, that there are even versions here.
As we know, the servers have the default PHP environments that the developer provides with the distribution. These can be easily installed from the repositories. However, it is not uncommon for the situation to require a newer version of PHP to be installed on the server - or an older one - depending on what the websites and web applications need. Individually installed PHP systems are usually installed in addition to the existing default so that both can be used, and there are several ways to install them, such as:
- By manually translating your source code. Examples: 8 PHP installed on Debian 7.1, or the "reverse" of this, when we are deploying older PHP to the newer system: a 9 PHP installed on Debian 5.6.
- Apply external, unofficial repositories from where you can easily install the required versions, which are not included in the distribution, with the APT package manager. For example the sury.org (this can be found in another description).
So the point is that no matter what configuration you have, whether you have multiple versions of PHP, it's always a good idea to use the latest version, whether the default or custom, on systems that are already ready for it. One such example is the Matomo (Piwik) web analytics system, which runs on the latest PHP versions. That is why we are moving forward so that the things that are being done here will work in all cases. In the case of the pivotal parts, we will deal with these separately.
I have written all this here so that those who have not known what it is so far should not be involved in the mention of the variations below. If someone only has the default PHP available or is unsure, go through the default PHP versions where there are several options.
Advanced PHP-FPM Configuration
Create a Linux user
The first step is to create a Linux user on whose behalf PHP-FPM will run Matomo. The user will not be used for anything other than this task, so this user will have a lot to do during configuration. Execute the following command as root:
adduser matomoYou will then be prompted for the password and a few more details to complete:
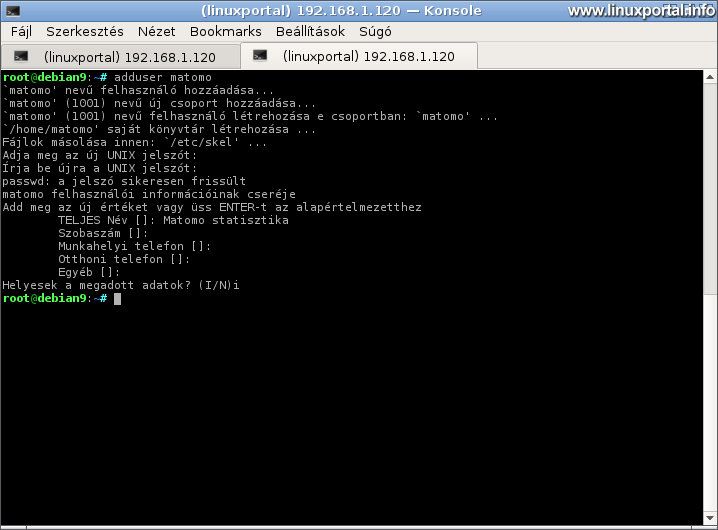
Create and configure a PHP-FPM pool
The next step is to create a PHP-FPM pool (I have written about this in more detail here), which will run the PHP files on this repository with the user "matomo" you just created. Thus, it is not www-data that will be the host of this account, but a separate user that we can monitor and manage separately everywhere (e.g. in log files, in different configurations, etc.).
Enter the PHP-FPM pool directory:
- Default for PHP5: /etc/php5/fpm/pool.d/
- Default PHP for 7: /etc/php/7.x/fpm/pool.d/ (x = depending on subversion)
- For handwritten PHP 7: /etc/php-fpm.d/ (example)
I have the second variation, so:
cd /etc/php/7.0/fpm/pool.d/Copy the www.conf file in the directory from which we will create the PHP-FPM configuration for Matomo and open it for editing:
cp www.conf matomo.conf
nano matomo.conf
So we now have a "raw" config file that contains all the default settings. We need to rewrite some of this. Going line by line:
[Www]
Right at the beginning is the name of the pool itself in square brackets. We rewrite this to "[matomo]".
user and group
Change both to matomo:
user = matomo
group = matomo
listen
Here you enter a socket file through which the matomo user will connect to this pool of PHP-FPM. You can enter any name here, but it is customary for the file name to include the PHP version you are using and the associated user / website name, so that there is no confusion later if you have more than one pool. So in my case the Debian 9 on the perfect server:
listen = /run/php/php7.0-matomo-fpm.sock
(This file will be created after restarting PHP-FPM after configuration)
access.log
Set the output of the log file to the directory you want created earlier for Matomo. Here we leave the original comment setting and create a new one:
;access.log = log/$pool.access.log
access.log = /var/log/matomo/php-fpm-access.log
security.limit_extensions
Find this option here and set it to:
security.limit_extensions = .php .html
My settings
Finally, let's insert two blocks at the end of the file, one with our own PHP settings:
; Saját PHP beállítások
php_admin_value[error_log] = /var/log/matomo/php-errors.log
php_admin_flag[log_errors] = on
php_admin_value[memory_limit] = 128M
Here we also set up a PHP bug log file, which collects any PHP bugs that might occur in Matomo, turns on logging, and sets a 128 Mb script memory limit that Matomo needs.
And let's add a section containing my own PHP-FPM options, and save the config file:
; Saját PHP-FPM beállítások
pm.max_children = 16
pm.min_spare_servers = 2
pm.max_spare_servers = 4
Here we specify the maximum number of threads a PHP-FPM process can run at one time, as well as the lower and upper limits of the backup servers. By the way, these are already listed above in the config file, only this way it is easier to handle if we put it at the end. I fine-tuned the settings little by little when using my own instance of Matomo, based on what the PHP-FPM log file usually recommends if, for example, something is set too low.
PHP-FPM log file
The PHP-FPM central log file can be found here:
- Default for PHP5: /var/log/php5-fpm.log
- Default PHP for 7: /var/log/php7.x-fpm.log (where x is the subversion)
- For handwritten PHP 7: <specified when configuring PHP prefix (installation) directory> /var/log/php-fpm.log (example)
In this log file, we also receive messages, such as in which the system draws our attention to the fact that one of the process settings should be raised, because it turns out to be small depending on the specific use (e.g. high traffic, etc.).
Restart and verify PHP-FPM
If we are all up to now, let's restart PHP-FPM with a service that suits our system:
- Default for PHP5: php5-fpm.service
- Default PHP for 7: php7.x-fpm.service (where x is the subversion)
- For handwritten PHP 7: Here is how we created the service unit file, such as in this description.
But you can also use this command to find the exact name of our service to restart it:
ls /lib/systemd/system | grep "php.*fpm"I have the default PHP 7.0, so here's how to restart it:
systemctl restart php7.0-fpm.serviceThen we look at the running processes of PHP-FPM:
systemctl status php7.0-fpm.service
So here we can see that PHP-FPM has started with the master process, matomo, web1 (WordPress page user ISPConfigban we brought one earlier) and the default www. For the latter three, they expect 2-2 threads for inbound connections.
Of course, this is not yet PHP-FPM for our Matomo system, so some setup is still needed, just the matomo pool has started, which is obviously fine.
Migrate log files
On page 6, we created a log directory for Matomo and set up the rotation of log files. Here they now need to be reconfigured to work properly in the new runtime environment.
Transfer privileges to the matomo
The previously created log directory is Configured for www-data. Now we need to migrate the directory and all of its content to the matomo user, because if PHP-FPM runs the page with the matomo user, then this user will have to do everything in the future. Run as root as below chown command to migrate:
chown -R matomo:matomo /var/log/matomo/Configure Logrotate for PHP-FPM Log Files
Also the 6. page we have set up Logrotate to rotate the log file. This is now extended to the log files generated by PHP-FPM. As root, open the previously created file:
nano /etc/logrotate.d/matomoAnd let's also insert the lines highlighted in green to make the file look like this:
/var/log/matomo/matomo.log
/var/log/matomo/php-fpm-access.log
/var/log/matomo/php-errors.log
{
	rotate 7
	daily
	copytruncate
	compress
	delaycompress
	missingok
	notifempty
}
Migrate Cron to matomo
earlier we created the cron task also for the Matomo archiving script, we are now changing this so that it is not the www-data that runs the script, but the matomo. Open as root /etc/cron.d/matomo-archive file:
nano /etc/cron.d/matomo-archiveThen, we'll go over the www-data section to matomo:
MAILTO=''
SHELL='/bin/sh'

*/5 * * * * matomo /usr/bin/php /opt/matomo/console core:archive --url=http://www.wordpress.vm/matomo/ >> /var/log/matomo/matomo.log
Transfer hosting permissions to the matomo user
If we have done everything so far, the following error messages may appear in Matomo's log file:
The directory "/opt/matomo/tmp/cache/tracker/" does not exist and could not be created.
This is because we have not yet changed the permission of the Matomo repository, so the archive script executed in cron on behalf of the matomo user could not write to the file system that is currently named www-data. This can also be solved quickly with the following command:
chown -R matomo:matomo /opt/matomo/So now everything is in the possession of the matomo user. If we now wait for the next 5-minute cycle, it will collect the log data nicely, regardless of the PHP-FPM - not yet fully configured - because here in the cron the CLI PHP runs the script:

Migrating Apache Configuration to PHP-FPM
And finally, the most important part comes: we're migrating the Apache configuration for Matomo storage to work with PHP-FPM.
Open as root the previously created mod_php-based Apache configuration file:
nano /etc/apache2/conf-available/matomo.confAnd let's take the red highlighted section out of it (or even comment it out line by line):
Alias /matomo /opt/matomo

<Directory /opt/matomo>
        Options +FollowSymLinks
        Options -Indexes
        AllowOverride All
        Require all granted
        DirectoryIndex index.php index.html

#        <IfModule mod_php5.c>
        <IfModule mod_php7.c>
                AddType application/x-httpd-php .php
                php_flag display_errors On
                php_value session.gc_maxlifetime 3600
                # A következő beállítás a Matomo-nak kell:
                #php_value always_populate_raw_post_data -1
                # Ha gondok vannak a működéssel (php hibák) javasolják az opcache kikapcsolását.
                #php_flag opcache.enable Off
        </IfModule>

</Directory>
And put the following block in its place:
	<IfModule mod_proxy_fcgi.c>
		<FilesMatch "\.(php|html)$">
			# Unix socket alapú beállítás:
			SetHandler "proxy:unix:/run/php/php7.0-matomo-fpm.sock|fcgi://localhost"
		</FilesMatch>
	</IfModule>
Here, make sure that the green highlighted socket file is exactly the same as the socket file we have configured the pool above-in.
Then save and restart Apache:
systemctl restart apache2.serviceNow that we're done, we can try Matomo.
Geolocation settings (optional)
Install MaxMind-DB-Reader-php PHP Plugin (optional)
So now we need to install the same plugin for the other PHP system. The process for this is pretty much the same as the part done on the previous page, with the difference that now we have to use separate switches in a few places because of the unique PHP. Let's also see how it all happens.
Install PHP developer package
We will need a phpize command for this PHP as for the default. If one now hand translated PHP 7.xwe are dealing with, similarly to the link, we do not need to install anything for this, because the development packages have already been added in preparation for the translation. And if you installed PHP 7.x in another way (such as from unofficial repositories), it may not include the developer package. In this case, install the version that suits your version. Versions:
- For PHP 7.0.x: php7.0-dev
- For PHP 7.1.x: php7.1-dev
- For PHP 7.2.x: php7.2-dev
- etc. ...
Alternatively, you can search for installable packages as follows:
apt-cache search "^php" | grep "\-dev"Then install:
apt-get -y install <megfelelő csomagunk neve>Download and install PHP plugin
Go to the / tmp directory and download MaxMind-DB-Reader-php PHP plugin zip version of the From GitHub:
cd /tmp
wget https://github.com/maxmind/MaxMind-DB-Reader-php/archive/master.zip
Unzip and enter the ext / subdirectory under the created directory:
unzip master.zip
cd MaxMind-DB-Reader-php-master/ext
Run the phpize command (as root) here, but now with our proper PHP system. variations:
- For manually translated PHP 7, the command to run is: / bin / phpize
- For custom PHP 7 installed from other libraries, the command: /usr/bin/phpize7.x (e.g. sury.org repository (where x represents the PHP version)
So run the phpize command in one of the above extensions in the / ext directory under the downloaded and unpacked extension. For example:
/usr/bin/phpize7.2Normally it gives a similar output (depending on our PHP version):
Configuring for:
PHP Api Version:         20151012
Zend Module Api No:      20151012
Zend Extension Api No:   320151012
Then configure it, compile the source, and install it, but you need to provide the configure command with a switch that also specifies the path to php-config. variations:
- To manually translate PHP 7 to access php-config: / bin / php-config
- For custom PHP 7 installed from other libraries: /usr/bin/php-config7.x (for example sury.org repository (where x represents the PHP version)
./configure --with-php-config=<valamelyik fenti php-config elérés>
make
make install
In the end, the appropriate output is similar to this (for example, I have a hand-written PHP 7.1):
Installing shared extensions: /opt/php-7.1/lib/php/extensions/no-debug-non-zts-20160303/
Open the php.ini file. variations:
- For manually translated PHP 7: /lib/php.ini
- For custom PHP 7 installed from other libraries: /etc/php/7.x/fpm/php.ini (for example, when using the sury.org package, where x is a subversion of the PHP system)
nano <megfelelő php.ini fájl>And add the following line to the end:
extension=maxminddb.so
Save and restart Apache:
systemctl restart apache2.serviceWe have now installed the PHP plugin for MaxMind databases for our other PHP versions. So Matomo is also using this newer PHP to retrieve IP address information.
Testing Matomo
Now, when you enter our Matomo instance interface, the statistics are nice (I have WordPress page statuses):

Background check
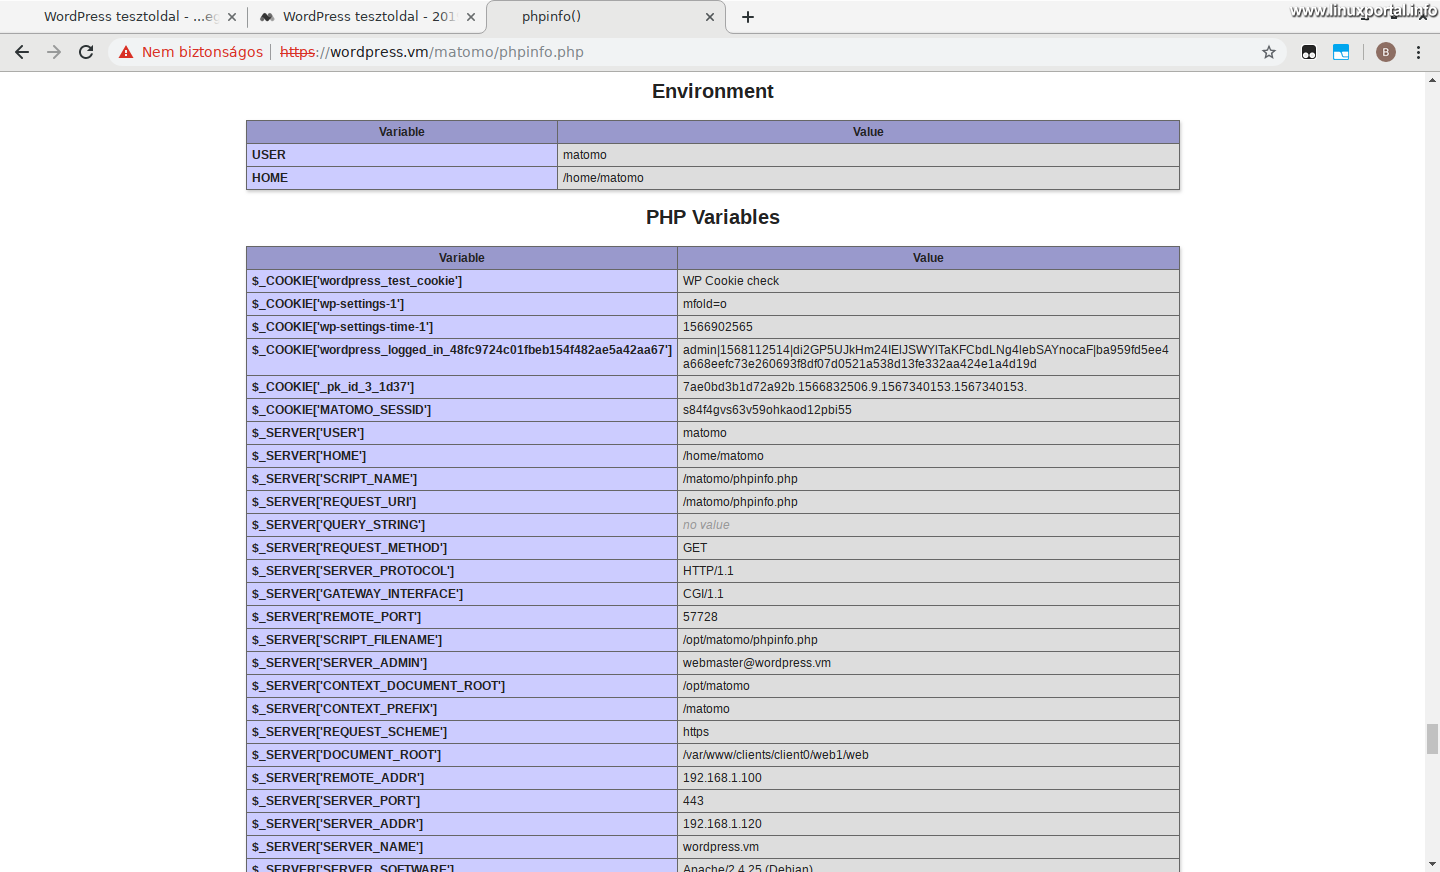
And if you look at the php info stored on your storage:

You can see the FPM / FastCGI value in the Server API line. And if you scroll down, you can also see the user running PHP in the repository:
And if you look at the PHP-FPM process, then:
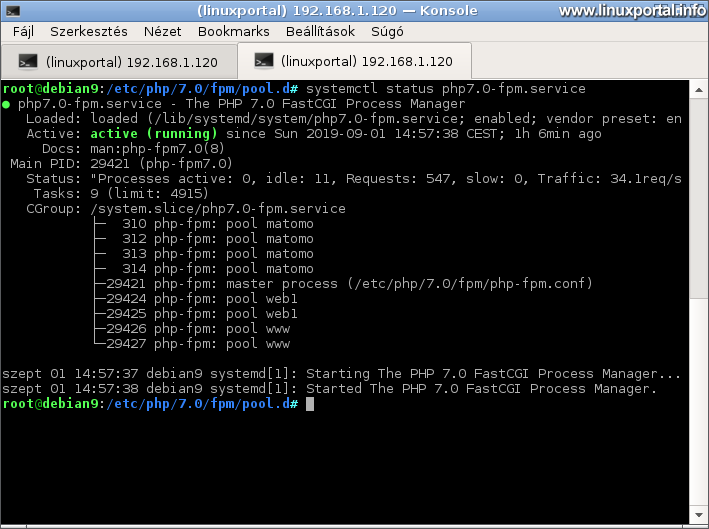
you can also see that the number of matomo processes has already jumped to 4 during use.
Conclusion
So this would be a meticulous way of installing Matomo (formerly Piwik) web analytics system. The statistics are very serious, there are many filtering and configuration options, it is worth installing. Of course, anyone who already has a working PHP-FPM can get started with hosting.
I've been trying to put as much information as possible into the drier rows to make the relationships more transparent, so I think it's easier to understand. I hope I have been able to raise interest in Matomo. )
- Encyclopedia - Matomo (Piwik) web analytics
- How to upgrade our Matomo (formerly Piwik) web analytics system to version 4.x.
- Matomo.org
- What should we do if our Matomo web analytics system generates "AH01630: client denied by server configuration" type Apache errors that causes Fail2Ban to block our IP address?
- Encyclopedia - PHP-FPM
- How to install PHP-FPM on a Debian 8 (Jessie) LAMP server
- How to install newer PHP versions on our Debian 9 (Stretch) LAMP server in PHP-FPM mode
- Server monitoring with Munin on Debian 9 (Stretch) and Debian 10 (Buster)
Navigation
- To post registration and login required
- 176 views