
Content
- page: Overview of basic terms and preparation for Matomo hosting
- page: Download and install Matomo
- page: Placing tracking code on WordPress pages
- page: Placing tracking code on Drupal pages
- page: Placing and customizing tracking code on custom pages
- page: Make important settings after installation
- page: Installation of GeoIP 2 (PHP) based geolocation system
- page: Matomo migration of a complete system to PHP-FPM based server API operation
6. page content
Continuation
Az previous page we have reviewed the JavaScript codes to be pasted into custom web pages, and here we perform the Matomo (Piwik) web analyst after installing the system.
Set up a trusted website
Before Matomo was installed we have already seen it in preparationthat the storage space created for the web statistics system can be accessed in several ways. This is also supported by Matomo - so either our domain name The interface is accessible from below, as is the hosting space - however, if you do not make the necessary settings, you will stumble upon such a warning page when you want to access your copy of Matomo from under a new domain name:

During installation, the server IP address I logged in through the interface, so I registered it first, so now the new wordpress.vm domain name is still unknown to the system.
There is nothing wrong with that either, because it is just a safety warning. To prevent this, open the as described in the warning config.ini.php file in the installation directory (as root):
nano /opt/matomo/config/config.ini.phpAnd here's the [General] section, add the following lines (if you want to use the Matomo system with and without www):
trusted_hosts[] = "wordpress.vm"
trusted_hosts[] = "www.wordpress.vm"
Of course, replace your own domain name.
Then updated to the warning page, the access panel is now ready:

So, if you are linking Matomo to another web page, where you also want to get statistics from the / matomo subdirectory, you should always put the new domain name in the trusted hosts configuration.
Other necessary settings
When you enter Matomo, click the gear icon in the upper right corner to enter the main settings panel. There may be a couple of warnings here, but now we open the System Verification section, where you can get detailed information about different system needs. To do this, click on system check link in the panel. Here at the top, everything is fine, but rolling to the bottom, there are some flaws:
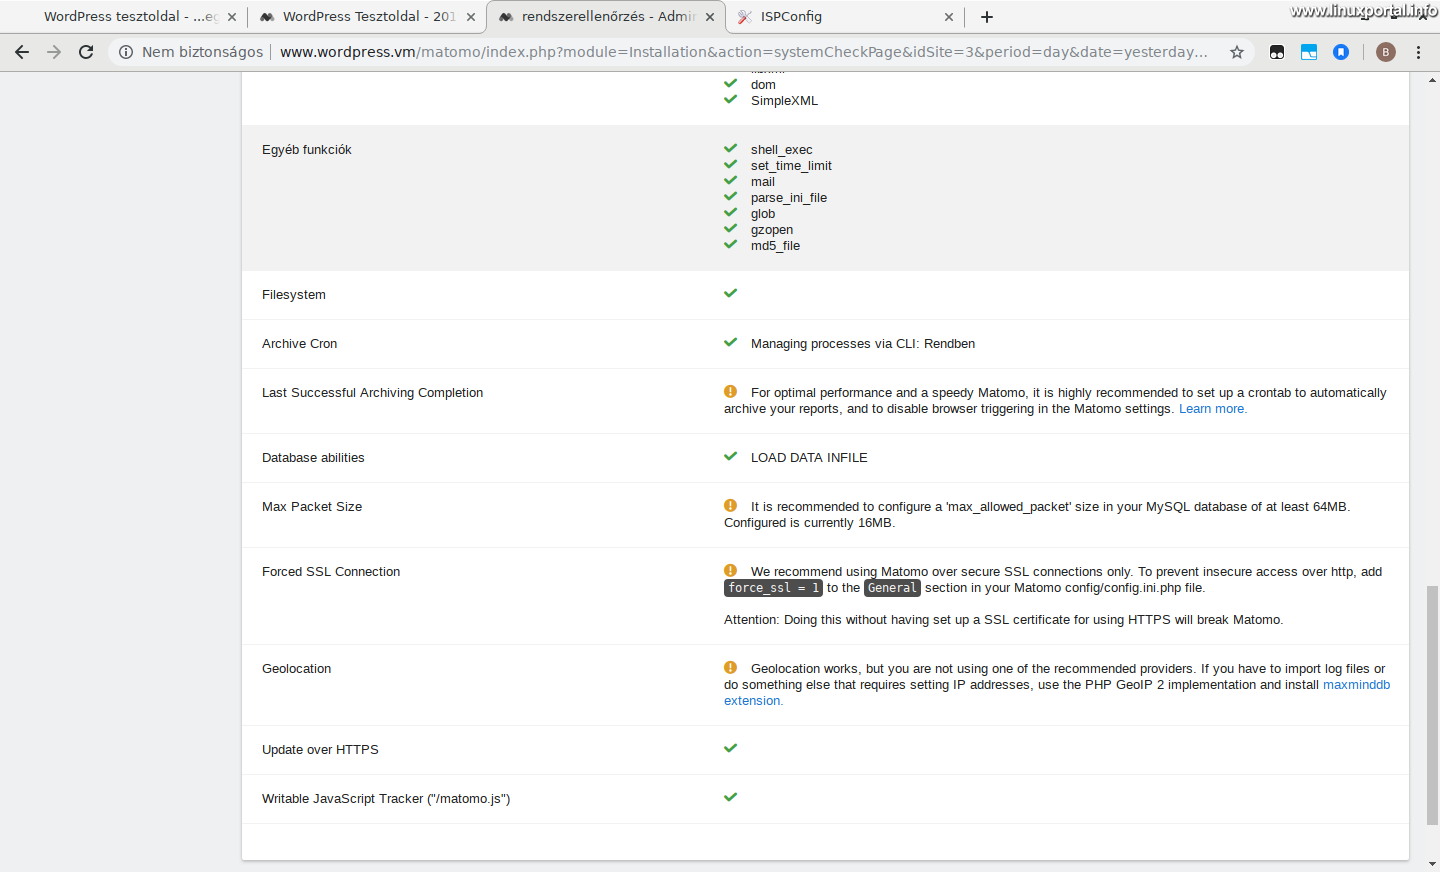
Here we can see four errors, which we will fix in the future. Going in line, let's take the first one: the automatic archiving script.
Automatic archiving from cron
Matomo can create various summaries and reports in two ways: when it enters the interface, it generates them when the panels are loaded, or we run the summary script from cron periodically in the background. The first solution takes time, hours, but as data is collected and traffic to the pages grows, this method becomes slow, greatly degrading the user experience when we go to the control panel. Not to mention that if we don’t enter the interface for days, maybe weeks, we won’t aggregate until they accumulate a lot, and then the next entry can take up to minutes to load all the panels. Therefore, it is highly recommended to run the archiving script from cron in the short term.
Create a log directory
The archiving script also generates output that we can log. So we'll need one in the first round log directory where we collect the log files for Matomo (there will be more later PHP-FPM log files).
To do this, log in as root and create a matomo directory under / var / log:
mkdir /var/log/matomoThen hand over the directory to www data user so that it also belongs to the user running the Matomo web interface (also), because the we set it up at the very beginning az Apacheto load that module with PHP files. Change the owner of the library accordingly:
chown www-data:www-data /var/log/matomo/Create a Cron task
Now that your future log file has space, let's create a cron task. To do this, open a blank file in the cron.d directory as root:
nano /etc/cron.d/matomo-archiveThen add the following content:
MAILTO=''
SHELL='/bin/sh'

*/5 * * * * www-data /usr/bin/php /opt/matomo/console core:archive --url=http://www.wordpress.vm/matomo/ >> /var/log/matomo/matomo.log
Here are the essentials:
- mailto: In a live environment, set a working email address here, in which case cron will send the error output here if there is a problem.
- * / 5 * * * *: 5 runs this task every minute. We can make it rarer, but that's fine.
- www-data: The task is being performed on behalf of this user. Because of the mod_php mentioned earlier, the www-data user needs to run this script.
- / Usr / bin / php: The Command Line (CLI) PHP run location.
- / Opt / matomo / console ...: The command to be executed and its parameters, switches. In this case, the Matomo system console script with its external access URL.
Attention! Here, everyone enters the URL to their own copy of Matomo! Which can be the / matomo directory under the server's IP address, or one of the / matomo directories running on the server that is already configured as a trusted host. - And finally, redirect the output to the appropriate log file.
Then, after waiting for the next 5 prec round and looking into the / var / log / matomo / directory, you will see an 4-5 kbyte file. If we open it, it has something like:
cat /var/log/matomo/matomo.logINFO [2019-08-26 15:00:01] 18921 --------------------------- INFO [2019-08-26 15:00:01] 18921 INIT INFO [2019-08-26 15:00:01] 18921 Running Matomo 3.11.0 as Super User INFO [2019-08-26 15:00:01] 18921 --------------------------- INFO [2019-08-26 15:00:01] 18921 NOTES INFO [2019-08-26 15:00:01] 18921 - If you execute this script at least once per hour (or more often) in a crontab, you may disable 'Browser trigger archiving' in Matomo UI > Settings > General Settings. INFO [2019-08-26 15:00:01] 18921 See the doc at: https://matomo.org/docs/setup-auto-archiving/ INFO [2019-08-26 15:00:01] 18921 - Reports for today will be processed at most every 900 seconds. You can change this value in Matomo UI > Settings > General Settings. INFO [2019-08-26 15:00:01] 18921 - Reports for the current week/month/year will be requested at most every 3600 seconds. INFO [2019-08-26 15:00:01] 18921 --------------------------- INFO [2019-08-26 15:00:01] 18921 START INFO [2019-08-26 15:00:01] 18921 Starting Matomo reports archiving... INFO [2019-08-26 15:00:01] 18921 - tracking data found for website id 3 since 2019-08-25 22:00:00 UTC (since midnight) INFO [2019-08-26 15:00:01] 18921 Will pre-process for website id = 3, period = day, date = last8 INFO [2019-08-26 15:00:01] 18921 - pre-processing all visits INFO [2019-08-26 15:00:02] 18921 Archived website id = 3, period = day, 0 segments, 6 visits in last 8 days, 1 visits today, Time elapsed: 0.973s INFO [2019-08-26 15:00:02] 18921 Will pre-process for website id = 3, period = week, date = last8 INFO [2019-08-26 15:00:02] 18921 - pre-processing all visits INFO [2019-08-26 15:00:03] 18921 Archived website id = 3, period = week, 0 segments, 6 visits in last 8 weeks, 1 visits this week, Time elapsed: 1.058s INFO [2019-08-26 15:00:04] 18921 Will pre-process for website id = 3, period = month, date = last8 INFO [2019-08-26 15:00:04] 18921 - pre-processing all visits INFO [2019-08-26 15:00:05] 18921 Archived website id = 3, period = month, 0 segments, 6 visits in last 8 months, 6 visits this month, Time elapsed: 1.340s INFO [2019-08-26 15:00:05] 18921 Will pre-process for website id = 3, period = year, date = last7 INFO [2019-08-26 15:00:05] 18921 - pre-processing all visits INFO [2019-08-26 15:00:06] 18921 Archived website id = 3, period = year, 0 segments, 6 visits in last 7 years, 6 visits this year, Time elapsed: 1.093s INFO [2019-08-26 15:00:06] 18921 Archived website id = 3, 4 API requests, Time elapsed: 4.478s [1/1 done] INFO [2019-08-26 15:00:06] 18921 Done archiving! INFO [2019-08-26 15:00:06] 18921 --------------------------- INFO [2019-08-26 15:00:06] 18921 SUMMARY INFO [2019-08-26 15:00:06] 18921 Total visits for today across archived websites: 1 INFO [2019-08-26 15:00:06] 18921 Archived today's reports for 1 websites INFO [2019-08-26 15:00:06] 18921 Archived week/month/year for 1 websites INFO [2019-08-26 15:00:06] 18921 Skipped 0 websites INFO [2019-08-26 15:00:06] 18921 - 0 skipped because no new visit since the last script execution INFO [2019-08-26 15:00:06] 18921 - 0 skipped because existing daily reports are less than 900 seconds old INFO [2019-08-26 15:00:06] 18921 - 0 skipped because existing week/month/year periods reports are less than 3600 seconds old INFO [2019-08-26 15:00:06] 18921 Total API requests: 4 INFO [2019-08-26 15:00:06] 18921 done: 1/1 100%, 1 vtoday, 1 wtoday, 1 wperiods, 4 req, 4615 ms, no error INFO [2019-08-26 15:00:06] 18921 Time elapsed: 4.615s INFO [2019-08-26 15:00:06] 18921 --------------------------- INFO [2019-08-26 15:00:06] 18921 SCHEDULED TASKS INFO [2019-08-26 15:00:06] 18921 Starting Scheduled tasks... INFO [2019-08-26 15:00:06] 18921 Scheduler: executing task Piwik\Plugins\ExamplePlugin\Tasks.myTask... INFO [2019-08-26 15:00:06] 18921 Scheduler: finished. Time elapsed: 0.000s INFO [2019-08-26 15:00:06] 18921 Scheduler: executing task Piwik\Plugins\CustomPiwikJs\Tasks.updateTracker... INFO [2019-08-26 15:00:06] 18921 Scheduler: finished. Time elapsed: 0.001s INFO [2019-08-26 15:00:06] 18921 Scheduler: executing task Piwik\Plugins\PrivacyManager\Tasks.deleteLogData... INFO [2019-08-26 15:00:06] 18921 Scheduler: finished. Time elapsed: 0.006s INFO [2019-08-26 15:00:06] 18921 Scheduler: executing task Piwik\Plugins\PrivacyManager\Tasks.anonymizePastData... INFO [2019-08-26 15:00:06] 18921 Scheduler: finished. Time elapsed: 0.001s INFO [2019-08-26 15:00:06] 18921 done INFO [2019-08-26 15:00:06] 18921 ---------------------------
It describes everything about the rollout cycle. How many web pages did you aggregate statistics, how many did you miss, why did you miss it, etc. In this case, it writes that there has been no activity on the page since the last script run, so there was nothing to summarize. If we started crawling the page at this point, the output of this cumulative would be different after that.
So the point here is that the summary is already running in the background at appropriate intervals, and its output will be appended to this file.
Disable web archiving
If everything has gone well so far, go back to the settings page and select "Basic settings" on the left:

Here, the top two orange warnings (if any) will not be dealt with at this point, but will switch to the setting below Gender option. This disables the system from generating aggregations and archives while displaying the web interface, leaving the cron job running in the background, which does the same 5 every minute.
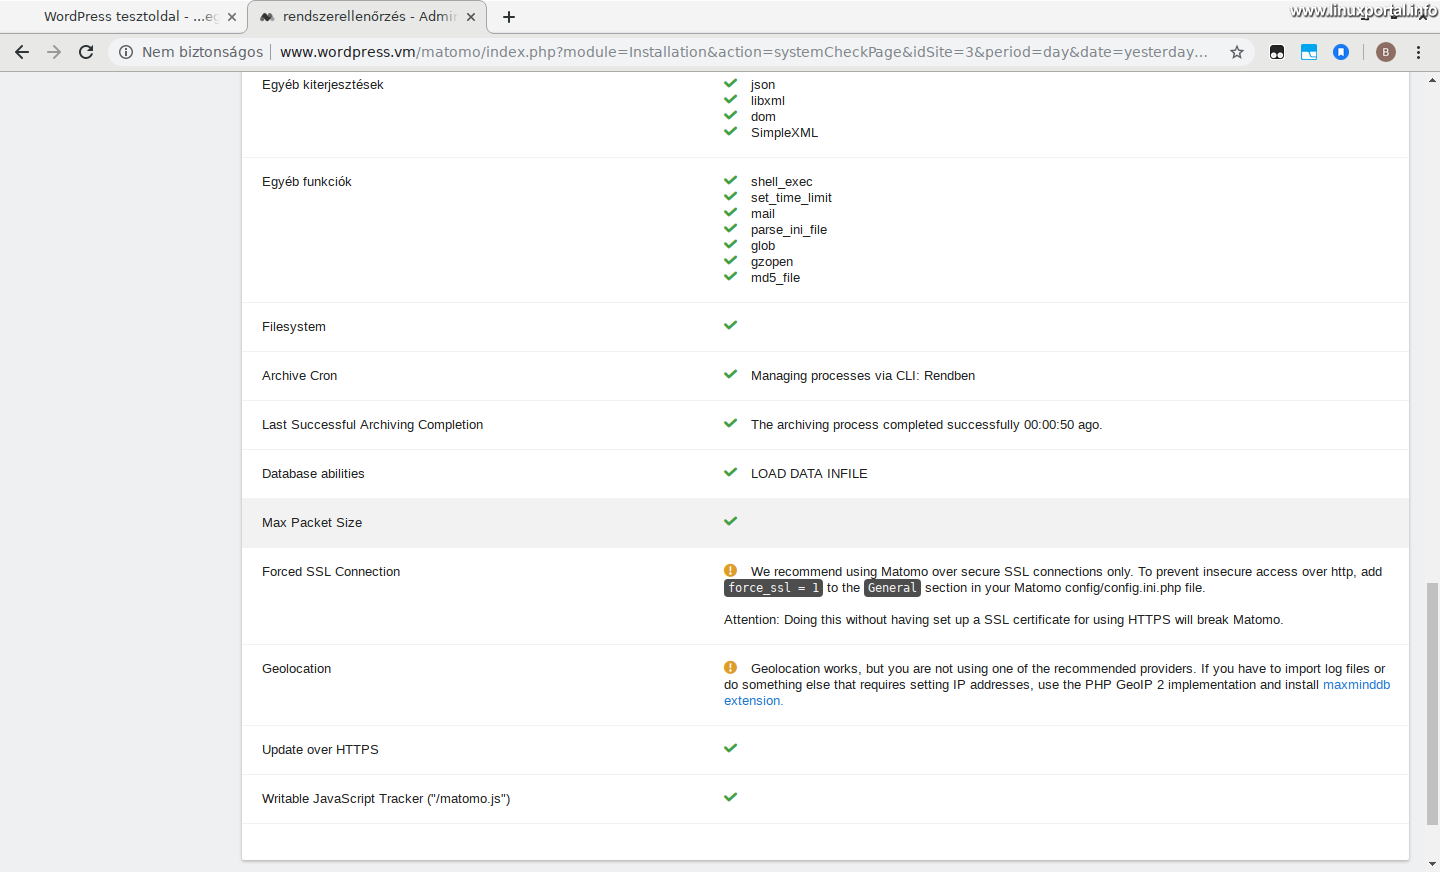
Save the form and go back to the previous System Verification page where we've seen the details:

And here we can see that there is a green check mark on the lines of "Archive Cron" and "Last Successful Archiving Completion". Also write down the time of the last successful archiving.
Rotate a log file with Logrotate
So far, everything is perfect and almost everything. The output of the archiving cycle seen above is appended to the existing log file each time, because in the cron task we used the double ">>" signal instead of the single ">" signal to redirect the output. Thus, we can look back not only at the output of the last cycle, but at all so far. This, in turn, means that after a while, our log file will become very large, more difficult to manage, and large files will be able to be written a little slower, which requires extra resources. To avoid this log rotation is used. I have made a separate description of this before, so I will not go into detail here, just show you the finished configuration.
Go to the /etc/logrotate.d/ directory:
cd /etc/logrotate.d/Let's create a new file for Matomo:
nano matomoAnd let's insert the following content and save it:
/var/log/matomo/matomo.log
{
	rotate 7
	daily
	copytruncate
	compress
	delaycompress
	missingok
	notifempty
}
(Meanings of the options are included in the description already linked above.)
There's nothing more to do, and now the logrotate is up and running.
Set the maximum package size for the database
If you look again at the Matomo Preferences - System Validation page, the following problem is the maximum packet size for the database: The "Max Packet Size" line has the following warning message:
"It is recommended to configure a 'max_allowed_packet' size in your MySQL database of at least 64MB. Configured is currently 16MB. "
Of course, this is how our Matomo system works, but for optimal operation, we need to increase the maximum packet size to at least 64 Mb in the settings of our MySQL / MariaDB database server.
Open the configuration file for our Database Server (as root):
MySQL configuration file
On older systems (eg Debian 8):
nano /etc/mysql/my.cnfMariaDB configuration file
On newer systems (eg Debian 9, Ubuntu 18.04 LTS, etc.):
nano /etc/mysql/mariadb.conf.d/50-server.cnfIf you have the file, look for the "max_allowed_packet" variable (dwarfin the CTRL + W the search), overwrite its value 16Mto from 64Mand save it.
Restart the database server (whichever you use here is the same command).
systemctl restart mysqld.serviceThen, if you look back at Matomo's System Verification page and refresh it, there's a green checkmark in the "Max Packet Size" line:
Forced SSL connection
Matomo makers strongly recommend using the interface only SSL used over a connection. Therefore, if not available HTTPS accessing your storage is a mistake. It does not restrict operation, but appears here as an error.
In this tutorial, we will not go over how to set up SSL, so here are just a few links to get started on this topic:
For LAMP systems unfortunately I haven't made such tutorials yet, but I'm replacing them little by little. So if we chose such a server as a starting point and failed to configure SSL on it, then skip this section, our statistics system will work fine without it.
Since a Debian 9 (stretch) on V1.0 perfect server i am making this description so for the sake of the tutorial i have now turned it on ISPConfigban a (self-signed) SSL for the WordPress test page, so now I can access the page via HTTPS and also the Matomo interface through it. Sure, now the browser is throwing warnings about unauthenticated SSL, but we won’t deal with that right now.
So if you managed to set up SSL in some form (self signed, free Let's Encrypt, purchased certificate, etc.), turn it on in the Matomo configuration file so that you can only access its interface via an SSL connection.
Make the following configuration only if you have SSL configured, so you can access the Matomo interface over HTTPS. Otherwise the system will not be available!
Open the configuration file:
nano /opt/matomo/config/config.ini.phpAnd for the [General] section, add the following option:
force_ssl = 1
Then, when we refresh the Matomo System Verification page, the "Forced SSL Connection" line also turned green:

Set geolocation
All that's left is to set up geolocation, but this page would have been very long, so it was moved to to the next page.
- Encyclopedia - Matomo (Piwik) web analytics
- How to upgrade our Matomo (formerly Piwik) web analytics system to version 4.x.
- What should we do if our Matomo web analytics system generates "AH01630: client denied by server configuration" type Apache errors that causes Fail2Ban to block our IP address?
- Matomo.org
- Matomo.org - Troubleshooting
- Rotate and compress log files with Logrotate
- Server monitoring with Munin on Debian 9 (Stretch) and Debian 10 (Buster)
Navigation
- To post registration and login required
- 82 views