Content
Introductory
Rufus is a very popular free and open source portable application for Windows operating systems that can be used to easily create bootable USB flash drives. Thanks to its active development, new editions are released regularly, which contain many new features. I have already prepared a few descriptions on this topic:
- How to Build a Bootable Drive with Rufus (2018-04-21)
- Make bootable flash drives with Rufus 3.3 (2018-10-22)
As you can see, a lot of time has passed since version 3.3 (version release date: 2018-09-17), so it is worth reviewing the operation of the latest version, which at the time of writing the description was 4.3.
With Rufus, you can create a bootable USB flash drive for installing several systems, and it also supports the Hungarian language. The program is one of the fastest among the free programs in creating a boot pendrive, and it can be useful in situations where we want to install a system on our computer, but we no longer have a CD/DVD reader - which is quite a rarity nowadays.
Over time, Rufus has received many fixes and new features from changes in different versions here you can find out.
Obtaining a Rufus program
The program does not require installation and can be started immediately.
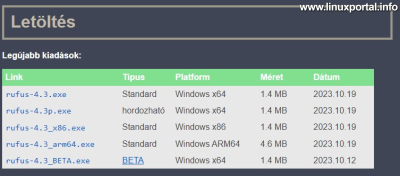
In the current download section, you can choose from several variations:
- rufus-4.3.exe: Normal version
- rufus-4.3p.exe: Portable version. This was added to the program in version 2.0 (2015-03-03), the essence of which is to create a rufus.ini file in the startup directory and save the settings in it. In this way, the ini file and the startup file can be taken together anywhere, the settings will be preserved.
- rufus-4.3_x86.exe: 32-bit version for computers with older architectures.
- rufus-4.3_arm64.exe: For computers/devices with ARM64 architecture.
- rufus-4.3_BETA.exe: This was a beta release for this version, but it is no longer available at this time. Maybe they will be removed from the list later.
In the most general case, we use the first download, so I also download this, but of course, choose according to your needs.
The program does not require installation (nor does the standard version), so it can be used immediately after running.
Creating a bootable installer flash drive
Let's start the program, then the main window will immediately appear, which is divided into three main parts, as is already well known.
Driving properties
In this section, we can set the properties of the boot medium to be created.
Device
Here you can select the target flash drive or our external USB hard drive. In this example, an empty 32 GB flash drive is connected to the machine.
Next to the drop-down is to the right floppy disk icon. This allows you to save the current contents of the flash drive in the form of a disk image. This is a very useful function, because if you don't have an empty flash drive at hand, you can use it to save its contents while we install our operating system, but you can also simply make a backup of your flash drive at any time.
We can save the disk image created from our flash drive in several formats. According to our needs, we can choose from the following disk image file formats:
- Uncompressed VHD Image: An uncompressed VHD (Virtual Hard Disk) image file that saves the contents of the entire flash drive without any changes. VHD files can be used in virtual machines such as Hyper-V, VirtualBox or VMware, or can be mounted in the Windows operating system as a virtual drive.
- Compressed VHDx Image: VHDx is the successor to the VHD format, which Rufus downloaded in compressed form.
- Full Flash Update Image: The Full Flash Update (FFU) image format is a sector-based format that includes partition information, Windows recovery data, etc. in addition to data. With this, we can even save a working system partition, preserving all its properties. The format can even store multiple partitions.
The image below shows the Virtualbox virtual disk image types:
With the help of the VHD/VHDx formats, we can create storage devices for our VirtualBox virtual machines, for example.
For the sake of the example, if we start the save, the save will start immediately after the file browser window:
Boot selection
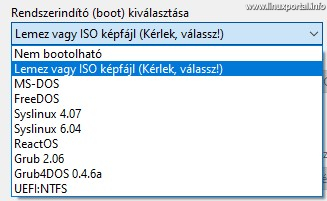
In the boot selection section, there is a drop-down where you can set the type of content written to the flash drive, these can be the following:
- Unbootable: With the help of this option, we can write out image files that are not designed for booting, but for example normal installation sets, etc., which can be started from a working operating system.
- Disc or ISO image file (Please choose!): The most common option of the Rufus program, we can write the installation set of our choice, which we previously downloaded from the site of the system creator. In all cases, you must use the "SELECT" option on the right, where you can browse for the appropriate ISO or other image file.
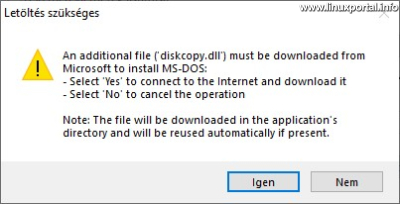
- MS-DOS: With the help of this option, we can install an old MS-DOS system. In this case, if we don't browse our own image file, Rufus will get the necessary files, so we don't necessarily need to have the MS-DOS files:
After downloading, the usual warning window appears that everything will be deleted from the medium. Then the written content looks like this:
I put this in just as a bit of nostalgia, that we get a good old MS-DOS system here. These files are familiar to those who have used it in the past.
Nowadays, this can be used, for example, to start various BIOS update programs. There are BIOS updates that can be started from a DOS environment, etc.
- FreeDOS: It is an open source and free system compatible with MS-DOS. In essence, it is advisable to choose here in case of copyright issues, but in terms of operation, it is the same as the previous one.
- Syslinux 4.07 / 6.04: SYSLINUX is a bootloader for Linux operating systems that runs on the MS-DOS/Windows FAT file system. Its purpose is to simplify the first installation of Linux and to create rescue and other special boot disks. Details >>
(When selecting this option, only the system loader is displayed by default. To display operating systems, we need to upload our own disk image file.) - ReactOS: ReactOS is a free and open source operating system for amd64/i686 personal computers designed to be binary compatible with computer programs and device drivers developed for Windows Server 2003 and later versions of Microsoft Windows. ReactOS is a potential open source replacement for information about Windows and undocumented Windows APIs. Details >>
(When selecting the option, by default only the startup section is written, to install the operating system we need to upload our own installation image file, which we can download it from here). - Grub 2.06: With this option, Rufus will write the GRUB bootloader to the pen drive. By default, only the system loader itself is written here, if we do not browse anything, so we have to set it up and configure it.
- Grub4DOS 0.4.6a: It is a GRUB-based boot loader for DOS and Windows boot loaders. Details >>
- UEFI:NTFS: This is a special boot method that allows you to boot NTFS partitioned devices UEFI systems (since the UEFI standard only officially supports FAT32 file systems). This is useful when larger files need to be used as a boot device, as NTFS can handle large files, unlike the limitations of FAT32.
If we have selected the boot system that suits our needs, click the SELECT button next to the drop-down menu to browse the disk image file. This is necessary for most boot options, except for MS-DOS and FreeDOS, where due to the small size of the systems, Rufus downloads or already contains the necessary files.
It is also worth noting here that Rufus does not manage network drives, so we can only browse files from local drives.
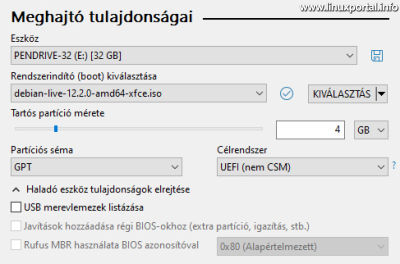
In this example, I write a LIVE system with a Debian 12 XFCE desktop environment to the pendrive:
Permanent partition size
In the case of live systems, it is possible to create a so-called "persistent storage" on the bootable USB drive. A "persistent partition" is an area on a USB drive that allows you to save data and system configurations while using a live system. This means that when we boot the live system from the USB drive, any changes we make (such as saving files, changing settings, installing software) will be preserved on subsequent boots, unlike traditional live systems, which lose all changes when restart the machine.
The "Persistent partition size" slider allows you to choose how much space you want to reserve on the USB drive for the persistent drive.
It's important to note that creating persistent storage is optional and only relevant for Live systems where the user wants to preserve their changes across reboots.
As you can see in the image above, in this example I have set 4 GB of storage.
Partition scheme and target system
There are two settings in this line:
- Partition Schema: MBR vagy GPT. The point here is what system the target computer to be installed (BIOS vagy UEFI), whichever system the system is running on, we need to write our boot flash drive to the same system to start the installer.
For older BIOS machines, select MBR (Master Boot Record).
However, for installation on another UEFI-capable computer, select the GPT option.
In essence, there is a difference in the size of the partitions that can be managed: a BIOS machine with a MBR partition can boot from a partition of up to 2 TB and a secondary partition can handle 4TB, while the GPT partitions of newer UEFI machines no longer have these limits.
In addition, the old BIOS-based MBR partitioning scheme can only handle a maximum of 4 primary partitions. So, if we plan to install more operating systems on the computer, keep that in mind.
Based on these, decide which mode to install your computer on. - Target system: Here, what you have to offer depends on what you have set up: MBR is only "Bios or UEFI" and GPT is only "UEFI (not CSM) "option will be available.
If you are unsure, you can choose the (older) MBR standard because it is handled by newer machines, but in this case the boot partition on which you are installing your system can be up to 2 TB.
Advanced tool properties
- List USB hard drives: If you turn it on, it will also list external USB hard drives, otherwise only pen drives will appear in the above dropdown.
- To add patches to legacy BIOSs (extra partition, alignment, etc.): This option provides greater compatibility with older BIOSes. Leave it blank unless your machine is very old.
- To use a Rufus MBR with a BIOS ID: This option is only available when selecting the old DOS Boot options, the essence of which is that Rufus adds a unique BIOS ID to the MBR. This helps identify the bootable drive, which is especially useful in cases where you have several different bootable devices connected to your computer.
In this example, I am creating a bootable flash drive for UEFI systems with a GPT partition scheme.
Formatting options
Here you can fine-tune the format of the data carrier.
Volume label
Enter the name of the device here. When importing image files, this is filled in to your own preference, but can be changed.
File system and cluster size
- File system: Here you can choose between FAT32 and NTFS. For certain boot types, only FAT32 can be selected. If you want greater compatibility, then leave it at the default FAT32 setting, but if there are large files (> 4 GB) in the image file, then choose the NTFS option. The latter is less often needed in the case of an average installation image file. The partitions of the operating system to be installed can be set during the installation, so this section only applies to the installation flash drive itself.
- Cluster Size: The size of the cluster, which is also called allocation unit also known as its size, it has a significant impact on the efficiency of a file system and the utilization of storage space. A cluster is the smallest storage unit of a file system in which files are stored. Setting the cluster size affects how much space the system wastes during the storage process and can affect system performance. Although this setting is not of great importance when writing the USB installer here, during the installation of the operating system, it is worth keeping in mind a few points regarding the planned future use when creating the system and other partitions:
- Space utilization: Larger clusters waste more space, especially when storing many small files. For example, if the cluster size is 4 KB and we store a 1 KB file, we waste another 3 KB of space because the file system does not store any other data in that cluster.
- Performance: A larger cluster size can improve system performance for large files because there are fewer clusters for the file system to manage. This is beneficial when, for example, we work with large multimedia files or databases.
- Limitations: Some file systems, such as FAT32, limit the maximum partition size they can handle depending on the cluster size. For example, in the case of FAT32, a larger cluster size allows for larger partitions, but results in worse space utilization.
- Compatibility: Sometimes cluster size can affect compatibility with certain devices or systems, such as certain older hardware or embedded systems.
Advanced formatting options
- Quick Format: This setting allows us to quickly format the drive without fully checking the physical interface. Quick format does not erase the data on the drive, it just rewrites the file allocation table (FAT), which makes the process faster. However, if you want to safely remove the data, turn off this function, because otherwise the old data will remain recoverable with special tools.
- Using extended volume label and icon files: This option allows you to specify a custom name (label) and icon for the drive that will be displayed when the drive is connected to a computer. This feature can be useful to easily identify the drive, especially if we have several similar drives.
- Search for faulty blocks on the device: This option allows the program to check the drive for bad sectors or blocks during formatting. If checked, Rufus will run a scan on the drive and try to identify bad areas. In the drop-down menu, you can choose how many passes to perform the error search. This can be useful to diagnose the health of the drive and help prevent data loss. However, this can significantly increase the formatting time. We use this function when we are not sure of the correct condition of our flash drive or external USB storage device.
condition
At the bottom of the panel is the progress bar, below which are four small function icons, the start and close buttons, and the status bar.
Icons
- Change application language: A long list with nearly 40 selectable languages appears when you click.
- Business card: Displays the name of the program.
- Settings: Here you can also find a settings panel where you can make settings related to updates:
- Show log: And here we can also view the log entries of our previous operations:
Launching
Finally, if we have set everything according to our needs, then we can start.
By clicking the button, another warning window pops up informing you that everything will be deleted from the data medium:
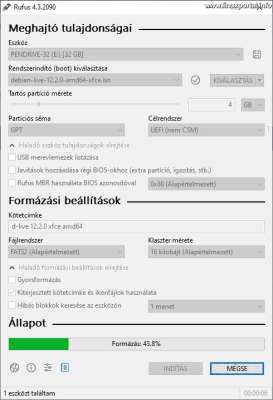
If we have also checked this, the formatting will start...
Since I didn't set up quick format, it will take a while. But it doesn't matter much in this situation, because I also set up a 4GB persistent partition above, so now it creates two partitions here.
After formatting, write the ISO files:
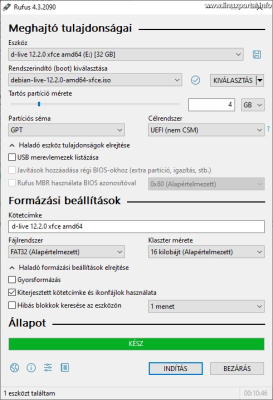
Finally, it indicates when it's done:
Conclusion
Rufus is a versatile disk image file writing program, whose flexible settings allow us to create our own installation flash drive in most situations. Its operation is fast and safe, and it is convenient to use, so I strongly recommend it to everyone. Due to its active development, it is regularly updated, so it is advisable to visit its site from time to time in order to use the latest version.
- How to Build a Bootable Drive with Rufus
- Make bootable flash drives with Rufus 3.3
- Creating a bootable flash drive on Debian
- Making a bootable flash drive with the balena Etcher 1.5
- Encyclopedia - BIOS (Basic Input Output System)
- Encyclopedia - UEFI (Unified Extensible Firmware Interface)
- Encyclopedia - MBR (Master Boot Record)
- Encyclopedia - GPT (GUID Partition Table)
- Encyclopedia - CSM (Compatibility Support Module)
- Creating a recovery flash drive using GParted Live
- Creating a bootable flash drive on a Debian system - Writing a bootable image file with the dd command
- rufus.ie
- To post registration and login required
- 363 views


