Contents of page 2
Continuation
Az on the first page we installed the PHP-FPMand looked at how to use it with global settings across the server. On this page, you will learn about the use of pools, which allow you to run each web site as a separate user, and to apply different php.ini options.
Configure PHP-FPM
Website Dependent Setup (Multiuser Mode)
If you want to build a live web server and take advantage of the real power of PHP-FPM, you can set up any web page PHP code to run as a different Linux user, and you can use custom php settings for each website. This allows websites to operate in isolation from each other and without confusing client privileges. To accomplish this, PHP-FPM a pool, where you can specify each individual setting in detail.
Creating a Linux User and Web Hosting
First, let's create a Linux user to run the new website.
Log in as root and create the user as adduser command:
adduser weboldal1The command prompts for the user's password and confirmation, as well as some other information, and then creates the user.
The user's home directory has become: / Home / weboldal1 /.
Then create a directory for your web page. This will be the web root directory.
After logging in with the new user, create the root directory in the home directory:
mkdir public_htmlConfigure PHP-FPM Pool
As mentioned above, PHP-FPM can use the pools to manage the PHP settings for each web page separately. On the first page of the description, we have already dealt with this in the global settings, when /etc/php5/fpm/pool.d/www.conf file has been edited, because when you install PHP-FPM, a single pool is created, which is also the default, and that is www.conf. In this file, the www data user is set as the default user running PHP and a default TCP socket was also set up to listen for requests on port 9000. We modified this for the UNIX socket to test its operation in several ways. So we actually set this default pool for global use. However, in order to run a particular website with a separate pool, we need to copy this default file and then make the necessary changes to it.
So first, copy the default pool file as root:
cp /etc/php5/fpm/pool.d/www.conf /etc/php5/fpm/pool.d/weboldal1.confOpen for editing:
nano /etc/php5/fpm/pool.d/weboldal1.confand go through the necessary settings:
[Www]
Set the pool name in square brackets right at the very beginning of the file. Here, too, it is advisable to use the same name, so for example: [Weboldal1] will be the setting. The system displays this name in log files and statistics. So later on, we will be able to easily identify this pool if we have anything to do with it.
user and group
Here, set the Linux user name created above for both. These two options determine which user and group on which PHP-FPM is to run the sub processes.
listen
Here are two ways to configure PHP-FPM: unix socket vagy TCP socket Based on. The operating principle is the same, so I am not going to detail the differences under other subheadings, but just the settings.
If you want to use a unix socket (this is recommended on one machine), you need to set up a new socket file that does not already exist on your system. Here is the domain name they are also combined with the name of the basic socket file to make the names clear (which PHP version of PHP-FPM is running which web page), so our setup line:
listen = /var/run/php5-fpm-weboldal1.local.sock
The socket file is then created in the specified directory after restarting PHP-FPM.
And if you want to use a TCP socket, you need to pay attention to the port number. Here, too, the point is that if you have multiple websites / pools that work with a TCP socket, each should be set to a separate port. For example:
listen = 127.0.0.1:8999
For the default www pool, port number 9000 is usually set to "factory", so always reduce the port number when setting up another TCP-enabled pool. The port numbers must be unique for the entire server, so if the server is running multiple different versions of PHP-FPM, two identical port numbers cannot occur.
listen.owner and listen.group
These apply to the unix socket, what user and group should be the host of the socket file, so who can connect to PHP-FPM. Because it is Apachea www data user, set these settings to www-data. Or, take the comments out of line, which are there by default.
security.limit_extensions
Here are the file extensions that you want to allow PHP code to run. Just like in the first part of the description for global settings. The extensions listed begin with a dot and are separated by spaces, for example:
security.limit_extensions = .php .html
At the basic level, these settings are sufficient for operation. Of course, there are plenty of options to configure, but we'll cover these in another description.
Once that is done, save the file and restart PHP-FPM a systemctl command:
systemctl restart php5-fpm.serviceThen you can check the operation of the pools:
systemctl status php5-fpm.serviceWe need to get something like this:
● php5-fpm.service - The PHP FastCGI Process Manager
   Loaded: loaded (/lib/systemd/system/php5-fpm.service; enabled)
   Active: active (running) since p 2019-03-22 22:55:50 CET; 2min 16s ago
  Process: 4030 ExecStartPre=/usr/lib/php5/php5-fpm-checkconf (code=exited, status=0/SUCCESS)
 Main PID: 4035 (php5-fpm)
   Status: "Processes active: 0, idle: 4, Requests: 0, slow: 0, Traffic: 0req/sec"
   CGroup: /system.slice/php5-fpm.service
           ├─4035 php-fpm: master process (/etc/php5/fpm/php-fpm.conf)
           ├─4037 php-fpm: pool weboldal1
           ├─4038 php-fpm: pool weboldal1
           ├─4039 php-fpm: pool www
           └─4040 php-fpm: pool www

márc 22 22:55:50 szerver1 systemd[1]: Started The PHP FastCGI Process Manager.
Here you can see that the fund has started www pool and weboldal1 pool, each with 2-2 processes waiting for PHP requests. PHP-FPM is now ready to use.
Set up a virtual host
To make it work, you need to configure it even from the Apache page. We need to create a website for virtualhoszt configuration, which contains the Apache operating options for the website.
Remaining root, go to the Apache directory of available web site configurations:
cd /etc/apache2/sites-availableThen create a new file with weboldal1.local for our site:
nano weboldal1.local.confInclude the following content:
<VirtualHost *:80>
	ServerName weboldal1.local
	ServerAlias www.weboldal1.local

	ServerAdmin webmaster@localhost
	DocumentRoot /home/weboldal1/public_html

	ErrorLog ${APACHE_LOG_DIR}/error.log
	CustomLog ${APACHE_LOG_DIR}/access.log combined

	# PHP-FPM Helyi beállítása (proxy_fcgi modul függő SetHandler beállítás):
	<IfModule mod_proxy_fcgi.c>
		<Directory /home/weboldal1/public_html>
			<FilesMatch "\.(php|html)$">
				# Unix socket alapú beállítás:
				SetHandler "proxy:unix:/var/run/php5-fpm-weboldal1.local.sock|fcgi://localhost"

				# TCP alapú beállítás:
#				SetHandler "proxy:fcgi://localhost:8999/"
			</FilesMatch>
		</Directory>
	</IfModule>
</VirtualHost>
The configuration includes:
- : Monitors incoming requests on the standard HTTP port 80.
- ServerName: The domain name of the website
- ServerAlias: The additional subdomain used for the website, in this case www.
- DocumentRoot: Web Root Directory. This is where the page runs
- ErrorLog and CustomLog: Saves the error log and the log file containing the hits here.
- IfModuleA: Checks the mod_proxy_fcgi presence of the module on the web server, and only executes parts of the block if it exists.
- Directory: Validates parts of the block only in the specified directory. In this case, it is executed in the root directory of the website.
- FilesMatch: Apply the following only to the specified file extensions
- SetHandler: Specifies where Apache will forward requests that match the previous criteria (requests to specific file types in a given directory).
Here I put the Unix socket option and the TCP base path. So we use the one that suits us, and we can delete the other line or comment.
This is a very basic virtual host setting, but enough to make a website work with it. Save the file and enable the virtual host:
a2ensite weboldal1.localThe system will create one symbolic link in the Configured Library Configured Web Pages and prompts us to restart Apache for the changes to take effect.
Before you do, you'll need to enable the required Apache module:
a2enmod proxy_fcgiAnd here's the restart of Apache:
systemctl restart apache2.serviceConfiguring a hosts file on the client system
In order to access the LAMP a website running on a server for which there is no real domain name, the client page still needs to be set to the appropriate IP address - domain name association. When requesting to the server, Apache will know here which virtualhost to process (name-based virtualhost).
To access the web page on the LAMP server from a Linux system, open / etc / hosts from the client system as root and add the following two lines:
192.168.1.120   weboldal1.local
192.168.1.120   www.weboldal1.local
I have the IP address set up for my virtual machines here, of course, let's change it to the correct IP address. Let's also set the domain names to our proper address, which is what we've done so far.
So with these two lines, we make the web storage created so far with and without www.
For Windows client systems, the c: \ Windows \ System32 \ drivers \ etc \ hosts we need to edit the file as an administrator, which can also include the two lines above.
This has the disadvantage of having to configure the hosts file on each machine from which you want to access the page. Of course, it also requires that the server itself be accessible from other hosts based on its IP address. So either you need to have the server on the same network or have a public IP address that can be accessed from anywhere. But it is a great solution in a home developer environment because you don't have to buy domain names to operate your pages.
Testing
Everything is ready to run PHP-FPM on the newly created storage space, leaving only testing left.
Enter the root directory of your new user with your new user:
cd ~/public_html/And create a php file that will query the php information:
nano phpinfo.phpAnd let's put this a few lines:
<?PHP
    phpinfo();
?>
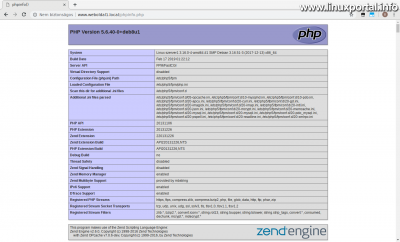
If we load this php file with the domain name into the browser and we did everything right, we will get a similar output as at the beginning of the description for global settings:
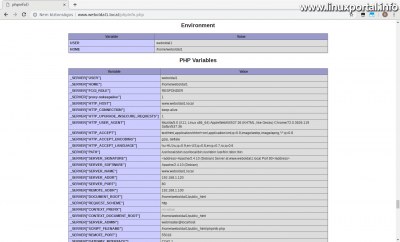
Here we can see the Server API line of the FPM / FastCGI value, so the system works. And if you scroll down, almost to the bottom, you can also see the user running PHP on this web host:
Here you can see our newly created user and their corresponding paths below.
So here is how PHP-FPM configured for a custom website works.
Extras
If I mentioned above external access to user web directories, we'll run through the implementation of PHP-FPM as an extra. This should only be done if you have configured the server on the server and want to use it.
This can be useful, for example, if, in a development environment, you don't want to bother setting up a virtualhost and client-side hosts file, or make the web hosting available on a live server before you redirect the domain name to it. To do this, copy the following section from the virtualhost configuration above (as root):
	<IfModule mod_proxy_fcgi.c>
		<Directory /home/weboldal1/public_html>
			<FilesMatch "\.(php|html)$">
				# Unix socket alapú beállítás:
				SetHandler "proxy:unix:/var/run/php5-fpm-weboldal1.local.sock|fcgi://localhost"

				# TCP alapú beállítás:
#				SetHandler "proxy:fcgi://localhost:8999/"
			</FilesMatch>
		</Directory>
	</IfModule>
Here we also use our preferred SetHandler option (Unix socket / TCP port based option).
Then open the userdir configuration:
nano /etc/apache2/mods-available/userdir.confAnd place the copied part in this configuration to look like this:
<IfModule mod_userdir.c>
	UserDir public_html
	UserDir disabled root

	<Directory /home/*/public_html>
		#AllowOverride FileInfo AuthConfig Limit Indexes
		AllowOverride ALL
		Options MultiViews Indexes SymLinksIfOwnerMatch IncludesNoExec
		<Limit GET POST OPTIONS>
			Require all granted
		</Limit>
		<LimitExcept GET POST OPTIONS>
			Require all denied
		</LimitExcept>
	</Directory>

	<IfModule mod_proxy_fcgi.c>
		<Directory /home/weboldal1/public_html>
			<FilesMatch "\.(php|html)$">
				# Unix socket alapú beállítás:
				SetHandler "proxy:unix:/var/run/php5-fpm-weboldal1.local.sock|fcgi://localhost"

				# TCP alapú beállítás:
#				SetHandler "proxy:fcgi://localhost:8999/"
			</FilesMatch>
		</Directory>
	</IfModule>


</IfModule>
Then restart Apache:
systemctl restart apache2.serviceThe same PHP-FPM and dedicated web hosting is now available, in the following format:
http://<szerver IP-címe>/~weboldal1/
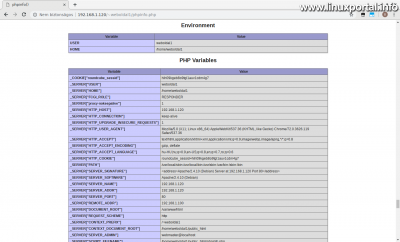
And the output of PHPinfo is:
http://<szerver IP-címe>/~weboldal1/phpinfo.php
Of course, we can still access the web page only if the client machine's IP address is visible from the client machine. However, you do not need to configure the hosts files on the client machines.
Conclusion
At first, PHP-FPM might seem a bit macerated, but once you get a taste of it, you won't regret the work you do because the performance and stability of the websites you run will speak for itself. After all, it is a modern day CMS system, where things are pointed to the PHP environment.
Of course, there are still plenty of configuration options in both the PHP-FPM pool and the Apache virtualhost configuration, but these settings are great to start with, so we can still play around so that we can run our websites perfectly in the long run with PHP-FPM. In another description, we also review these extra settings in detail.
- Encyclopedia - PHP-FPM
- Installing Debian 8 (Jessie) LAMP Server v1.0
- How to install newer PHP versions on our Debian 9 (Stretch) LAMP server in PHP-FPM mode
- How to manually change the PHP version of a website or web application running in a PHP-FPM pool?
- Encyclopedia - Apache HTTP Server
- apache.org - mod_proxy_fcgi
- wiki.apache.org - PHP-FPM
- What's new and changed in PHP 8
- How to install PHP 8 on your Debian or Ubuntu server
Navigation
- To post registration and login required
- 363 views


