
Content
Introductory
A PHP is one of the most common server-side scripting languages for building dynamic web pages, making it an essential part of our web server. The latest major version of this, PHP 2020, was released on November 26, 8. In this tutorial, we will look at how to install PHP 8 on an Ubuntu 20.04 (Focal Fossa) LAMP server, and a Debian 10 (Stretch) perfect server, and how to set both systems up and running Apache environment. I've done tutorials before on that how to install newer versions of PHP on our Debian 9 (Stretch) LAMP server in PHP-FPM mode, and that how to configure custom PHP versions on your ISPConfig server, therefore we can consider this guide as supplementing and continuing them.
What's new in PHP 8
PHP 8 has been expanded with many new features and many changes have been made to it. The changes we can see it here.
Installing PHP 8
PHP 8 is currently not listed in either Debian or Ubuntu official in the trunk, so you need to use an external repository to use it. For this purpose a deb.sury.org luggage is ideal.
Using the sury.org repository
You can also configure the repository on Debian or Ubuntu systems.
Configuring a package on Debian
I have previously made a description in which Sury.org has been configured for Debian, so I will not go into detail here. So if you want to configure the repository on Debian, see the following description:
Configuring a package on Ubuntu
On Ubuntu, you can configure it as follows: log in rootand then issue the following command:
sudo add-apt-repository ppa:ondrej/phpI do this Ubuntu 20.04 LTS (Focal Fossa) LAMP server I install, I have the output:

Then update both the package database and the packages to be the latest on our server:
sudo apt-get update
sudo apt-get upgrade
This sets up the deb.sury.org repository on our Ubuntu system. From here we can install the packages from it.
Installing PHP packages
I still choose to install the PHP base packages separately as earlier. So for a clearer installation, we will first install the basic packages needed for PHP to work.
basic Packages
If you have used other versions of PHP before, these packages may already be up on your machine. Regardless, we can run the command, there will be no problem. However, if you are installing on a fresh system, be sure to install these packages to make your PHP environment work properly:
apt-get -y install \
    mcrypt \
    imagemagick \
    memcached \
    php-apcu \
    php-gettext \
    php-imagick \
    php-memcache \
    php-pear \
    php-yaml
If we have that, then the PHP 8 package selection can come.
PHP 8 package selection
Similarly, a in the previous description for custom PHP versions, I also put together a package selection for PHP 8 that contains pretty much everything. Here are the differences in two packages between Ubuntu and Debian, so I chose the installation command for the two systems separately. I will detail below.
For Ubuntu systems
apt-get -y install \
    libapache2-mod-php8.0 \
    libphp8.0-embed \
    php8.0 \
    php8.0-apcu \
    php8.0-bcmath \
    php8.0-bz2 \
    php8.0-cgi \
    php8.0-cli \
    php8.0-common \
    php8.0-curl \
    php8.0-fpm \
    php8.0-gd \
    php8.0-http \
    php8.0-imagick \
    php8.0-imap \
    php8.0-intl \
    php8.0-mbstring \
    php8.0-memcache \
    php8.0-mysql \
    php8.0-opcache \
    php8.0-pspell \
    php8.0-raphf \
    php8.0-soap \
    php8.0-tidy \
    php8.0-uuid \
    php8.0-xml \
    php8.0-xmlrpc \
    php8.0-xsl \
    php8.0-yaml \
    php8.0-zip
Of course, we can deviate from this: we can take packages out of it, or we can even add them if necessary.
For Debian systems
The difference between Debian systems is that two packages are not currently (2021-02-05) in the Sury.org Debian repository:
- php8.0-http (still in beta: 4.0.0beta1)
- php8.0-xmlrpc (RC only: 1.0.0RC1)
In the meantime, the two previously missing packages (php8.0-http and php8.0-xmlrpc) have already been added to the Sury.org package repository, so all packages are available. I have modified the following sections accordingly.
In light of this, then the installation command for Debian systems:
apt-get -y install \
    libapache2-mod-php8.0 \
    libphp8.0-embed \
    php8.0 \
    php8.0-apcu \
    php8.0-bcmath \
    php8.0-bz2 \
    php8.0-cgi \
    php8.0-cli \
    php8.0-common \
    php8.0-curl \
    php8.0-fpm \
    php8.0-gd \
    php8.0-http \
    php8.0-imagick \
    php8.0-imap \
    php8.0-intl \
    php8.0-mbstring \
    php8.0-memcache \
    php8.0-mysql \
    php8.0-opcache \
    php8.0-pspell \
    php8.0-raphf \
    php8.0-soap \
    php8.0-tidy \
    php8.0-uuid \
    php8.0-xml \
    php8.0-xmlrpc \
    php8.0-xsl \
    php8.0-yaml \
    php8.0-zip
The package compilation above already includes the two (previously) missing packages. With this selection, we can comfortably run modern CMS systems is.
All available PHP 8 packages can be listed on both systems with the following command, so you can choose from them:
apt-cache search php8
PHP 8 command line check
Once you have installed the required packages for PHP 8, you can check:
php --version
As you can see, this also became our default command line PHP version after installation.
Set default command line PHP (optional)
If you have multiple versions of PHP on the server, but say you do not want to use this most recently installed instance as the primary command line, you will need to set the default version. You can also do this with the command below root-Kent:
update-alternatives --config phpI have this LAMP server already had PHP 7.4 up, so now for the sake of the tutorial I will switch to this:

Configuring PHP 8 on a LAMP server
- Debian 9 (Stretch) LAMP Server v1.0 (PHP 7.0)
- Debian 10 (Buster) LAMP Server v1.0 (PHP 7.3)
- Ubuntu 18.04 LTS (Bionic Beaver) LAMP Server v1.0 (PHP 7.2)
- Ubuntu 20.04 LTS (Focal Fossa) LAMP Server v1.0 (PHP 7.4)
I have indicated in parentheses which server was created with which version of PHP. In all four cases, the "factory" default PHP in the distribution's repository was uploaded to these servers. So the point is that we install on any of them, before the PHP 8 we just added, each server already had some version of PHP before it, with which we just installed PHP 8.
I used the most recent of these in this description, the Ubuntu 20.04 LAMP on a virtual machine i make this description so i already had a 7.4 php.
There are many ways to configure PHP. If you already have your packages upstairs, you can speak on a “basic level,” but to meet today’s expectations, you need to adjust it a bit.
Checking the initial state using phpinfo
First, place a phpinfo file in the web root directory of the server and load it into your browser to better understand what is going on around PHP.
Create the file with / Var / www / html directory, which is the default web root directory (if you later migrated it, create it in it):
sudo nano /var/www/html/phpinfo.phpAnd let's include the usual few lines:
<?php
    phpinfo();
?>
Then save and load your browser into the server IP address or hostname:

As you can see in the picture, here is a PHP 7.4, which Apache runs as a module (Apache 2.0 Handler). Although we also installed PHP 8, it still doesn't work now because the installer detected that an Apache module is already enabled, so it didn't activate the newer version. So now the default PHP will run the requested pages (this should not be confused with setting the default PHP on the command line described above). We have to switch this manually.
Switch to PHP 8
As root, disable the default PHP Apache module (in this case 7.4), then enable 8.0 and restart Apache. For these we use the a2dismod, a2andmod and the systemctl commands:
a2dismod php7.4
a2enmod php8.0
systemctl restart apache2
After turning on the php8.0 Apache module, it listed a few more suggested things. THE Multi-Processing Modules (MPMs) we will not deal with this topic now, we will review them in more detail in another description.
Then upgrade to our phpinfo page:

And we can see that he also switched to PHP 8. However, we are not done with that yet, we still need to change a thing or two.
Switch to PHP 8 FPM
PHP 8 now runs php files in the web root, but it still works as an Apache module (mod_php), which has been obsolete for many years. Instead of PHP-FPMwe will use, which is currently the most advanced Server API (SAPI) for PHP. To do this, run as a few commands while remaining root:
a2dismod php8.0
a2enmod proxy_fcgi setenvif
a2enconf php8.0-fpm
systemctl restart apache2
All that happens here is to turn off the php8.0 apache module that has just been turned on, then turn on a few more modules needed to run PHP-FPM, and then turn on the php8.0-fpm configuration, which starts the www-pool processes , finally restarting Apache.
You can then check the php8.0-fpm service:
systemctl status php8.0-fpm.service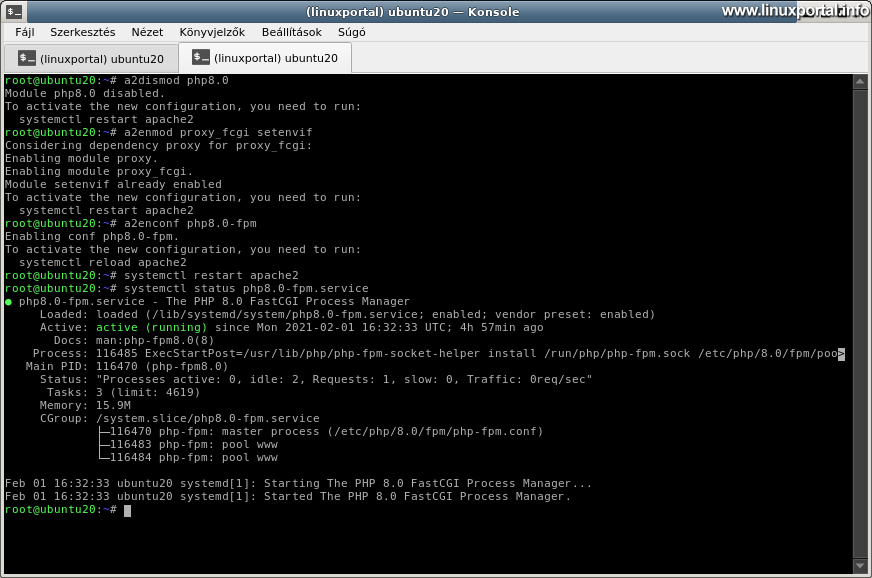
Then if we refresh our phpinfo page again, we can see the difference:

The Server API queue now has a value of "FPM / FastCGI" and the paths already point to the FPM libraries.
Of course, we could have done these last two switching steps in one step, now I have divided them into two separate parts just for the sake of illustration.
This PHP-FPM configuration is just a default setting that runs all PHP files globally with PHP 8 FPM on the entire server in the default www pool. Thus, any web pages in the web root as well as Apache configurations (e.g. phpMyAdmin).
To learn more about additional PHP-FPM settings and fine-tuning, such as running web pages / Apache configurations in separate FPM pools or even running separate versions of PHP, you can learn more in the following tutorials:
- Combined use of different PHP-FPM versions on a single server
- How to install PHP-FPM on a Debian 8 (Jessie) LAMP server
- Create and configure a PHP-FPM pool for phpMyAdmin
check and configure phpMyAdmin
A phpMyAdmin an important element of LAMP servers: even if you do not have a website running on the server, phpMyAdmin is a complex enough system to test LAMP components (Apache, PHP, MySQL / MariaDB) if we have installed newer versions of these than the versions offered in the official distribution of the distribution. Therefore, when I modify a LAMP server, I always test phpMyAdmin to see if it works properly. That's why I have it open in a separate browser tab. So now let's look at whether phpMyAdmin and PHP 8 can handle each other.
Starting our web database manager:

at first glance everything is fine, on the right we also see PHP 8.0.1, so it runs on this. However, if we take a closer look at it, we will find some interesting things:

Entering one of the databases, he threw a PHP notice:
Deprecation Notice in ./libraries/classes/Di/ReflectorItem.php#82
 Method ReflectionParameter::getClass() is deprecated
Which, of course, is not a fatal error, but in a live server environment it is not very good either, because other errors can also occur, especially after switching to a major PHP version.
All this, of course, also follows from the fact that a In PHP 8, the default error_reporting setting has changed also, which means that bugs that may have remained hidden in the past will now appear here. So normally it would be enough to just modify it in php.ini error_reporting value so as not to display the notices, and so we could skip the following sections. However, this faster solution may not be a good decision, because by better investigating this error, it is specifically It came about due to changes in PHP 8, so it would not be safe to leave it that way.
Version overview (theoretical part)
Running through the phpMyAdmin official announcements, we can see how the phpMyAdmin project is compatible with PHP 8. As we can see, PHP 2021 bugs are currently (02-05-8) still being fixed in the latest versions. Of course, this could improve in, say, half a year, or even become fully compatible. However, it is not yet 100% ready to use PHP 8. And even taking into account that the various Linux distributions do not even have the latest phpMyAdmin packages, so the number of possible errors is even higher. Below I have compiled the phpMyAdmin versions of the LAMP servers I have created so far:
- Debian 8 (Jessie) LAMP Server v1.0 (phpMyAdmin 4.2.12) (I just made this interesting, don't use Debian 8 anymore, it's very old)
- Debian 9 (Stretch) LAMP Server v1.0 (phpMyAdmin 4.6.6)
- Debian 10 (Buster) LAMP Server v1.0 (phpMyAdmin 5.0.4) - here it is currently only available in the backports repository, it was not in this before, it had to be downloaded and installed separately
- Ubuntu 18.04 LTS (Bionic Beaver) LAMP Server v1.0 (phpMyAdmin 4.6.6)
- Ubuntu 20.04 LTS (Focal Fossa) LAMP Server v1.0 (phpMyAdmin 4.9.5)
So accordingly, we can see that - depending on our own LAMP server - our version of phpMyAdmin is not the latest, except for Debian 10, where it was not previously included in the package, so it had to be downloaded and installed separately, but more recently (in the second half of 2020) To the Debian 10 backports repository, from where you can now install and now have access to the latest version (5.0.4), which may not be the case later.
Aware of these, we can see that at the moment it will be necessary to set up some phpMyAdmin and the websites to be served on the server without any problems. However, as I mentioned above, if we come across this description later, when phpMyAdmin is fully compatible with PHP 8, the following configuration sections will no longer be needed, but even then it will be advisable to create an optimal environment on our server where all websites can run properly.
Setting options (theoretical part)
As I mentioned above, PHP-FPM can be configured in many ways, so we have to decide for ourselves what the needs are for the server we want to build, and which is the most optimal approach accordingly. I will list some variations here as an idea, but then we will only proceed with one type of setup.
- Global PHP 8 FPM configuration, and phpMyAdmin runs in the default FPM pool of another PHP (such as the default 7.4 in the distribution)
- Global PHP 8 FPM configuration, and phpMyAdmin runs in a separate FPM pool of another PHP (such as the default 7.4 in the distribution)
- Global default PHP FPM (for example 7.4), so phpMyAdmin runs in this, the web root runs in the default FPM pool of PHP 8 FPM
- Global default PHP FPM (for example 7.4), so phpMyAdmin runs in this, the web root runs in a separate FPM pool of PHP 8 FPM
This could still be codified, but these are the main directions. Of these, I intentionally omitted the forms of operation as an Apache module (mod_php) because we no longer use them.
Here I will now provide a brief, comprehensive theoretical guide to help us decide which is the right setting direction for us.
The global PHP FPM setting means enabling one of the PHP fpm Apache configurations, examples are:
a2enconf php5.6-fpm
a2enconf php7.0-fpm
a2enconf php7.1-fpm
a2enconf php7.2-fpm
a2enconf php7.3-fpm
a2enconf php7.4-fpm
a2enconf php8.0-fpm
Enabling Apache configurations is a2andconf and turn them off a2disconf with the command. After enabling the configurations, you will need to restart Apache.
If one of the php fpm configurations is enabled, all you have to do is run everything on the entire server by default, such as websites, Apache configurations, and so on. For this to work, you also need to disable the Apache module for that version of PHP (for example: a2dismod php7.4 ). I have written about this in more detail before another specification.
An exception to this global setting is to set a web page separately to virtualhosztor the configuration of an Apache configuration. An Apache configuration can be, for example, a phpMyAdmin or an example Roundcube webmail or even one Matomo web analytics system or any other web application that you want to make available from each web page from a subdirectory.
In light of these, when building a server, we need to assess what kind of websites will run on it, what kind of PHP version (s) they will require most of them, and what other web applications we will have (phpMyAdmin, webmail, etc.) and what kind of PHP versions they support. Then, on the basis of these, we have to decide which is the most optimal setting, so that, for example, we have to make as few extra settings and interventions as possible later when setting up another website. For example, if we know that the server is the latest CMS systems you want to run it, turn on the latest PHP, however, if there will be older development websites, choose an older PHP as a global setting to provide a suitable PHP environment for each website, and so on.
And all you need to know about PHP-FPM pools is that each version of PHP has a default "www" pool. So if you enable one of the PHP-FPMs, it will run everything in this www pool by default. We can deviate from this by creating a separate FPM pool for a website or Apache configuration (either in the same PHP version or in another) and running it. This allows us to separate their runtime environment from each other, which allows for more optimal operation, as well as increases security, because in this case we can run each pool even with another user. So, regardless of global settings, it is better to run each website in a separate FPM pool. You can read more about these here.
Configure phpMyadmin
The closest to the second of the situations listed above is the setting I made earlier in another description, so I still recommend doing this, which we will now do here:
So the situation is the same: we want to run phpMyAdmin in a separate PHP environment from the other websites, the Apache configuration. In this case, therefore, not under globally configured PHP 8, but in a separate FPM pool of PHP by default in the distribution. This can eliminate two problems:
- PhpMyAdmin can work fine under an earlier PHP 7.x because it is not yet 100% compatible with PHP 8. Of course, this will expire later because it will be compatible with it over time, but it is not yet.
- Because we provide it with a separate runtime environment, this allows us to fine-tune everything necessary for phpMyAdmin that does not interfere with other websites, etc. This is the only reason to make this setting so that you don't have to worry about it later.
We will now proceed in a slightly faster pace here, because I have already described all the important details in the other description. Then come the settings.
Configuring Apache
Here we first start by configuring Apache, because from here we will have to take over the necessary settings for the PHP environment, so it is easier to start with this. Open as root a /etc/apache2/conf-available/phpmyadmin.conf file containing the Apache configuration of phpMyAdmin:
nano /etc/apache2/conf-available/phpmyadmin.confAnd let's include the PHP-FPM part, as shown here:
# phpMyAdmin default Apache configuration

Alias /phpmyadmin /usr/share/phpmyadmin

<Directory /usr/share/phpmyadmin>
	Options SymLinksIfOwnerMatch
	DirectoryIndex index.php

	# limit libapache2-mod-php to files and directories necessary by pma
	<IfModule mod_php7.c>
		php_admin_value upload_tmp_dir /var/lib/phpmyadmin/tmp
		php_admin_value open_basedir /usr/share/phpmyadmin/:/etc/phpmyadmin/:/var/lib/phpmyadmin/:/usr/share/php/php-gettext/:/usr/share/php/php-php-gettext/:/usr/share/javascript/:/usr/share/php/tcpdf/:/usr/share/doc/phpmyadmin/:/usr/share/php/phpseclib/:/usr/share/php/PhpMyAdmin/:/usr/share/php/Symfony/:/usr/share/php/Twig/:/usr/share/php/Twig-Extensions/:/usr/share/php/ReCaptcha/:/usr/share/php/Psr/Container/:/usr/share/php/Psr/Cache/:/usr/share/php/Psr/Log/:/usr/share/php/Psr/SimpleCache/
	</IfModule>

	# PHP-FPM beállítása a saját phpmyadmin pool-hoz
	<IfModule mod_proxy_fcgi.c>
		<FilesMatch "\.(php|html)$">
			SetHandler "proxy:unix:/run/php/php7.4-phpmyadmin-fpm.sock|fcgi://localhost"
		</FilesMatch>
	</IfModule>
	# PHP-FPM beállítás vége

</Directory>

# Disallow web access to directories that don't need it
<Directory /usr/share/phpmyadmin/templates>
    Require all denied
</Directory>
<Directory /usr/share/phpmyadmin/libraries>
    Require all denied
</Directory>
A php7.4-phpmyadmin-fpm.sock put your own PHP version in the filename. I have a 7.4, so I named it that way. It is advisable to name it in such a way that it also refers to the PHP version and what we are running with it, so that we do not get involved in its operation later.
Here we can still see that in this example there are 2 PHP settings: upload_tmp_dir, and open_basedir. We will need these in the next section, which is why we have now started with this file. If you are working with a different distribution, they may be different there, such as Debian 10 LAMP server when setting up Apache also, so it is important not to use these as a basis, but what settings are in our own file, because then we will have to take them over.
Now save the file and come to the PHP-FPM pool setup.
Create a PHP-FPM pool
Create a new file in your FPM directory under your default PHP version, which I have in 7.4:
nano /etc/php/7.4/fpm/pool.d/phpmyadmin.confAnd let's include the following:
; Pool-unk neve
[phpmyadmin]

; Futtató felhasználó
user = www-data
group = www-data

; Socket fájl
listen = /run/php/php7.4-phpmyadmin-fpm.sock

; Socket fájl tulajdonosa és módja
listen.owner = www-data
listen.group = www-data
listen.mode = 0660

; Process management beállítások
pm = dynamic
pm.max_children = 5
pm.start_servers = 2
pm.min_spare_servers = 1
pm.max_spare_servers = 3
pm.max_requests = 0

; log fájl
access.log = /var/log/phpmyadmin/php-fpm-access.log
access.format = "Log: %t \"%m %r%Q%q\" %s time:%{mili}dm mem:%{kilo}MKB cpu:%C%%"

; Ezekben a fájltípusokban futhatnak php kódok
security.limit_extensions = .php .html

; Környezeti változók
env[HOSTNAME] = $HOSTNAME
env[PATH] = /usr/local/bin:/usr/bin:/bin
env[TMP] = /var/lib/phpmyadmin/tmp
env[TMPDIR] = /var/lib/phpmyadmin/tmp
env[TEMP] = /var/lib/phpmyadmin/tmp

; Saját PHP beállítások
php_admin_flag[log_errors] = on
php_flag[display_errors] = off
php_admin_value[session.gc_maxlifetime] = 3600
php_admin_value[error_log] = /var/log/phpmyadmin/php-errors.log
php_admin_value[memory_limit] = 128M
php_admin_value[upload_max_filesize] = 256M


; További PHP beállítások, amiket a 'gyári' phpMyAdmin Apache konfigból vettünk át
php_admin_value[upload_tmp_dir] = /var/lib/phpmyadmin/tmp
php_admin_value[open_basedir] = /usr/share/phpmyadmin/:/etc/phpmyadmin/:/var/lib/phpmyadmin/:/usr/share/php/php-gettext/:/usr/share/php/php-php-gettext/:/usr/share/javascript/:/usr/share/php/tcpdf/:/usr/share/doc/phpmyadmin/:/usr/share/php/phpseclib/:/usr/share/php/PhpMyAdmin/:/usr/share/php/Symfony/:/usr/share/php/Twig/:/usr/share/php/Twig-Extensions/:/usr/share/php/ReCaptcha/:/usr/share/php/Psr/Container/:/usr/share/php/Psr/Cache/:/usr/share/php/Psr/Log/:/usr/share/php/Psr/SimpleCache/
; Ezeket pontosan másoljuk át az phpMyAdmin Apache konfigja alapján!
We will not go into the detailed description of these here now, because I have already described the another specification. What is important here now, I will only highlight:
- A listen = /run/php/php7.4-phpmyadmin-fpm.sock file name should be the same as the one specified in the Apache configuration.
- My PHP settings: For example, you can enter your own environment settings here. I set these up here. Of these, the path to the log file is important, and we'll have to deal with that soon.
- Additional PHP settings: Here, let's take over exactly all the Apache settings that were in our own copy of the config file. I only had these two, which I mentioned above. Note the syntax differences, so that you need to enter the values here differently than they were in the Apache config file.
If we're done, save it.
Manage log files
Once you've put it all in a separate pool, it's a good idea to redirect your log files to a separate location. Here it is we proceed on the basis of the relevant part of the previous description. Create a directory for log files, set its owner:
mkdir /var/log/phpmyadmin
chown -R www-data:www-data /var/log/phpmyadmin
Set the also rotate log files. Create a new logrotate file:
nano /etc/logrotate.d/phpmyadminAnd let's add:
/var/log/phpmyadmin/php-fpm-access.log
/var/log/phpmyadmin/php-errors.log
{
	rotate 7
	daily
	copytruncate
	compress
	delaycompress
	missingok
	notifempty
}
Restart systems
Finally, restart PHP-FPM (our own version) and Apache:
systemctl restart php7.4-fpm.service
systemctl restart apache2.service
Testing
When we are all set, we check the fruits of our labor.
Update it to the phpMyAdmin interface. If you have logged out in the meantime, please go back:

PHP 7.4 is also shown here on the right.
And if we put a phpinfo file together quickly:
nano /usr/share/phpmyadmin/my_phpinfo.phpContents of which:
<?php
    phpinfo();
?>
And load a new tab, then:

You can also see your runtime environment, where you can also scroll down to find your own PHP settings, such as "upload_max_filesize":

And finally, if you even look at the web root directory where you can place your web pages, then:

You can see that here PHP 8 is already waiting for the web pages to be uploaded.
Thus, our phpMyAdmin system runs in a separate PHP 7.4 environment, and the content placed in the web root in a globally configured PHP 8.0.1 environment. So it was definitely worth reloading phpMyAdmin, because we can be sure that they won't interfere with each other's settings if you ever need to change them.
Configuring PHP 8 on an ISPConfig 3 server
Of these, I am writing this description with Debian 10.
One ISPConfig On a 3-system server, the situation is much simpler, because here the Web hosting control panel it already does all the necessary settings in the background for us, so we only need to set a few basic things in its interface.
If you have installed the PHP 8 packages as described at the beginning of this description, you will still need to restore the default PHP.
Restore default PHP
Once PHP 8 was added to the system, so the default PHP is what it is now. During the setup in ISPConfig, it happened to me that I did not save the settings, so the red circle did not disappear. After I restarted everything, the control panel didn’t come in after logging in, just its header. It all happened after I finally migrated the storage to PHP 8 FPM. So after that, neither the control panel worked nor the background task ran. The latter also threw a lot of PHP errors when I tried to run it manually:
PHP Warning:  Undefined array key "admin_mail" in /usr/local/ispconfig/server/server.php on line 97
PHP Warning:  Undefined array key "php_fpm_incron_reload" in /usr/local/ispconfig/server/plugins-available/z_php_fpm_incron_reload_plugin.inc.php on line 109
PHP Warning:  Undefined array key "CA_path" in /usr/local/ispconfig/server/plugins-available/apache2_plugin.inc.php on line 269
PHP Warning:  Undefined array key "template" in /usr/local/ispconfig/server/lib/classes/tpl_ini.inc.php on line 92
PHP Warning:  Trying to access array offset on value of type null in /usr/local/ispconfig/server/lib/classes/tpl_ini.inc.php on line 92
PHP Warning:  Undefined array key "template" in /usr/local/ispconfig/server/lib/classes/tpl_ini.inc.php on line 92
PHP Warning:  Trying to access array offset on value of type null in /usr/local/ispconfig/server/lib/classes/tpl_ini.inc.php on line 92
PHP Warning:  Undefined array key "csr" in /usr/local/ispconfig/server/plugins-available/apache2_plugin.inc.php on line 1314
PHP Warning:  Undefined array key "website_autoalias" in /usr/local/ispconfig/server/plugins-available/apache2_plugin.inc.php on line 1428
PHP Warning:  Undefined array key "vhost_proxy_protocol_enabled" in /usr/local/ispconfig/server/plugins-available/apache2_plugin.inc.php on line 1815
PHP Warning:  Undefined array key "vhost_proxy_protocol_enabled" in /usr/local/ispconfig/server/plugins-available/apache2_plugin.inc.php on line 1839
PHP Warning:  Undefined array key "template" in /usr/local/ispconfig/server/lib/classes/tpl_ini.inc.php on line 92
PHP Warning:  Trying to access array offset on value of type null in /usr/local/ispconfig/server/lib/classes/tpl_ini.inc.php on line 92
PHP Warning:  Undefined array key "template" in /usr/local/ispconfig/server/lib/classes/tpl_ini.inc.php on line 92
PHP Warning:  Trying to access array offset on value of type null in /usr/local/ispconfig/server/lib/classes/tpl_ini.inc.php on line 92
PHP Fatal error:  Uncaught TypeError: count(): Argument #1 ($var) must be of type Countable|array, bool given in /usr/local/ispconfig/server/lib/classes/tpl.inc.php(1344) : eval()'d code:77
Stack trace:
#0 /usr/local/ispconfig/server/lib/classes/tpl.inc.php(1344): eval()
#1 /usr/local/ispconfig/server/lib/classes/tpl.inc.php(788): tpl->_parse()
#2 /usr/local/ispconfig/server/plugins-available/apache2_plugin.inc.php(3473): tpl->grab()
#3 /usr/local/ispconfig/server/plugins-available/apache2_plugin.inc.php(2007): apache2_plugin->php_fpm_pool_update()
#4 /usr/local/ispconfig/server/lib/classes/plugins.inc.php(120): apache2_plugin->update()
#5 /usr/local/ispconfig/server/mods-available/web_module.inc.php(137): plugins->raiseEvent()
#6 /usr/local/ispconfig/server/lib/classes/modules.inc.php(302): web_module->process()
#7 /usr/local/ispconfig/server/lib/classes/modules.inc.php(235): modules->raiseTableHook()
#8 /usr/local/ispconfig/server/server.php(180): modules->processDatalog()
#9 {main}
  thrown in /usr/local/ispconfig/server/lib/classes/tpl.inc.php(1344) : eval()'d code on line 77
After a long debugging and searching, it turned out that not all parts of ISPConfig are yet compatible with PHP 8. So since PHP 8 is now the default PHP, it runs, among other things, the control panel, which now has an error. Then after I found the solution, it worked again.
Source: howtoforge.com - Community (I also threw exactly these errors line by line on a manual run).
Therefore, after fixing the bug, I have now put this part back in to prevent the same from happening to anyone else. So the solution is to restore the default PHP to the default PHP version of the distribution. So I have Debian 10 for PHP 7.3. By implication, for other distributions or releases to the appropriate proprietary version.
So run the following commands rootas, and select your own default version, and then restart Apache (I will restore order after that):
update-alternatives --config php
update-alternatives --config php-cgi
update-alternatives --config php-fpm.sock
systemctl restart apache2.service
Over time, this problem will certainly go away when ISPConfig is already 100% compatible with PHP 8, but we still need to switch back to the default PHP version of the distribution.
Once we are done with this, we can safely proceed with the settings.
Create a new PHP version
Log in to your ISPConfig 3 panel as admin.

Let's move to the top right System main menu, then to the left Additional PHP Versions menu:

There are already custom PHP versions on this server, resulting from a previous description. Click here for green Add new PHP version button. This will bring up the new PHP form:
Name tab

- Server: Select your server name from the drop-down list
- Client: If you are using clients, it is advisable to leave it blank so that all clients will have access to this version of PHP.
- PHP Name: PHP 8.0
- Active: kite
FastCGI Settings tab

- Path to the PHP FastCGI binary: php cgi8.0
- Path to the php.ini directory: /etc/php/8.0/cgi
Note here that you do not need to use an absolute path for the first value, because the php-cgi files / usr / bin they are in directories that are by default included in the path.
PHP-FPM Settings tab

- Path to the PHP-FPM init script: php8.0-fpm
- Path to the php.ini directory: / etc / php / 8.0 / fpm
- Path to the PHP-FPM Pool directory: /etc/php/8.0/fpm/pool.d
- Unlabeled Field 4: This PHP-FPM socket directory wants to be left blank. In previous versions, this was not yet included
Once saved, you will be returned to the list of custom PHP versions:

You can also see here that there is a host that uses PHP 7.4. We will now switch PHP to version 8 on that repository.
Enable PHP 8 on hosting
Once you have added PHP 8 to the list, you just need to turn it on to the desired hosting location. Fortunately on this server there is also a hosting space where a Drupal 9 website runs, so I can present this.
Enter above Sites main menu:

Select the repository to which you want to apply the newly added PHP 8 here:

Here, right on the first tab, scroll down to the bottom and configure PHP 8:

Then save the form.
After saving, wait until the red circle at the top of the page disappears.

For the first time, I had the problem here: the red circle did not disappear even after long minutes. This occurs when the ISPConfig cron task cannot run properly because there is something wrong with it (in which case the script did not cope with the requirements of PHP 8). If the red circle disappears, you can be sure that the background task ran properly, so the settings were saved.
Check storage
We are launching the website on hosting, for me this is Drupal 9. And in that status report page:

Here you can see the working PHP in the PHP version section. (Let's not deal with the missed Drupal base system update now, I will replace it before uploading the next version of the server.)
And if you click on the more information link for the PHP version here, you will submit a phpinfo page:

This is already a working PHP 8 hosting, and Drupal 9 seems to be having a good time.
Conclusion
As you can see, installing PHP 8 requires some post-configuration, especially on LAMP servers, but once it’s up, you can use it without any problems. In the case of the ISPConfig 3 server environment, at first I was surprised by that error, but luckily we managed to find a solution, after which we can switch between the different versions of PHP on our repositories without any problems.
PHP 8 is still a very new thing, so chances are that some of this information will become obsolete over time, as sooner or later all actively developed PHP-based systems will be compatible with it, and even PHP 8 itself will be honed a lot in the times to come. it will be as mature as its predecessor, PHP 7. But once we learn the basics of installing and configuring it, this knowledge will come in handy later if we already need to use newer sub-versions of PHP 8.
This description took a little longer than I planned, but I still tried to include as much extra information and theory as possible so that not only the dry command lines are listed, as you can see in most other places, because I think it's important that whoever reads it not only make these settings, but also understand how they work. Anyone who already knows these doesn't have much new in them either, but at the time, for example, I would have been happy if someone had offered me things at the same time, and I didn't have to gather the knowledge needed for settings from many other sides.
Use it with health, I hope many people benefit from a little PHP 8 boom. :)
- What's new and changed in PHP 8
- How to install newer PHP versions on our Debian 9 (Stretch) LAMP server in PHP-FPM mode
- How to configure custom PHP versions on our ISPConfig server
- How to install PHP-FPM on a Debian 8 (Jessie) LAMP server
- Create and configure a PHP-FPM pool for phpMyAdmin
- How to manually change the PHP version of a website or web application running in a PHP-FPM pool?
- Install Ubuntu 20.04 LTS (Focal Fossa) LAMP Server v1.0
- Perfect server: Debian 10 (Buster) V1.0
- Encyclopedia - Apache HTTP Server
- Encyclopedia - PHP
- Encyclopedia - PHP-FPM
- Encyclopedia - LAMP Systems
- Encyclopedia - ISPConfig
- Download the perfect server: Debian 10 (Buster) v1.1
- deb.sury.org
- To post registration and login required
- 670 views