
Content
Introductory
If you use external USB drives and storage devices, you can safely disconnect and disconnect them in the graphical desktop environment of your Linux system with a few clicks. Devices issued in this way will no longer be accessible, as the associated block device names will be eliminated and the hardware will be de-energized. By default, we can only re-use hardware by physically reconnecting it, which requires human intervention.
There may be a need to still have access to our software-disconnected, turned-off storage device without having to physically unplug it and then reconnect it. For example, if you have an external USB hard drive on which you make daily data backups but don’t want the drive to be turned on before and after the backup; we want to do all this automatically, without any intervention, by turning the device on and off before saving, and disconnecting and turning off (and not just sleeping) after the backup.
But if for any other reason you want to be able to access your logically disconnected and de-energized USB storage device, this tutorial will look at how to restart and make available your external HDD, flash drive or card reader without having to physically reconnect it.
USB standards and versions
Before embarking on anything, we must first touch on a few tangential words about USB standards and versions; just enough to make the rest of the description easier to understand. For today's task, USB standards, that is, various Host Controller Interface (HCIs) we need to approach things. The Host Controller provides communication between the peripherals and the computer, for which there are several interfaces. Let's briefly review these without claiming to be exhaustive:
OHCI (Open Host Controller Interface)
Az Open Host Controller Interface (OHCI) is an open standard that is Universal Host Controller Interface (UHCI) is the standard for the USB 1.x hardware control interface.
- Supported USB versions: USB 1.0, USB 1.1
- Maximum data rates:
- USB 1.0 (Low Speed Mode): 1,5 Mbps (0,1875 Mbps)
- USB 1.1 (Full Speed mode): 12 Mbps (1,5 Mbps)
- Controller (s): ouch-pci, ohci_hcd
Universal Host Controller Interface (UHCI)
The Universal Host Controller Interface (UHCI) is an Intel-created interface for USB 1.x (low and full speed). To use this, hardware manufacturers need a license from Intel.
- Supported USB versions: USB 1.0, USB 1.1
- Maximum data rates:
- USB 1.0 (Low Speed Mode): 1,5 Mbps (0,1875 Mbps)
- USB 1.1 (Full Speed mode): 12 Mbps (1,5 Mbps)
- Controller (s): uhci-pci
EHCI (Enhanced Host Controller Interface)
Az Enhanced Host Controller Interface (EHCI) is a high-speed controller standard for USB 2.0 that is also owned by Intel.
- Supported USB version: USB 2.0
- Maximum data rates:
- USB 1.0 (Low Speed Mode): 1,5 Mbps (0,1875 Mbps)
- USB 1.1 (Full Speed mode): 12 Mbps (1,5 Mbps)
- USB 2.0 (High-speed mode): 480 Mbps (60 Mbps)
- Controller (s): here and there
xHCI (Extensible Host Controller Interface)
Az Extensible Host Controller Interface (xHCI) is the current latest host control standard that improves speed, energy efficiency, and virtualization over its predecessors. It is intended to replace the previous (OHCI / UHCI / EHCI) host control interfaces. It supports the speed of all previous USB devices, and this is also the Intel standard.
- Supported USB versions: USB 1.1, USB 2.0, USB 3.0, USB 3.1
- Maximum data rates:
- USB 1.1 (Full Speed mode): 12 Mbps (1,5 Mbps)
- USB 2.0 (High-speed mode): 480 Mbps (60 Mbps)
- USB 3.0 (SuperSpeed mode): 5 Gbps (625 Mbps)
- USB 3.1 (SuperSpeed + mode): 10 Gbps (1,25 Gbps)
- USB 3.2 (SuperSpeed + mode): 20 Gbps (2,5 Gbps)
- Controller (s): xhci_hcd, xhci-pci
There are even newer and faster USB specifications for these, but these are not covered here.
Find USB devices
Now that we know the USB standards, versions, and drivers, in this step we will look for the USB devices connected to our computer.
List of assets
The devices connected to the system are primarily lsusb command to list:
lsusb
lsusb -t
For the sake of clarity, the list is displayed in two ways: the first command gives a plain list, then the -t and with a switch it displays our devices in a tree structure:

USB hubs are responsible for monitoring device connections and disconnections to their ports, and for powering and power management of devices. A USB host controller or host controller has an embedded hub called a root hub. The USB ports on the back of the computer are the ports on the root hubs. The USB host controller is responsible for controlling the USB bus and communicating between the devices and the host controller. Direct communication between devices is not supported.
A computer can have multiple Host Controller Interfaces (HCIs), and a host controller interface can handle multiple buses, so for example, it can have multiple USB2 (EHCI) ports and USB3 (xHCI) ports. ) ports, etc.
The first lsusb In the output of the command we can see the USB buses with serial numbers (00x), the device serial numbers (00y), the IDs (ffff: ffff, device IDs, later on), as well as the devices communicating on them, including 001 for each bus. also includes the special hubs mentioned above, the root hubs, and their other connecting devices, which have a unique device serial number per bus starting from 002 based on their connection. For example, if you unplug the mouse and reconnect it, you will already get a higher device serial number. USB devices can be, for example, keyboards, mice, flash drives, external HDDs, webcams, printers, etc., or even additional hubs that allow you to further share USB ports.
The output even shows that the particular bus is just a 1.1 USB or a 2.0 USB. In the example of my laptop, there are 4 buses in the machine. These include 2 USB ports of 1.1 and 2 USB ports of 2.0. The Linux system detects the standard of the connected device (OHCI, UHCI, EHCI or xHCI) and connects it to the appropriate bus. For example, as shown, the mouse connects to bus 003 (USB 1.1) to device slot 30, and the external hard drive connects to device slot 001 of bus 018, which operates USB 2.0 ports. Of course, the other issue is that this external drive would also know the USB 3.0 standard, only the laptop does not have a USB3 port, so connect to it. So no matter the location of the connected devices, Linux automatically connects them to the optimal bus for the device; they are connected in the same way even when I swap the connection points of the devices. Of course, the USB port connector on the machine also matters, so for example, if a computer has blue USB 3 connectors, they know the speeds / standards backwards if a slower device is plugged in, but a device plugged into a black connector will not know operate at the speed of USB3, only at the same or slower speeds.
The second, lsusb -t and the output of the command shows a more detailed list of all USB ports in use. These USB ports are not the same as the external physical ports and their numbers, but rather have some logical significance, as the system determines which port on which bus, for example, a connected external hard drive or mouse is. In addition, there may be internal devices in the list that are configured on the motherboard, so they do not have external ports, and the motherboards may even have built-in hubs, which are used to further increase the number of external connectivity options.
So the example shows that there are two Host Controller Interfaces, one of which is the OHCI (Open Host Controller Interface), which handles two USB 1.x buses, and there is an Enhanced Host Controller Interface (EHCI). which handles two more USB buses that operate at 2.0 standard and speed, respectively. Thus, this machine has a total of 4 buses to which the devices are connected and communicate on them. This, of course, varies from computer to computer, what interface standards are on your motherboard, or even on a retrofitted PCI USB expansion card, and how many buses they handle, and so on.
In the output list for Class values you can even see what function the given USB port has, e.g. Video, Human Interface Device (keyboard, mouse), etc .; in addition, the driver of the given device is displayed next to the Driver values, e.g. ohci-pci, ehci-pci, etc., which I have already written about in the list above, and at the end of the lines you can also see the speeds of the devices, e.g. 12M, 480M. These are also included in the list above (for Mbps values), which standard can know which speed (s) at maximum.
Based on this information, we can determine which of our devices is connected to which host control interface, and from this we know which USB version it includes, which bus or root hub it is connected to. It is also worth noting here that a USB port can also be connected to the USB 3.x, 2.0 and 1.x root hubs. For example, if a USB 3.x root hub fails, or we turn it off it will be automatically switched to another bus / root hub, which can be another 3.x root hub (if there are more), or it can be the root hub of a 2.0 or 1.x USB bus. We will deal with this below, as this is the main topic of our task today.
View detailed information
It is also possible to view the full details of USB devices with the lsusb command -v (verbose) switch. This command already rootrun as, because so far there was no difference between the output of the lsusb command for plain user and root, but here are some parts that do not appear when run as plain user. So as root, our command is:
lsulb -vAnd if you are only interested in the details of a particular USB device, you can also enter the serial number of the USB bus and the serial number of the device. Remaining with my own example, I query the details of my external hard drive, which would be available on device 1 number 18 of bus 22 based on the image of the first output, but I had my laptop turned off and external HDD removal and reconnection changed to XNUMX, so this is what the lsusb command is asking for now -s using the switch:
lsusb -v -s 1:22So here remains the -v switch and add another -s switch as well : in the form we specify our exact tool for the query. The output of this is:
Bus 001 Device 022: ID 152d:0578 JMicron Technology Corp. / JMicron USA Technology Corp. JMS567 SATA 6Gb/s bridge
Device Descriptor:
  bLength                18
  bDescriptorType         1
  bcdUSB               2.10
  bDeviceClass            0
  bDeviceSubClass         0
  bDeviceProtocol         0
  bMaxPacketSize0        64
  idVendor           0x152d JMicron Technology Corp. / JMicron USA Technology Corp.
  idProduct          0x0578 JMS567 SATA 6Gb/s bridge
  bcdDevice            1.00
  iManufacturer           1 JMicron
  iProduct                2 USB3.0 External HDD
  iSerial                 3 0000AB12359B
  bNumConfigurations      1
  Configuration Descriptor:
    bLength                 9
    bDescriptorType         2
    wTotalLength       0x0055
    bNumInterfaces          1
    bConfigurationValue     1
    iConfiguration          0
    bmAttributes         0x80
      (Bus Powered)
    MaxPower              500mA
    Interface Descriptor:
      bLength                 9
      bDescriptorType         4
      bInterfaceNumber        0
      bAlternateSetting       0
      bNumEndpoints           2
      bInterfaceClass         8 Mass Storage
      bInterfaceSubClass      6 SCSI
      bInterfaceProtocol     80 Bulk-Only
      iInterface              0
      Endpoint Descriptor:
        bLength                 7
        bDescriptorType         5
        bEndpointAddress     0x81  EP 1 IN
        bmAttributes            2
          Transfer Type            Bulk
          Synch Type               None
          Usage Type               Data
        wMaxPacketSize     0x0200  1x 512 bytes
        bInterval               0
      Endpoint Descriptor:
        bLength                 7
        bDescriptorType         5
        bEndpointAddress     0x02  EP 2 OUT
        bmAttributes            2
          Transfer Type            Bulk
          Synch Type               None
          Usage Type               Data
        wMaxPacketSize     0x0200  1x 512 bytes
        bInterval               0
    Interface Descriptor:
      bLength                 9
      bDescriptorType         4
      bInterfaceNumber        0
      bAlternateSetting       1
      bNumEndpoints           4
      bInterfaceClass         8 Mass Storage
      bInterfaceSubClass      6 SCSI
      bInterfaceProtocol     98
      iInterface              0
      Endpoint Descriptor:
        bLength                 7
        bDescriptorType         5
        bEndpointAddress     0x01  EP 1 OUT
        bmAttributes            2
          Transfer Type            Bulk
          Synch Type               None
          Usage Type               Data
        wMaxPacketSize     0x0200  1x 512 bytes
        bInterval               0
        Command pipe (0x01)
      Endpoint Descriptor:
        bLength                 7
        bDescriptorType         5
        bEndpointAddress     0x82  EP 2 IN
        bmAttributes            2
          Transfer Type            Bulk
          Synch Type               None
          Usage Type               Data
        wMaxPacketSize     0x0200  1x 512 bytes
        bInterval               0
        Status pipe (0x02)
      Endpoint Descriptor:
        bLength                 7
        bDescriptorType         5
        bEndpointAddress     0x83  EP 3 IN
        bmAttributes            2
          Transfer Type            Bulk
          Synch Type               None
          Usage Type               Data
        wMaxPacketSize     0x0200  1x 512 bytes
        bInterval               0
        Data-in pipe (0x03)
      Endpoint Descriptor:
        bLength                 7
        bDescriptorType         5
        bEndpointAddress     0x04  EP 4 OUT
        bmAttributes            2
          Transfer Type            Bulk
          Synch Type               None
          Usage Type               Data
        wMaxPacketSize     0x0200  1x 512 bytes
        bInterval               0
        Data-out pipe (0x04)
Binary Object Store Descriptor:
  bLength                 5
  bDescriptorType        15
  wTotalLength       0x0016
  bNumDeviceCaps          2
  USB 2.0 Extension Device Capability:
    bLength                 7
    bDescriptorType        16
    bDevCapabilityType      2
    bmAttributes   0x00000f0e
      BESL Link Power Management (LPM) Supported
    BESL value     3840 us
  SuperSpeed USB Device Capability:
    bLength                10
    bDescriptorType        16
    bDevCapabilityType      3
    bmAttributes         0x00
    wSpeedsSupported   0x000e
      Device can operate at Full Speed (12Mbps)
      Device can operate at High Speed (480Mbps)
      Device can operate at SuperSpeed (5Gbps)
    bFunctionalitySupport   1
      Lowest fully-functional device speed is Full Speed (12Mbps)
    bU1DevExitLat          10 micro seconds
    bU2DevExitLat          32 micro seconds
can't get debug descriptor: Resource temporarily unavailable
Device Status:     0x0000
  (Bus Powered)
The output of the latter is included in the output of the previous command, but this way we can easily filter out the devices we want to query for separately.
Here we can see that we get a lot of information about our USB peripherals, of which we will only deal with a few in our task today.
Device IDs
As I mentioned above in interpreting the output of the very first command, we could even see IDs there. These are not vital data for this task of ours today, it is only interesting to say a few words about it.
The IDs, as shown in the previous image, display two values of 4 hexadecimal digits (2x16 bits) separated by a colon. Each hardware device has its own ID that accurately identifies it. Accordingly, the first part of this number represents the manufacturer of the USB hardware device, and the part after the colon represents its type.
So if we look at the number "152d: 0578" based on the image, which is the ID of my external HDD, we will also find these in this detailed output:
  idVendor           0x152d JMicron Technology Corp. / JMicron USA Technology Corp.
  idProduct          0x0578 JMS567 SATA 6Gb/s bridge
It is clear from these two lines that the first part of the number (152d) indicates the manufacturer identifier (idVendor field) and the second part (0578) indicates the type (idProduct). Here, the prefixes "0x" refer only to the hexadecimal nature of the numbers.
The external HDD in the example is a 3,5 "SATA notebook winchester in a USB 3 case, so the system detects this case (USB / SATA bridge) and displays its manufacturer or type number. me.
Serial numbers (iSerials)
The importance of serial numbers, that is, the "iSerial" fields in the detailed outputs, is much more important.
Staying with the external HDD example above, its iSerial value, of course, is this as well rootrun as:
lsusb -v -s 1:22 | grep "iSerial"Or it is worth expanding it with a few fields to get more comprehensive data about the queried device:
lsusb -v -s 1:22 | grep -E "iSerial|idProduct|iProduct"This is how the iSerial number appears and the description of the hardware device above it, so we can't accidentally confuse it with another device:

Here you can see the requested data: idProduct, iProduct and iSerial. The error message below does not need to be addressed.
Looking at the iSerial value, we can see a 3 digit here, which is not essential, but then a long hexadecimal number. This is the serial number of the device. But what happens if we don't query an external HDD or mouse, but the root hub that handles them?
As mentioned above, root hubs are special, embedded hubs of host controllers or host controllers, which are always located in device slots 1 of a given bus. Therefore, if we query the data of the root hub operating the HDD above accordingly, as in the previous example:
lsusb -v -s 1:1 | grep -E "iSerial|idProduct|iProduct"idProduct 0x0002 2.0 root hub iProduct 2 EHCI Host Controller iSerial 1 0000:00:04.1

Here we can see that the data of the USB 2.0 root hub already mentioned earlier in the description is displayed, which includes an EHCI (Enhanced Host Controller Interface). And its iSerial number is different from the iSerial number of the external HDD you saw earlier.
So root hubs have an iSerial number in the following format: 0000: 00: 00.0, which is the same as for PCI buses (Peripheral Component Interconnect) addressing system. This is already more closely related to the rest of today’s topic.
Turn off external storage device, logically disconnect
Since the main topic of this description is how to reboot disabled USB storage devices, you must first turn them off before you can turn them back on later. In this chapter, therefore, we will now make a brief detour in which I will turn off my external HDD. This can also be done in the graphical interface on the taskbar with the safe removal feature or from the command line. But first, let's look at the lists of USB devices and block devices, before turning it off, because we'll need a few things from here to turn it on:
lsusb
lsusb -t
lsblk
So here we can see that the USB storage includes the external storage as the 001 device of the 022 bus - which is a 2.0 (EHCI) USB bus - as well as the external storage in the list of block devices. / Dev / sdb under the device name in which the / dev / sdb1 partition is also mounted on a directory. So first we detach it rootas the partition and then turn off the winchester in udisksctl command:
umount /dev/sdb1
udisksctl power-off -b /dev/sdb
Essentially the same thing is done by detaching USB storage from the graphical interface. The winchester stopped, the LED on its case also turned off.
Here, of course, pay attention to the exact device name.
Then we retrieve the lists again and see the changes:
lsusb
lsusb -t
lsblk
Our USB device has disappeared from the recent lists, and the block devices have also lost the / Dev / sdb also with one eye partition. So we would not normally be able to reattach this to mount command only if you unplug it and reconnect it. But since this description is just about how to reboot your external HDD without physically reconnecting, we’ll look around USB root hubs in the next section.
Find, manage, and reboot USB root hubs
In this chapter, we will look at USB root hubs. First of all, we need to identify them exactly, because usually a computer can have several USB buses or root hubs, so it doesn't matter which one we find.
The USB system is connected to the high speed PCI / PCIe bus in the desktop computer / laptops. Of course, there may be architectures where this works differently, but for traditional desktop PCs and laptops, it is connected to the PCI bus. Therefore, we will briefly touch here on the addressing system of the PCI buses so that the other parts can be understood.
Addressing PCI buses
Here we briefly mention what the PCI bus addressing system looks like, which is necessary to find the right USB bus and root hub.
Previously, the value of the iSerial field was used to query USB details, where a standard USB device has the unique serial number of the device, but USB root hubs contain a PCI bus address in this field, which clearly identifies the USB root hub in the computer. .
The format of this number, as I mentioned earlier, is therefore: 0000: 00: 00.0. These are hexadecimal numbers with the following meanings:
- 0000: 00: 00.0: Domain, that is, the address range of the PCI bus. We don't have to deal with this in particular, it's 4 pieces 0
- 0000: 00: 00.0: Bus. This is not to be confused with USB buses, but is the serial number of the PCI bus. 8-bit value, can handle 256 possible buses.
- 0000: 00:00.0: Device. That is, the serial number of the PCI device. It can be a 5-bit value, ie 32 devices per bus.
- 0000: 00: 00.0: Function. And this is a 3-bit value, so there can be 8 types of functions in one device location.
It is no longer necessary to go into this so as not to deviate from the USB system, so we would rather see these addresses in the case of USBs in practice.
Az lspci command to list the PCI devices in your computer. Among these we now look for the grep command to USB devices:
lspci | grep "USB"Here we list our USB controllers and root hubs in the output, before which we can also see the PCI addresses. Or we don't see the full addresses here yet, the domains, ie the address ranges, are missing. These are the -D switch to display:
lspci -D | grep "USB"So the picture is complete, the full titles can be seen at the beginning of the USB controllers:
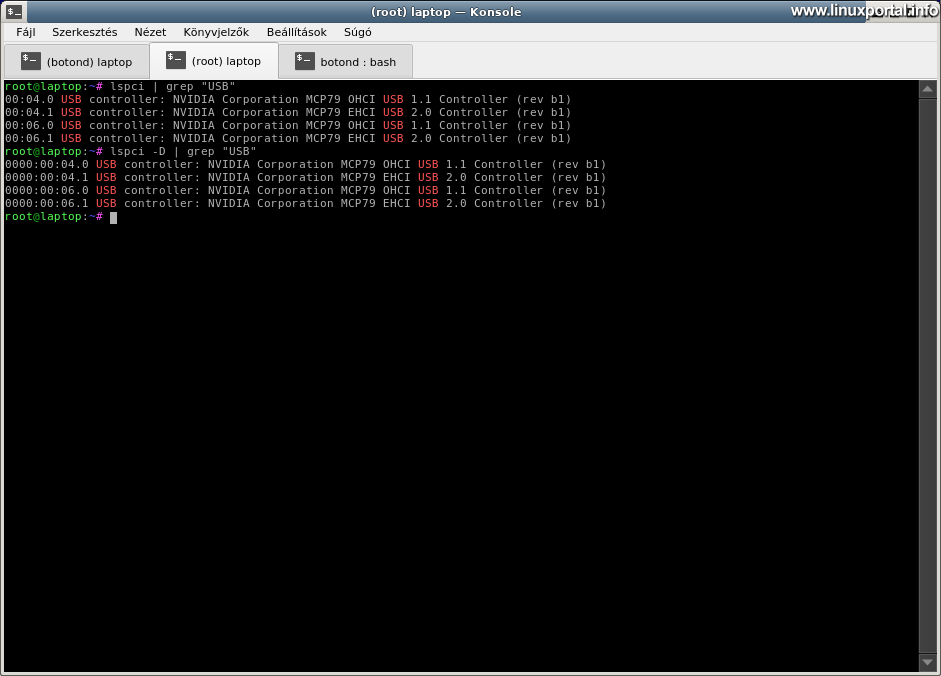
Here you can see that this machine has 4 USB buses and root hubs, which are located at the displayed PCI bus addresses. Here, all 4 USB buses are connected to PCI bus 0.
Interestingly, if we list all the devices, we can see where the other hardware is connected:
lspci -D
So here on this machine, almost all the hardware is on PCI bus 0, except for the Nvidia video card, which is on bus 2, and the WLAN device, which is on bus 5.
Going back to the USB devices, we’ll see how to find the right USB root hub to reboot your turned-off device.
Find the right USB root hub
Based on the theoretical parts so far, we can quickly find the root hub that operates our device that we want to turn on.
First of all, we list the USB devices with the lsusb command even when our HDD or flash drive is switched on:
lsusbHere we find the storage device in question, which we will want to be able to reboot later without a physical reconnection, and note which USB bus it is connected to.
For the sake of example, I have now reconnected the external HDD. So for me, the fresh output is:

Here, this external storage device is connected to USB bus 1 in device slot 28. Bus 1 is an Enhanced Host Controller Interface (EHCI) 2.0 USB controller. The drive is also mounted in a directory, so it's ready to use.
We then turn off the device or uninstall it by software. You can also do this on the taskbar or from the command line using the block device name. With me:
umount /dev/sdb1
udisksctl power-off -b /dev/sdbThen we re-list things to see that our external HDD has really disappeared from everywhere:
lsusb
lsblk
And we see that our drive has disappeared from everywhere.
So this is our starting point. Until we physically unplug the device and connect another to it in the meantime, the bus it is connected to will certainly not change, so we can reconnect our devices on it at any time with this bus serial number.
Then read the iSerial value of our USB bus. The iSerial value can be read by querying the root hub, which is connected to device location 1 of our corresponding bus. The command is therefore:
lsusb -v -s 1:1 | grep -E "iSerial|idProduct|iProduct"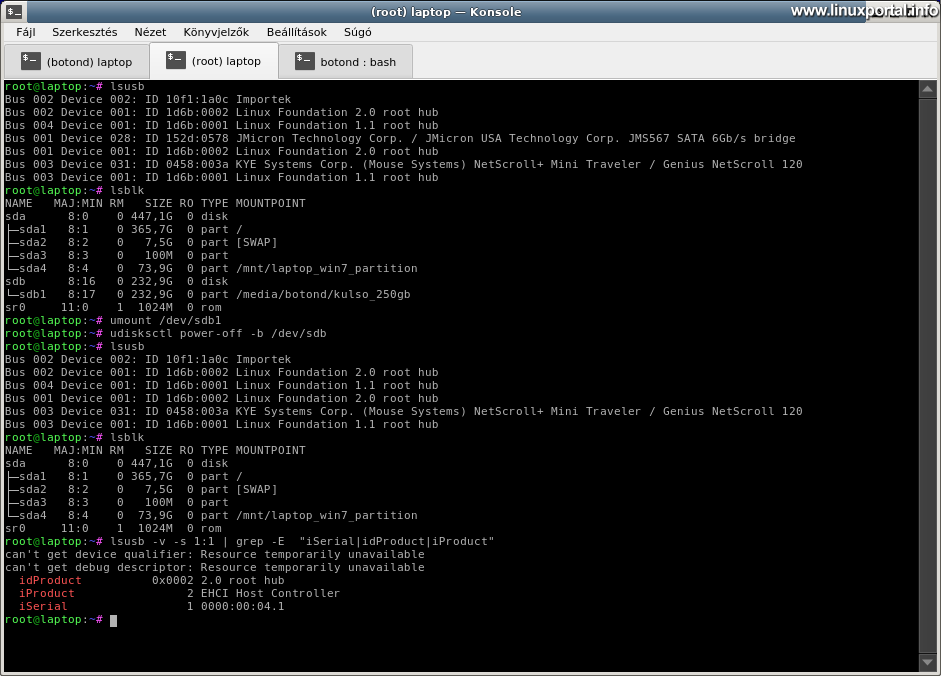
Here, we retrieved more data to reduce the potential for error.
The iSerial value of our 1st USB bus or root hub, ie the exact address of the space occupied within the PCI buses: 0000:00:04.1.
Turn USB root hubs on and off
Turning the USB root hubs on and off ensures that the system re-supplies all ports on that root hub, so that any devices on them that may be turned off will restart as if they had been physically reconnected.
Like many other hardware devices, USB root hubs can be accessed in the file system of the Linux system.
For PCI device controllers a / sys / bus / pci / drivers / can be accessed in a directory. If you go here and list the contents of the directory, you will see many device controls that your machine uses:
cd /sys/bus/pci/drivers
ls -al
Of these, only the controllers of the USB Host Controller Interface devices are relevant to us now, so what I listed at the beginning for the controllers of the different standards. For example, this machine only has USB 1.1 and USB 2.0, so here you can find the ouch-pci and that here and there directories. But if there were USB 3.x ports in the machine, here would be one xhci_hcd or a xhci-pci library as well. These directories contain those a symbolic links and files related to USB Host Controllers.
Here, select the appropriate controller that manages your appropriate USB root hub and access your directory. So for me this is the EHCI (Enhanced Host Controller Interface), so the ehci-pci directory will be right for you:
cd ehci-pci
ls -al
Of course, everyone should go to the control directory corresponding to their own root hub, which was previously displayed by the lsusb command.

After the previous theoretical parts, it is easy to understand that this EHCI host controller operates 2 buses on this machine and 2 root hubs on them, which work with the 2.0 standard. Of these, we also have the PCI bus address read above, namely 0000:00:04.1, which is present here in the form of a symbolic link, this refers to the corresponding device controller in the system. At the other address is the other bus of the EHCI host controller, which we are not dealing with now.
Interestingly, if you want to list the addresses of all the USB buses / root hubs that work on your computer, you can do so with the following command:
find /sys/bus/pci/drivers -type l -name "0000:*" | grep -E "(oh|uh|eh|xh)ci"This outputs all possible symlinks beginning with "0000:" that are in the various host control directories.

Here you can see the control directories and the links to the controls in the file paths.
Returning to the directory just listed, here are two more important files in addition to the links to the USB root hubs, and these are the connective and unbind files. These cannot be read just written, they can only be read by the owner, which is root. Files work by "throwing in" whatever PCI address, or USB root hub address, it does. Specifically, if you write the address to the unbind file, it will disconnect that USB bus / root hub, and if you write it to the bind file, it will turn it on. Let's see all this in practice.
First, I list the directory, USB devices, and block devices again so that we can see the different statuses during the switch as well:
ls -al
lsusb
lsusb -t
lsblk
Then I take my previously searched USB root hub address and write it to the unbind file:
echo "0000:00:04.1" > unbind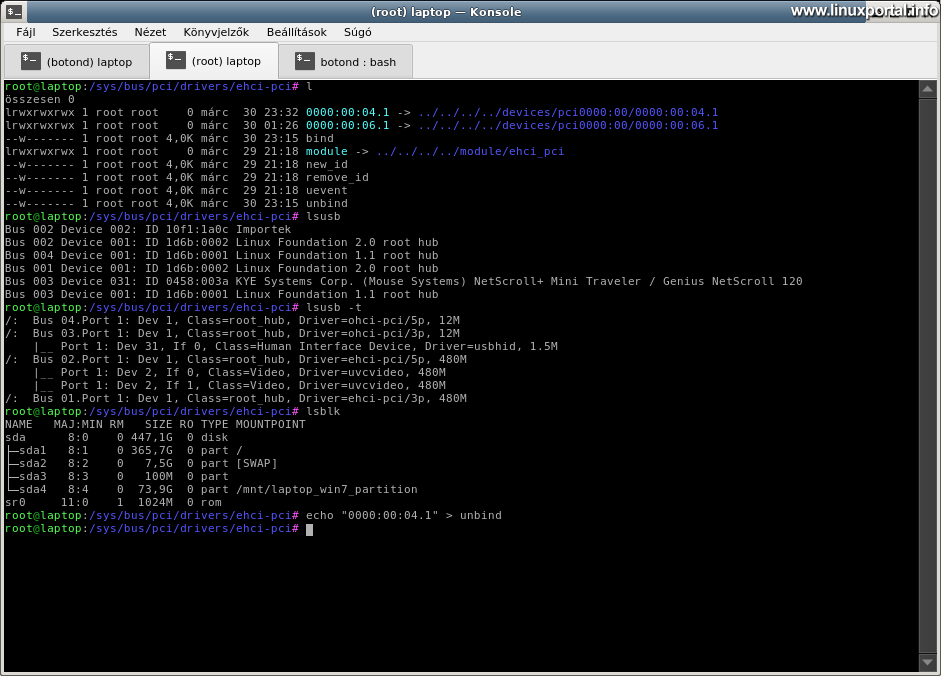
Then the LED on the external HDD will start flashing, the winchester will start, and the standard "New removable media detected" window will appear on the machine, as if when the device is physically connected.
But let’s see what happens in the background as well, since we just turned off the root hub, so that wouldn’t be a logical operation at first.
So I'll query the former again:
ls -al
lsusb
lsusb -t
lsblk
This is how you understand it:
One of our USB root hubs has completely disappeared: its symbolic link has also disappeared from the directory, and it has also been removed from the USB list, which had serial number 1. Only the 2-3-4 root hub is present, and of these, you have connected an external HDD device to bus / root hub 3, which, if you look closer, is powered by a 1.1 USB Host Controller (OHCI). Also below is the block device name (/ Dev / sdb), which he attached as he should. However, now we don't have the device on the right USB bus. So based on these, it can be seen that the system then switches all the devices that were on the disconnected bus to another running bus. This is where the system decides where they end up. In this case, you switched to one of the 1.1 USB buses. It has already been said above that if a bus fails, either due to a fault or because it is switched off, it happens as it does now: the devices on it are transferred to another working bus.
Then reconnect your newly disconnected USB bus / root hub now by writing to the bind file:
echo "0000:00:04.1" > bindThen let's ask everything again:
ls -al
lsusb
lsusb -t
lsblk
The LED on the drive cage will flash again, and another "New Removable Media Detected" window will appear on the desktop.
And if we look at the devices, the symbolic link with the address of the root hub has reappeared, and the USB 1 bus number 2.0 has reappeared in the list of USB devices, with the external HDD in device slot 3. And for block devices, there is no change, in the same way there is a block device mounted in the same directory.
So it did exactly the same thing as unplugging and reconnecting the external device.
Conclusion
This method allows you to turn the USB buses or root hubs on your computer on and off, allowing you to restart the devices on them without having to physically reconnect them.
- How to troubleshoot a "Not authorized to perform operation" error message when automatically mounting flash drives and other external USB storage devices
- en.wikipedia.org - USB
- docs.oracle.com - USB Host Controller and Root Hub
- wiki.xenproject.org - wiki - Bus: Device.Function (BDF) Notation
- renenyffenegger.ch - notes - hardware - PCI
- linux.org - threads - resetting-the-usb-subsystem
- To post registration and login required
- 527 views