
The 1. page content
Introductory
Nowadays, we use passwords, pin codes, and other login information in more and more places that are often hard to remember. In such cases, it is useful to have a handy application on hand where we can store our confidential information and access it conveniently from all our devices.
In this description, we will learn about a program called KeePass, which offers a high degree of security for storing our passwords and other access data on Windows, Linux, and Android systems. After installing the program on a Linux computer and Android mobile device, we will review the most important functions of the password management system: We will create a new database, create the basic structures in it by creating groups and entries. We will then look at how we can securely access and keep in sync the database that stores passwords, for example, on our own server, which we can write and read from our various devices via SSH access.
Obtaining and Installing KeePass
The open source and free KeePass software can be downloaded on a variety of platforms from the creator's side.
Installation on Debian
The Debian repository contains the KeePass program, to install it the following apt-get command:
apt-get install keepass2Then we can start the program a keepass2 command or the graphical interface from the menu.
Installation for Windows
Windows Setup is hurting can be downloaded here. It is installed normally.
Install for Android
And for Android devices, the From the Google Play Store Download a third party program that is fully compatible with the desktop KeePass program.
Installation on other platforms
The KeePass password management program has been ported to many platforms. The manufacturer download page you can get a list of these.
Creating a database
KeePass stores your passwords and notes in a highly encrypted database. So even if someone got the database file from us, it wouldn’t go much with it. Sure, it doesn’t exist unbreakable, but KeePass has such a strong encryption that big companies trust it.
You can create a database on any platform where you can categorically store your passwords and other access information.
Create a KeePass Database on Linux or Windows platform
On Linux and Windows platforms, creating a database in KeePass is the same.
In the main window, click on Fillet menu New option. This will open a file browser, in which you will need to select the location of your future database file and enter the name of the file that will be used. .kdbx will be created with the extension.

After saving the configured form, a window will appear where you can set the master database password:

With this password we will be able to access the database later. So we only need to note this one.
You can also enter a key file here, and you can allow Windows systems to use your Windows account login information to open the database, so you can't open it on another computer, for example.
Once the panel has been saved, another window will open, where you can configure multiple tabs
General tab
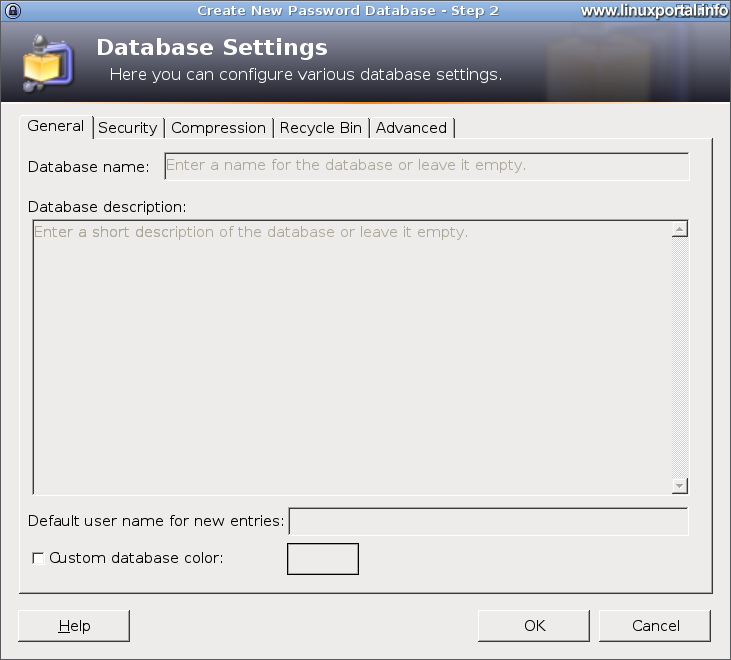
Here you can enter a name and description for our database and set a default username for new entries. You can also assign a color to a database so that if you have more than one database, it is easier to distinguish them from the list.
Security tab

Here we can select the main encryption algorithm of the database as well as the level of password hashing. The higher the value set in the iteration section, the stronger the encryption of the database password, but the slower the opening or saving of the database. For larger databases, if you experience a slowdown in this area, you may want to set it lower than the default value of 6000. This essentially strengthens protection against brute-force attacks if, for example, someone obtains the database and tries to open it on your machine with password hackers that quickly spin character combinations, and so on.
Compression tab

Compressing the database will obviously save space at the expense of speed. If you are not only using it on your machine, but also storing a database on a server that you are accessing from multiple devices, you might want to enable GZip compression to download faster on the network / Internet when you open it and save faster when you save a change.
Recycle tab

By setting the Recycle Bin, entries deleted in the database will not be permanently deleted, but will be added to the Recycle Bin category. This way, you can restore everything after a thoughtless delete operation.
Advanced Settings tab

In this panel, you can set the templates used to create new groups, control the number of megabytes of storage history for entries, and finally set an incentive or mandatory alert to change the password for the database master after how many days.
If we have flipped through these settings and saved this panel, the main window will open, with our new database open, with auto-generated main categories and two sample entries.

An asterisk after the name of the database file in the header of the window indicates that we have unsaved data, so we can click on the small floppy icon to save our recent database.
Overview of basic features
The KeePass password management program has a very rich feature set that allows you to efficiently customize your database that stores your passwords and other data you want to encrypt.
The following is an overview of the basic functions needed for general use to conveniently organize our data in the database.
Manage groups
It is possible to create groups in the database, which can contain additional subgroups and entries.

Groups can be nested to any depth, which can be customized icons or uploaded:


Groups can be arranged from a menu or conveniently by dragging and dropping them into the desired order and structure.
posts
Entries are the main components of the KeePass database. This is where passwords and other notes are stored.
You can create them in any group from the main menu or by right-clicking in the middle area of the popup menu.
When you create a new entry, you will see a multi-tab panel window where you can adjust many things.
Entry tab

In the panel that opens, you can set up basic and required information on the first tab: Posting Address, Username, Password, Password Repeat, URL (if you can link to a login URL) and Notes.
Here you can also assign a custom icon to the post by clicking on the small button next to the above title, in which case you can select the icon in the icon selection panel shown above.
Advanced Settings tab

At the top of this page, you can also add custom text fields to your post.
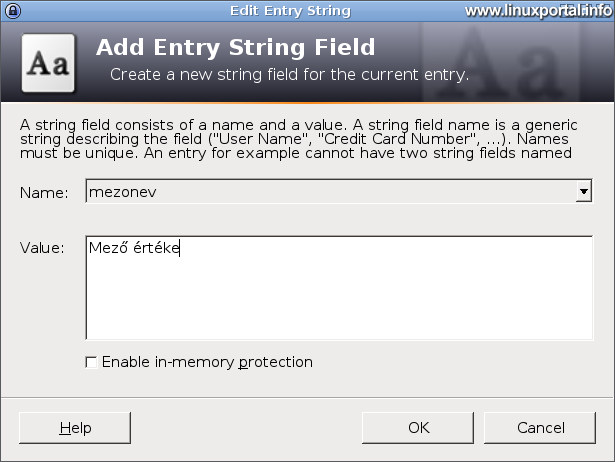
This will further customize the structure of our database.
Even staying on the same tab at the bottom allows you to add file attachments. However, always keep in mind that the program encrypts everything that enters the database. This greatly slows down database backup after a larger file is mounted. So here it is advisable to put only files in the database that you really need. For example, a SSL certificate private key file, or similarly short but secure files.
Properties tab

Here you can customize the post further: Set the colors of the post displayed in the lists, add tags, override URLs (browser-specific override rules), plugin information (if any plugins are installed in the program) and assign a unique ID to the post.
Automatic typing tab
Automatic typing is a very useful feature. It allows you to automatically type the username and password stored in the entry in different browser and other windows. For example, if you do not want to remember your password for the browser, it will be typed in the last active window. In this panel you can control how it works with a lot of settings.
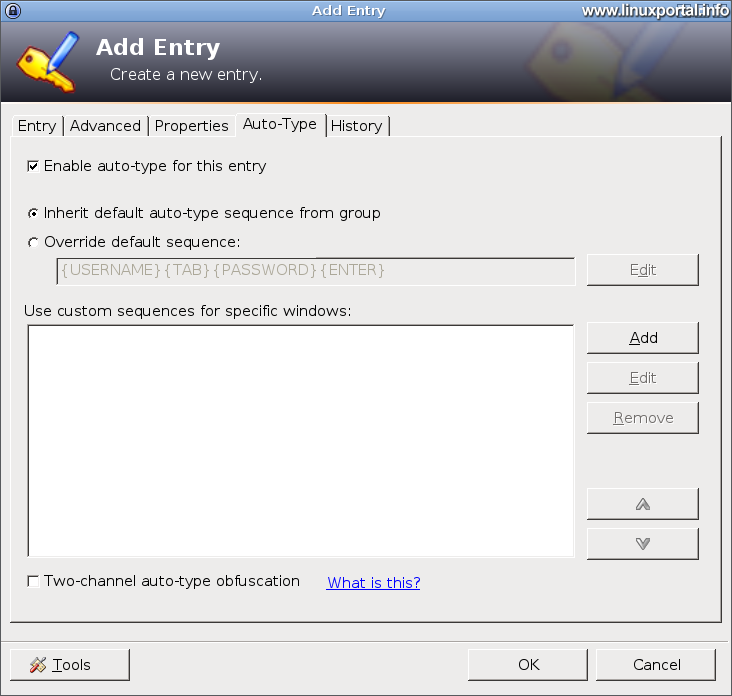
You wouldn't even think about everything that could be set here. The first round is the one-touch check. Below you can choose whether to apply the inherited settings from the group that you have set for the group or to overwrite it for this post. Here you can enter the typing sequence, for example, after typing in the username, send a TAB key sequence, then type the password and finally enter. Of course, this can be varied indefinitely, depending on the application needed for this feature.
In the bottom section, we can further fine-tune the automatic password typing sequences from our entry for our various programs:

From a long list above, you can select in which application window you want to apply this setting, and below it you can also choose whether to apply the group setting or custom settings. For custom settings, you can also set the entire keyboard sequence here. From the scrollable window below, you can select the variables that the program can replace. Here you can even enter arrow keys, special keys, other values, e.g. date, application directory name, etc. This way you can even navigate from the start windows of the programs to the appropriate access panel where you can then type in your username and password or anything else you set.
Moreover, if we combine this with the individual fields shown above, we can even add a PIN code field, for example, and where necessary, the value in the PIN code field will be typed for us. So you can log in automatically instead of us on almost any unique login interface.
This is probably the most useful function of the program.
History tab

Here you can view the changes made to the entry step by step or restore the status as needed.
appearance
Once you have saved the entire panel, you will be returned to the main screen, where you can see a preview of our post:

Of course, we can also customize the View menu Configure Columns by clicking on the option:

So these are the main features that you should definitely try. Of course, KeePass knows a lot, but the description section now covers general use only.
A next page we will continue with the add-on part of KeePass.
Navigation
- To post registration and login required
- 767 views