Content
Introductory
A LAMP systems you can also create an excellent development or test environment on your home computer. I have built a LAMP server before Debian 8 (Jessie) and Debian 9 (Stretch) systems, and in this tutorial, we will install the LAMP server elements for the Ubuntu 18.04 LTS (Bionic Beaver) Linux distribution, which consists of the following:
- Apache (version of Ubuntu 18.04: 2.4.29)
- MariaDB (version of Ubuntu 18.04: 10.1.40)
- PHP (version of Ubuntu 18.04: 7.2.x)
- phpMyAdmin (version of Ubuntu 18.04: 4.6.6)
If you want to build a more sophisticated system, I can recommend the Debian 9 (Stretch) the perfect server, which already stands up well in a live situation as a shared web hosting service. In due course I will make a similar version for Ubuntu.
I will label this Ubuntu 18.04 LTS (Bionic Beaver) LAMP installation with the 1.0 version as we will be adding many more additions later to make it even more useful and efficient.
The LAMP server installation description has also been completed for the newer Ubuntu 20.04 LTS (Focal Fossal) system:
Install Ubuntu 20.04 LTS (Focal Fossa) LAMP Server v1.0
basic Conditions
Of course, it can also be installed on a desktop computer with a graphical environment, the point is that the above components are now first installed on the machine for proper configuration and operation.
System Update
Let's update first package store our database and packages so that we can always work with the latest packages. To do this, issue the following apt-get commands as root:
apt-get update
apt-get -y upgrade
Installing MariaDB
To install the MariaDB database server (remaining as root) run the following command:
apt-get -y install mariadb-server mariadb-clientSecuring your database
With a single command, we can secure our database server and databases in a few steps. THE mysql_secure_installation command guides us through these steps:
mysql_secure_installationThe program asks us some questions we need answers to:
Enter current password for root (enter for none): [Enter]
Set root password? [Y/n] y
New password: Adjuk meg az új root jelszót
Re-enter new password: Ismételjük meg
Remove anonymous users? [Y/n] y
Disallow root login remotely? [Y/n] y
Remove test database and access to it? [Y/n] y
Reload privilege tables now? [Y/n] y
Root Access Testing
You can verify the success of the root password setting using the following MySQL / MariaDB login command:
mysql -u root -pThen type the root password you entered above. If all goes well, we should get the following output:

About console commands read here more. To exit, type exit or the \q commands.
Install Apache web server
To install the Apache web server, run the following command:
apt-get -y install apache2After the installer runs, you can also test if your browser uses The minimum IP address you set when you installed the server load it. I'm the 192.168.1.125 IP addresses I gave it during the installation, so I will have the following:
http://192.168.1.125/
What the Apache Ubuntu Default Page Comes To:

Installing PHP 7.2
On Ubuntu 18.04 LTS (Bionic Beaver), the default PHP branch is shown in Section 7.2. The latest official edition of this is currently (at the time of writing: 2019/08/06) a 7.2.21.
As PHP Apache module (mod-php) can be done with the following command:
apt-get -y install php7.2 libapache2-mod-php7.2Then, if we check the version:
php --versionthen only the 7.2.19version we see on our machine:
PHP 7.2.19-0ubuntu0.18.04.1 (cli) (built: Jun  4 2019 14:48:12) ( NTS )
Copyright (c) 1997-2018 The PHP Group
Zend Engine v3.2.0, Copyright (c) 1998-2018 Zend Technologies
    with Zend OPcache v7.2.19-0ubuntu0.18.04.1, Copyright (c) 1999-2018, by Zend Technologies
If you install at a later time, chances are that a newer version will be added.
Installing additional PHP packages
The PHP system we have just installed is still very basic, so you need to install additional PHP packages.
Below apt-cache command to search for PHP 7.2 packages available in the distribution:
apt-cache search php7.2It publishes quite a lot here, we don’t usually need all of these. Below I have compiled a selection that should be installed to have a system that works in most situations:
apt-get -y install \
    php-pear \
    php-imagick \
    php-apcu \
    php-memcache \
    php-gettext \
    php7.2-mysql \
    php7.2-curl \
    php7.2-gd \
    php7.2-intl \
    php7.2-imap \
    php7.2-pspell \
    php7.2-recode \
    php7.2-sqlite3 \
    php7.2-tidy \
    php7.2-xmlrpc \
    php7.2-xsl \
    php7.2-xml \
    php7.2-zip \
    php7.2-mbstring \
    php7.2-opcache
Of course, if needed, you can install additional plugins later.
Some CMS system also missed (example) at the same time with this add-on, but in recent releases they have switched to other solutions.
Then restart Apache a systemctl-EL:
systemctl restart apache2PHP testing
Let's test the functionality of our PHP system by creating a file in the webroot directory:
nano /var/www/html/phpinfo.phpAnd let's include the following:
Save and then upload this file to your browser at the appropriate IP address:
http://192.168.1.125/phpinfo.php
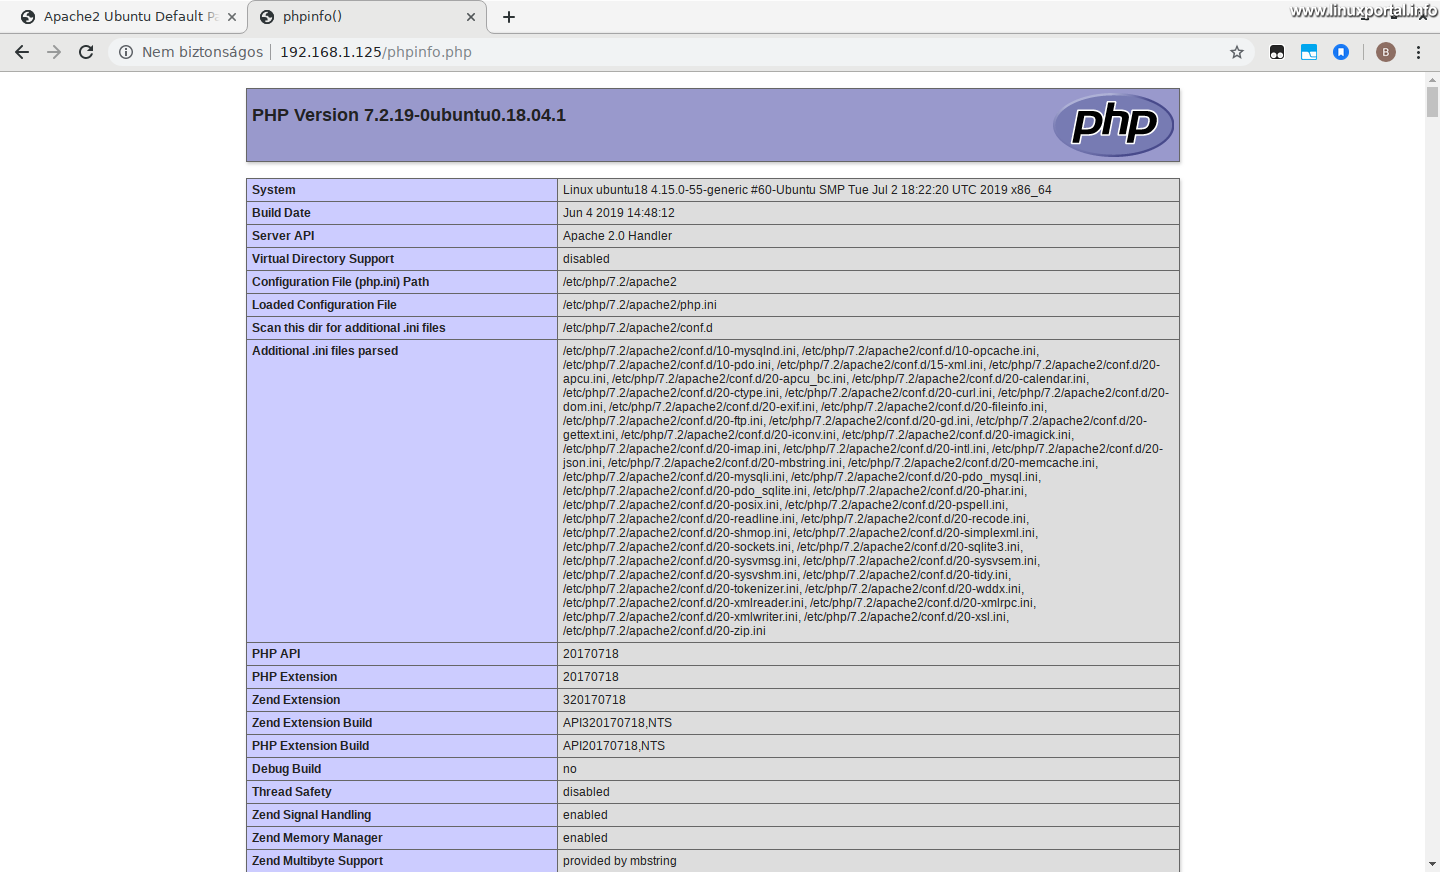
If you scroll down here you will see all the loaded PHP modules and their settings.
If you need to set something in php.ini and find it here: /etc/php/7.2/apache2/php.ini
Installing phpMyAdmin
There is nothing left of our LAMP system other than phpMyAdmin installation. Unbeknownst to you, phpMyAdmin is an essential part of database management, providing a convenient web interface for managing your databases, tables, and associated users and permissions.
To install, use the following command:
apt-get -y install phpmyadminDuring the installation, you will be asked some questions in the form of dialogs. First, we choose which HTTP server to use:

Here select apache2 setting.
Well, I didn't mean that color world, I liked the usual blue dialog theme on Debian, but that's it. I don't mix it with Debian in at least half a dream ...: D
The installation goes down and another question to answer comes up again:
For phpMyAdmin to work, you need your own database, whether you want it to be set automatically dbconfig-common via:
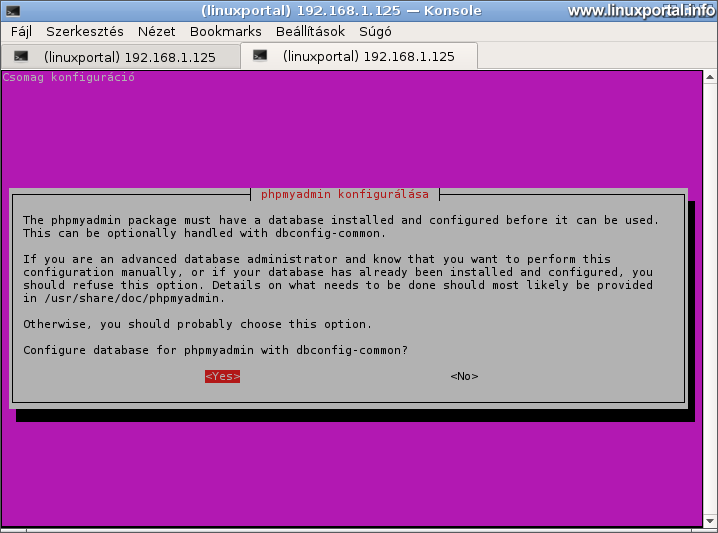
Choose yes here.
You will then be prompted for another password that the phpMyAdmin control user will work with:

With this user, phpMyAdmin does the background maintenance, structure synchronizations, etc., so we won't have to deal with it. So press an enter to do this to generate your own password.
The installation is now complete.
Allow root access
Here by default - for security reasons - you do not have root access to the phpMyAdmin interface, you have to configure it manually. To do this, perform the following command:
echo "UPDATE mysql.user SET plugin = 'mysql_native_password' WHERE user = 'root' AND plugin = 'unix_socket';FLUSH PRIVILEGES;" | mysql -u root -pThen the command line will ask us for the root password of MariaDB, enter it.
You can now log in with the root user on phpMyAdmin, which can be accessed at the correct IP address:
http://192.168.1.125/phpmyadmin/index.php

(Again, of course, everyone uses their own fixed IP address on the minimum server.)
After a successful login you will be greeted by the well-known home screen:

Additional security settings (optional)
If we plan to use the command line database in the future, or if we also want to use our shell scripts to manage our databases, securing command-line database use.
The setting is exactly the same as Debian 9 (Stretch) with setup on MariaDB on LAMP server, so that you can safely manage our databases from the command line here, by executing it accurately.
Download virtual machine
Conclusion
Here is a basic Ubuntu 18.04 LTS (Bionic Beaver) based LAMP server that can run PHP, MySQL / MariaDB based dynamic web pages. We will even expand this server later to be used for more.
- Encyclopedia - LAMP Systems
- Install Ubuntu 20.04 LTS (Focal Fossa) LAMP Server v1.0
- Installing Debian 8 (Jessie) LAMP Server v1.0
- Installing Debian 9 (Stretch) LAMP Server v1.0
- Installing Debian 10 (Buster) LAMP Server v1.0
- Debian 11 (Bullseye) LAMP server v1.0 installation
- Perfect server: Debian 11 (Bullseye) v1.0
- Howtoforge - Ubuntu 18.04 (LTS) LAMP Server Tutorial with Apache, PHP 7.2, and MySQL
- Ubuntu 20.04 LTS (Focal Fossa) minimal server installation
- Install a minimum server for Ubuntu 18.04 LTS (Bionic Beaver)
- Perfect server: Debian 8 (Jessie) V1.0
- Perfect server: Debian 9 (stretch) V1.0
- To post registration and login required
- 941 views