
The 1. page content
Introductory
It is important to share back and forth between computers on a network, including both Linux and Windows computers. Between Linux systems About NFS-based File Sharing I've made another description before, but to create shares on Linux that are available from Windows, or just want to access Windows shares from Linux, we now need to use other tools.
In this tutorial, we will walk you through this topic step by step, which we can follow with concrete, working examples.
The examples cover the following situations:
- Access a Debianon shared directory on Windows 7 systems.
- Access a shared directory on Windows 7 on Debian systems.
- Manage shares between Debian 8 and / or 9 operating systems
I use Debian 8, Debian 9, and Windows 7 on my home computers, so I can use these to show the Samba sharing settings in action.
Installing and configuring the package on Debian
Before embarking on anything, it is always a good idea to upgrade your storage and packages (as root) to the usual apt-get commands:
apt-get update
apt-get upgrade
This way, we can be sure that we can work with the latest software in our distribution.
Next, install the packages needed to run Samba shares:
Samba server
The following packages are responsible for running "outbound" shares on Debian (or any Debian-based distribution):
apt-get -y install libcups2 samba samba-common cupsOf these, the libcups2 and the cups they are responsible for network printing if we want to share printers as well.
Samba client
These are needed to handle "outside" shares on Debian:
apt-get -y install samba-client cifs-utilsHere is the samba-client (or smbclient) is clear, cifs-utils and ensures compatibility of file systems shared between different platforms (Linux, Windows, OS X, etc.).
Defaults
After installing the packages, you will need to create your own Samba configuration file, which will be customized for your machine or network.
First, make a backup of the factory Samba configuration file to keep in case you need to (while still remaining root):
mv /etc/samba/smb.conf /etc/samba/smb.conf.bakThen create your own (eg with nano editor):
nano /etc/samba/smb.confAnd let's include the following:
[global]
    workgroup = WORKGROUP
    server string = Samba Server %v
    netbios name = SZAMITOGEP-NEVE
    map to guest = bad user
    security = user
    encrypt passwords = yes
    dns proxy = no
This is the general default for the Samba server, where line items have the following meaning:
- workgroup: This is the workgroup of our network. Ideally, all computers are set to the same, for example, on a home network. By default, this is "WORKGROUP" in Windows. So if we didn't set it up on the other machines, that's fine.
- server string: Detailed description of the machine. Eg from Windows a Displays in the Network Neighborhood panel for details.
- netbios name: The network name of the computer. Enter the exact computer name that you gave to the machine during installation. (THE hostname can also be issued by command)
- map to guest: Guest access control. If you do not plan guest access to shares, remove this line or set it to "Never" (this is the default)
- security: This controls whether authentication is done on a per-user basis ("user" setting) or with passwords ("share") assigned separately to shares.
- encrypt passwords: Whether to encrypt passwords when sending over the network
- dns proxy: If you are using a DNS Proxy server, you need to enable it here. Otherwise, leave it like that.
Of course, there are many other settings for the Samba server, but that is enough for it to work.
Save the file, then restart the Samba daemon a systemctl via:
systemctl restart smbd.serviceSo we've prepared our Linux system for bidirectional sharing. All we have to do is create our first share.
Create a Samba share on Debian
Let's create a directory somewhere we want to share.
For the sake of testing, I created a "Share" directory on my laptop under my user (with my own user) and contained two test files:
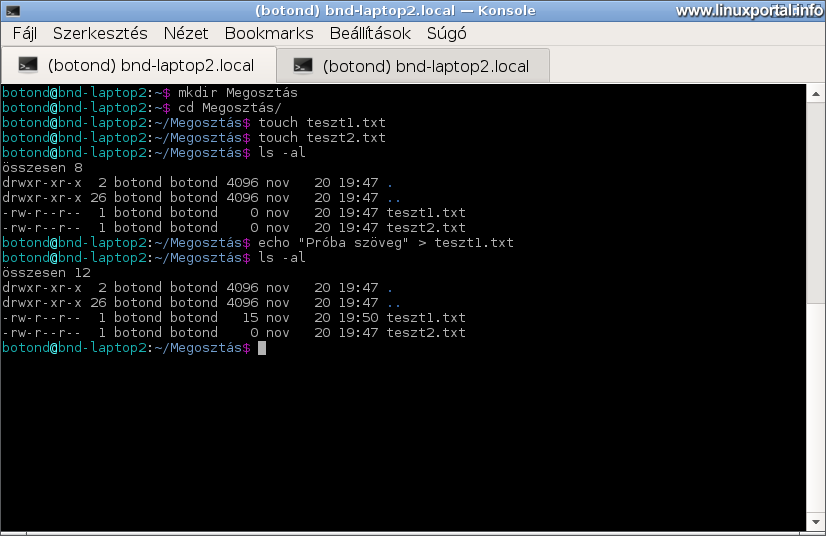
This is what I'm going to introduce to sharing now, of course, you can experiment with any library.
Re-open the previously edited Samba configuration file as root:
nano /etc/samba/smb.confAnd after the above basic settings, add the following section:
[Megosztás]
    path = /home/botond/Megosztás
    create mask = 0644
    directory mask = 0755
    read only = no
    browsable = yes
    writable = yes
    valid users = botond
    map archive = no
Here the line items mean:
- [Share]: This will be the name of our share. I just entered the same name as my library to share, but anything else can be entered. This will appear on the network as you browse.
- path: Access the directory you want to share.
- create mask: Authorization mask for files created in the shared directory. Therefore, with this setting, newly created files from the remote machine will be created with permission 0644.
- directory mask: Same with remotely created subdirectories.
- read only: Read-only sharing
- browsable: Is it possible to browse, search in the shared library, or to access files / subdirectories with known names only "invisibly".
- writable: This also refers to readability. Some versions of Samba use one switch and the other switch, so it is advisable to use both to maintain compatibility and of course to avoid conflicting settings.
- valid users: Valid users who can access the share. Of course, the permissions on your Linux system still apply. So they also have to be set up for this. For example, if it is a shared share, it can be shared by multiple users, etc.
- map archive: By default, when files in a Samba share are modified from under Windows systems, the executable bits from the files are lost from the owner parts because Windows systems handle the file attributes differently. This setting can be used to eliminate this effect. So if it's a share that contains shell scripts, for example, and you don't want to lose your run privileges on them, use this "no" option. In other cases, it is irrelevant. (inserted: 2019-03-12)
Save and then restart the Samba daemon:
systemctl restart smbd.serviceCreate a Samba user
You still need to create a Samba user to access the share. These users are stored in a separate database managed by Samba.
For this operation is smbpasswd command. So create (for a user who also exists on Linux) the Samba user and password:
smbpasswd -a <felhasználónév>
Accordingly, I created a Samba user for my user:
smbpasswd -a botondHere, too, I entered the same password as I used to log in, so I could avoid any confusion. Of course, you can enter a different password for Samba shares.
List Samba users
If you have forgotten Samba users, you can list them using the following command:
pdbedit -L -vA pdbedit command manages the database of Samba users, so we can do a lot with records.
We are now fully ready to access the network.
Testing Samba sharing
If we are in a situation where there is currently no other computer from which to try out our shared directory, we have the option to test the Samba share from the same system. To do this, use a terminal (with any user) smbclient command:
smbclient -U <Samba felhasználó> //<hoszt>/<Megosztás>You will be prompted for the Samba user password and then enter the SMB prompt where we can proceed to share, etc. So if we have done everything so far, then we can see something like this in the terminal:
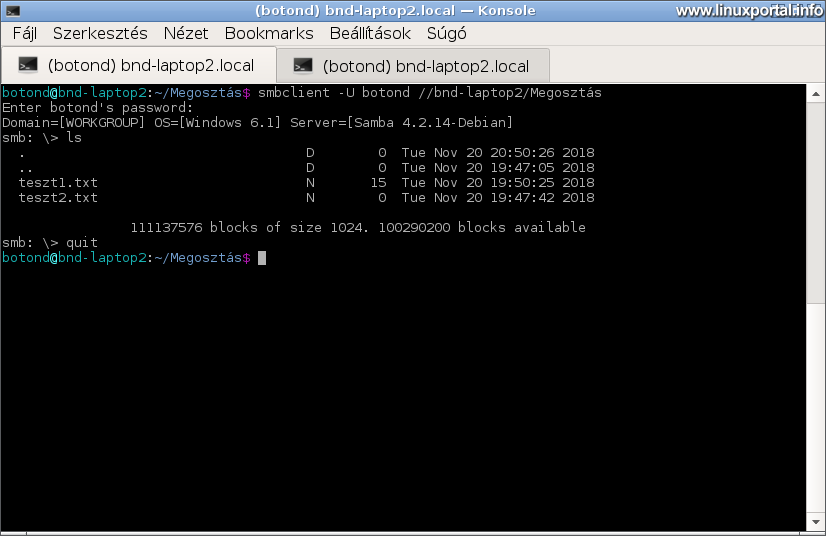
So we can be absolutely sure that our sharing is working.
The description on the next page and we'll be joining this sharing from Windows.
Navigation
- To post registration and login required
- 6050 views